Category: Security

Security is an important topic when it comes to technology. There are many different areas of security, so this category is divided into various sub-categories to help navigate through the posts on security.

  • How to Backup Files on Windows 10

    How to Backup Files on Windows 10

    I have talked about how I automatically backup my files from my server, but one thing I have discussed is how I backup my files from my Windows 10 desktop.

    Most of my important files are stored on my server, but I do have some data files, like game related files, that I would like to backup in case the hard drives in my desktop crash or begin causes data corruption in my files.

    In keeping with my automatic backup policy, I wanted to have my Windows 10 desktop automatically backup my files to the server, which will then backup to Backblaze. With Windows 10, it is actually easy to do.

    The steps below explain how to backup files on Windows 10 automatically.

    1. Determine where you want to store the files. If you plan to backup the files to an external hard drive, then connect the hard drive into the Windows 10 computer. For network shares, you will need to setup the share on the machine that contains the share and set the permissions.
    2. On the Windows 10 computer, click the Start button and select Settings->Update & Security->Backup.
    3. Click the Add a drive option.
    4. Select either the external drive or a network path for your backups.

      Note:

      If you chose to use a network path to store your backups then you may be prompted to enter the user ID and password to use to connect to the network share. Check the remember checkbox to ensure the credentials are stored so they will always be used to connect to the share and your backups will work without any interruption.

    5. By default, the backups will run every hour and will keep the backups forever. If you you would like to change this, click the More options option.
    6. From the More options window you can change how often the backup is run, how long to keep the backups, additional folders to backup and which folders to exclude. Pay attention to which folders are being backed up and ensure that all folders you want to backup are included.
    7. From this point you can click the Back up now button or wait for the next scheduled backup.

    At this point your Windows 10 computer will now automatically backup your data to the location you specified, at the scheduled time you specified.

    As I mentioned earlier, I backup my files to my server, which will automatically make of a second copy of the files on a second external hard drive, and then backup to the cloud with Backblaze.

    Do you automatically backup your computer? If so, how do you do it?

  • What Files Can You Backup With Backblaze?

    What Files Can You Backup With Backblaze?

    After I published my post where I test out the Web download option for restoring my photos from Backblaze, a regular reader of mine had sent me an email asking several questions about Backblaze. One of the questions was about what file types can be backed up with Backblaze.

    I indicated that so far I haven’t had an issue backing up any type of file that I needed to backup. All my files have been backed up without a problems and have been doing so for many years.

    At the time I replied to the email I didn’t have the number of files or a list of files types I have backed up over the years. It has also been a while since I last looked closely at the number of files and the types of files I have been backing up, so this was a good reminder to do so.

    For those that are interested in what can be backed up with Backblaze, then I will provide more clarity into what I have been able to backup.

    What files can you backup with Backblaze?

    Before going into detail about what file types can be backed up with Backblaze, lets look at how many files I currently have backed up and how much drive space the files use.

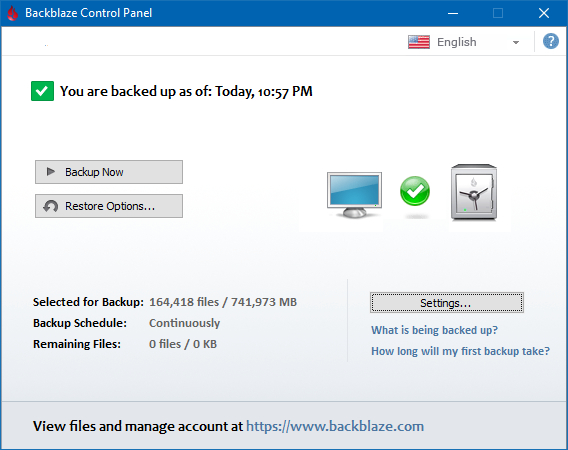
    Backblaze Control Panel
    The current status of my file backup with Backblaze.

    As you can see from the image above, I currently have 164,899 files backed up, and altogether they consume 745,199 MB (745 GB) of storage space. This has increased by about 4 GB since the previous post as I have uploaded some new photos.

    Over 160,000 files backed up is quite a lot, so explaining what file types I have backed up off the top of my head is not possible. I do have an idea of the file types, but not an exact list.

    Luckily, Backblaze does provide a high-level report that lists the type of files that I currently have backed up with them. It isn’t specific, but it does group my files into several categories.

    The file type report is shown below.

    Backblaze Files Report
    A report of the file types backed up with Backblaze.

    The report Backblaze provides groups the files into several categories, depending on the file extension. It then adds the total size of each category and displays it in the report. I’ll explain what I have stored in each category starting from the largest to the smallest.

    Photos

    As I expected, the largest type of file I have backed up are photos (541 GB), since I am always taking photos. There are different types of photos in this category, including JPEGs, RAW, and TIFF files. My Canon shoots both RAW and JPEGs at the same time, and most of the other JPEGs are those that I have automatically backed up from my Android phone and my wife’s iPhone.

    This is the most important category of files because these files contain a history of my family, and the files can’t be reproduced if they were lost. This is the main reason why they are backed up with Backblaze.

    Movies

    This category includes files with many different file types. Movie file types are more diverse than photo file types since many different video formats have been used throughout the years. In this category I have older AVI files that were created with a standard-definition camera. Newer files include MOV from Apple devices, MP4 from my Android smartphone, and MTS from my HD camera.

    There was a surprise here. When I ripped my Blu-ray discs for my Plex media server, I copied some MKV files into a folder that I originally didn’t include with Backblaze. At some point, Backblaze had included that folder and backed up the MKV files. I don’t really need those files backed up, but since they have been uploaded I’ll leave them for now.

    Other

    This category is the catch-all category for files that don’t fit into any of the other categories. Files in this folder will include data files that aren’t documents, spreadsheets, presentations, etc. I am not entirely sure what files are in this category as I do backup several computers to my server, including my wife’s Windows 8.1 laptop which could have many files that fall into this category.

    Much like the movies category some files that are organized into this category is a result of Backblaze finding a folder with files that needed to be backed up. On my C drive on the server I have Python 2.7 installed. Backblaze automatically selected that folder to backup and now backs up all the Python source files. I don’t need that directory backed up, so I will probably go and exclude it in the future, but it does show that if you forget to include a folder, Backblaze may automatically find it and back it up for you.

    Music

    The bulk of files in this category are the songs my wife has purchased from her iTunes account. Both DRM-protected and non-DRM-protected music files are backed up without any problems. Other music files that are backed up include MP3 and FLAC.

    Zip and Archives

    This category is self-explanatory – any compressed files types – ZIP, RAR, 7z, etc. are included here. Apparently, I have over 9 GB of compressed files, which is not entirely surprising as I do have backups from past computers that I have zipped up into a single file.

    Documents, Presentations and Spreadsheets

    I am grouping two categories together since they basically contain anything related to office-type files. This is mainly my wife’s data as she is constantly creating documents and presentations. She apparently has quite a number of files on her laptop that I have backed up to the server, and these files go back to her school days several years ago. There are also probably duplicate files as she has upgraded laptops over the years and I have copied her files from one laptop to the newer laptop.

    Anyway, any document that can be created by an office application is backed up by Backblaze.

    Financial Information

    This one is confusing. While I do backup my financial data, I always have it encrypted in a container, which is automatically backed up and is probably counted in the Other category. I am not sure what file(s) are in this category, as I don’t have any financial data stored outside of an encrypted container. Files from my wife’s laptop have probably been categorized here, or Backblaze determined that one of my encrypted containers contains financial information from the name of the container. Either way, 64 MB of financial data is backed up.

    Browser Favourites and Bookmarks

    Since I backup my wife’s laptop, this includes all of here Web browser favourites and bookmarks. These are important to her, so it is nice that they can be restored if issues occur with her laptop.

    What isn’t backed up

    Pretty much any file type that we need to have backed up can be backed up with Backblaze. With that being said, there are many files that Backblaze won’t backup. Backblaze provides a small list of file types that it won’t backup by default:

    • ISO (Disk Images)
    • DMG (Mac Disk Image)
    • VMC VHD VMSN (Virtual Drives)
    • SYS (System Configuration & Drivers)
    • EXE (Application Files)

    For some of the above file types you won’t need to worry as they are usually installed by an application and don’t need to be backed up. Some files, such as virtual drives, you may want to backup, especially if you have created a virtual machine and don’t want to lose the drives associated with that machine.

    If you would like to backup the above file types, Backblaze does allow you to remove the exclusions so those files can be backed up.

    Backblaze does have a page that outlines what Backblaze does backup.

    Files Size Limitation

    Is there a limit to the size of file Backblaze can backup? The answer is no.

    Backblaze doesn’t impose a file size limit when backing up files. If a file is 20 GB in size, the entire 20 GB file will be uploaded by Backblaze to their servers. If you would like Backblaze to prevent large files from being backed up, you can set the file size limit within Backblaze.

    By default, the limit is set to “No limits”, which means backup all files regardless of size.

    Conclusion

    I have over 160,000 files backed up with Backblaze, and there are many different file types that I need to have backed up. While there are some file type exclusions within Backblaze, I find that such exclusions haven’t prevented any of my data from being uploaded to the Backblaze servers.

    If I find that the exclusions do prevent some of my important files from being backed up, I can always remove those exclusions and then Backblaze will continue to backup my files automatically.

  • Getting Smart With Backups: Testing My Backblaze Restore

    Getting Smart With Backups: Testing My Backblaze Restore

    I have been using Backblaze for many years and haven’t had any issues with backing up my files. The backup process from Backblaze has worked like a charm for me. I have integrated Backblaze into my process of automatically backing up my important files without any issues.

    The one thing that I have always wondered about, and for some reason I haven’t tested out the feature, is how the process of restoring my files would work. Restoring my files successfully whill help me feel confident that the files I restore from Backblaze will be the same as the files I backed up.

    After all, a backup process is only as good as its restore process.

    I have decided to begin testing out restoring my data files from Backblaze to ensure that I will be ready in case I need to restore any of my files. Waiting until something does happen to my files is not the best idea.

    Restore Methods

    Backblaze provides three options when it comes to restoring files. I decided to restore my files using two of the options. The two options I will test will be:

    1. Web restore with zip download.
    This method basically allows me to select files using their Web interface and then Backblaze will zip the files and let me download the zip file from my account in a Web browser or from their download utility. This post will examine the results of this method. This method is suited for smaller restores and not for my entire library of files.
    2. USB hard drive.
    To restore all my files, I will use this method. For $189 Backblaze will copy my files to a hard drive and then mail the hard drive to me. From there I can restore my files from the hard drive. I can get my money back if I return the hard drive to them. This method allows a maximum of 4 TB of files to be restored. I will explore this method in a future post.

    The third option is using a USB flash drive which has a file restore maximum of 128 GB. Since the first two options are enough for me to restore either a subset or all of my data, I won’t be looking at the USB flash drive option.

    My current backup status

    All of my important files – meaning files I never want to lose – are backed up with Backblaze. I chose Backblaze mainly because of the promise of backing up unlimited data for $5/month. The amount of data I backup increases every year, so if it wasn’t for the flat $5/month rate, online cloud-based backup would be too expensive for me.

    To see what I mean, here is my current file backup status.

    Backblaze Control Panel
    The current status of my file backup with Backblaze.

    As you can see from the screenshot above, I currently have the following backed up:

    Files Total Size
    164,418 741,973 MB or 741.97 GB

    Since this post will look at restoring files through the Web and download application from Backblaze, I won’t be able to restore all of my files. Instead I will focus on a small subset for this test.

    Preparing the file restore from the Backblaze Web interface

    Let’s begin with the restore of some files.

    Using the Web interface is simple enough. I basically log into my Backblaze account and select the “View/Restore Files” option from the menu on the left. By default, the Web option is selected as the restore method, so I then use the folder tree at the bottom of the Web page to select the folders and files I want to restore.

    Once I have selected my files I click the “Continue with Restore” button and that’s it. Backblaze will now prepare the zip files with the files I selected and then notify me, by email, when it is ready for download.

    Note:

    Backblaze will inform you if your download will be too large. The Web option is used mainly for restoring a small number of files. For any restore that is over 20 GB in size, they recommend the USB flash drive or USB hard drive options instead.

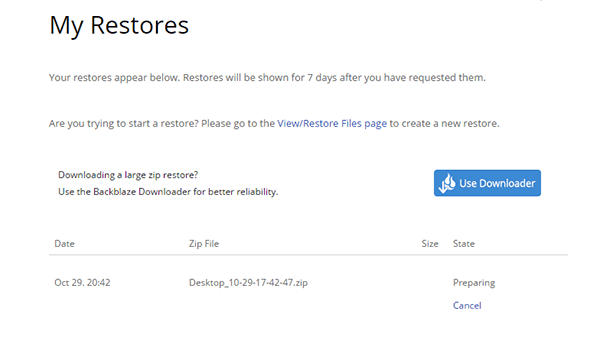
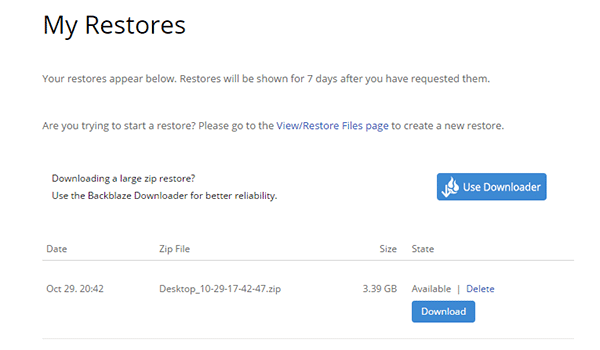
    When I click the “My Restores” option from the menu on the left I can see my restore is currently being prepared.

    Backblaze Restore - Preparing
    My Backblaze restore is being prepared.

    After about ten minutes of waiting I receive an email from Backblaze indicating that my zip file is ready to be downloaded. I returned to my account and to the same “My Restores” page and noticed that my zip file was now available for restore.

    At this point I also can see that the size of the zip file is 3.39 GB so I have a rough idea of how long it may take to download and how much drive space I will need.

    Backblaze Restore - Available
    My Backblaze restore is available for download.

    Now that my restore was ready it was time to download and see if the files are what they should be – meaning they are an exact duplicate of the original files.

    Restoring the files

    When downloading from the Web interface, Backblaze provides two ways of downloading the zip file: using the download button on the Web page, or using their Backblaze Downloader utility.

    The Downloader utility is a portable application that you extract anywhere on your desktop. From there you just run the executable, enter your Backblaze login information and it will go and download the last zip file that was prepared for your account.

    I wasn’t sure which option would be faster. I have a 100 mb/s (12.5 MB/s) Internet connection, although I do manage to get 120 mb/s (15 MB/s) when downloading games from Steam, so I wasn’t sure what to expect when downloading through Backblaze.

    In any case, I tested both options to see if there was any download performance difference.

    Download from the Web

    Using the “Download” button on the Web form from my Web browser (Google Chrome), I began to download the zip file.

    The download speed jumped between 2.5 MB/s to 8.5 MB/s with the average around 4 MB/s. This is a lot slower than I was expecting, but I was more concerned with the fact that my files were an exact duplicate of the originals, so speed wasn’t a major concern for me.

    It took just over 15 minutes to download the 3.39 GB zip file from Backblaze using Google Chrome. This worked out to an average of 31.38 mb/s (3.9 MB/s) on my 100 mb/s connection. It wasn’t bad, but not great either.

    I wondered if the Downloader utility would be faster, so I downloaded the zip file again using that utility.

    Download using Backblaze’s Downloader utility

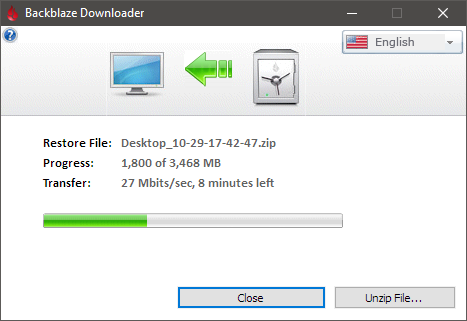
    I downloaded the zip file containing the Downloader utility, unzipped the file and then ran the executable. I entered my Backblaze credentials and left all the other options at their default values. I clicked the “Sign in to Start” button and let the utility do its job.

    The utility displays a progress bar during the downloading activity as well as the amount transferred and the transfer speed.

    Backblaze Downloader
    The Backblaze Downloader downloading my zip file restore.

    The Backblaze Downloader took 19 minutes to download the same zip file. This worked out to an average of 25.72 mb/s (3.2 MB/s) download speed. This was slower than using the Web browser to download the zip file.

    Bear in mind, however, that in order to get a completely accurate picture of the download speeds, I would have needed to run both download tests multiple times. Since I am less concerned with download speeds as I am with actually getting my files, I didn’t perform any additional tests.

    Verifying my restored files

    Once I unzipped the zip file containing the files I selected to be restored, I could actually see the number that I had selected. I basically selected an older directory (10 years old) to be restored but I was unsure of how many files were in that directory.

    The files in the directory were JPEG files, so the zip file size was very close to the uncompressed size because JPEG files are already compressed to begin with. There were also some RAW image files from my old Canon G2 camera I was using back in 2006.

    In total 1,417 files were in the folder, and the files were 3,636,151,770 bytes (3.6 GB) in size. This represents a very small sample size compared to how many files I actually have backed up. The table below shows the number of files and sizes that I restored and the percentage of the total backed up.

    Files Size (bytes)
    1,417 (0.86% of 164,418) 3,636,151,770 (0.49% of 741,973,000,000)

    While it is a small sample size, it does allow me to test out restoring a smaller number of files, and also files that have been backed up to Backblaze for many years – since I first started using their backup service.

    The most important aspect of restoring files is to determine if the files restored have no issues and that they match the originals byte-for-byte.

    To verify the files I performed two tests:

    1. I randomly opened image files to ensure that they could be opened without any issue. Opening all 1,417 files in many directories would take a while, so I would use the second test to verify all files.
    2. Create a SHA256 hash of each restored and original file and compare the hashes to see if they are identical. If one byte in a restored file was changed, then that file would have a completely different SHA256 hash than the matching file.

    I randomly selected files to open – both JPEG and RAW – and had no issues opening any of the files. I even displayed the thumbnails of directories in Windows Explorer and all thumbnails were displayed without any problems. So far so good.

    I then ran a small application I created that would generate the SHA256 hash for both the restored and original files. After all the hashes were calculated and compared, the application would display a message box that indicated if any files were identical, different, or missing. Since I selected a single directory to be restored, I can easily ensure that all files were restored and none were missing.

    After several minutes of creating the hashes and performing the comparison I was relieved to see that my application indicated all 1,417 files were matched successfully and that no file was missing from the original files.

    This indicated that the restoration of 10 year old files from Backblaze was 100% successful.

    Conclusion

    I have been using Backblaze for many years to automatically backup my files in the cloud. During that time I haven’t tested their restore option, and I didn’t want to wait until I lost my files in order to use their restore option.

    I managed to successfully restore 1,417 of my files that were a total of 3.6 GB in size without any problems. The download speeds, however, were a little disappointing, but as I mentioned earlier, my main concern was ensuring the files I restored were exact duplicates of the originals without any missing files.

    This goal was achieved.

    Next, I will restore all of my files using the USB hard drive method and then compare 100% of my files to the original to see if a complete backup of my files can also be successful.

    Being able to restore all of my files successfully is now my goal.

  • The Most Effective Ways to Increase the Security of Your Home Network

    The Most Effective Ways to Increase the Security of Your Home Network

    If you are like me, then you are always looking for ways to increase the security of your home network. Threats to your network, devices and to your files can come from anywhere online. So it is important to take the necessary steps to ensure your home network is secured.

    This post will outline some of the settings that I use to protect my network, devices, and files from both malicious software and users.

    Router Security Tips

    Router Security Tips

    The first line of defense of my network starts at the access point from the Internet into my network – the router. The router I am using is a Linksys E4200. It is an older router and only supports Wireless-N.

    I have flashed DD-WRT onto the router, so I have many more options than with the stock firmware. The DD-WRT firmware allows me to apply more security onto the router and adjust many more settings than the stock firmware allows.

    Here are the settings I have configured in my router:

    Administrator ID and password changed
    I have changed both the administrator and password for the router.
    Enabled WPA2 with passphrase
    Probably the most important security of wireless. I have configured my wireless network to use WPA2 with a strong passphrase. I always have to look it up when I want to connect a device.
    Using OpenDNS
    To help manage what sites my network can access, I use OpenDNS as my DNS servers in my router. This allows me to block certain domains that are not appropriate for my kids, which also includes malicious sites.
    Configured a guest network
    I have setup a guest network for guests to use. The guest network uses WPA2 with a much easier passphrase to remember so I can easily remember it. It is also prevented with firewall rules from communicating with the main network. This network also uses OpenDNS and the firewall rules enforce he use of OpenDNS.
    Disable WPS
    WPS is a security issue and I don’t use it, so I disable it.
    Disabled remote access
    I can’t access my router from the Internet. I can only access my router from a computer hard-wired into the router.

    Computer Security Tips

    Computer Security Tips

    Even though I have secured my router, I also need to make sure each computer that is connected to my network is also secured.

    For guest computers, I can’t verify what is installed or not installed. This is the reason I have those computers connect to the guest network.

    Here is a rundown of what security settings and software I have configured on my home computers.

    Never run as an administrator
    For seven years I haven’t found real need to run as an administrator. In fact, I can give you many reasons not to run as an administrator. I don’t run as an administrator on any of my computers.
    Google’s Chrome as my Web browser
    I use Chrome for its sandboxing and extensions features. One of the benefits of Chrome is tat each tab is a separate process so one tab doesn’t crash another tab. Firefox is my secondary choice for a Web browser.
    Use uBlock Origin in Web browsers
    When it comes to websites, I don’t trust many sites online, especially the JavaScript. uBlock Origin is always running in Chrome so I can choose what sites run JavaScript.
    I don’t use Flash
    Flash is disabled in my main browser. I find I don’t need to use Flash as much but if I do, I have another browser with Flash enabled that I will use to display Flash content when needed.
    Use a software firewall
    A hardware firewall can block access into my network, a software firewall can block application from connecting to the Internet. If I do get infected with malware, I don’t want it to connect outside my network, so my software firewall blocks the attempt. The built-in Windows firewall works for me.
    Anti-malware software installed
    I have Malwarebytes Anti-Malware Premium installed on my main desktop, with scheduled scans each week. On other computers I have the free version and run scans periodically.
    Anti-virus software installed
    I am not a big believe in anti-virus applications these days as they are basically reactive software. To avoid too many applications from being loaded, I just stay with the anti-virus built into Windows. Anti-virus scans are scheduled on a weekly basis.
    Windows and installed software is kept updated
    I always try to install the latest updates for both the operating system and installed software. Microsoft releases patches on the second Tuesday of every month. Adobe follows the same schedule, but other applications will provide a notification.
    Always keep in mind that all software has security flaws
    When it comes to software, I try to remain vigilant. I believe that all operating systems and applications have security flaws.

    Data File Security Tips

    Data File Security Tips

    I also look at security down to my data file-level. This means how can I best protect my files, both from an operating system and restorative perspective.

    Here are some tips that I currently have implemented, and you may do the same as well.

    Multiple backups
    I always keep multiple backups. Two copies of my files are stored locally, and two copies are stored offsite.
    Automated backups
    I have automated my file backup process. When a file is placed in a folder, it is automatically mirrored onto a second, local hard drive and also uploaded to my online backup cloud.
    I don’t have write-access to my data files outside my server
    I go to great lengths to protect my data files. Any new files or changes are written to a staging folder, and a service on the server copies the changes to the master folder. The folders that contain the master copies of my data are always mapped with a read-only account.

    That is my list of security settings and tips that I have applied within my home. Security involves multiple layers to properly protect your home network and all devices that connect to that network. While you may not implement as many features, it is important to recognize that you must apply some security on your network to protect our computer and data files.

  • How I Protect My Files From Malware

    How I Protect My Files From Malware

    I have a lot of important files stored on two external hard drives beside my computer. What makes these files important is that they contain photos and videos of my life since 2002 that can’t be replaced. Since that time my life has changed substantially – marriage and raising a family. Losing the files that captured all moments over the past 14+ years is not an option.

    With the rise of malware, more specifically ransomware that encrypts files until a ransom is paid, it has become increasingly more important for me to protect my data files. I already have implement methods of protecting my data – logging in with a standard user account, using OpenDNS and blocking many harmful sites, using browser plugins that block JavaScript until I allow it, as well as having devices outside my home to connect to a segregated guest network.

    Even with the precautions I have in place on both my network and computers, there is still a chance that some form of malware can get access to my files. With my kids using the computers more and more these days, the chances of malware infection increases.

    I decided to revamp how I backup and protect my data files. In turn, making it more difficult to modify those files, even while on the network. Here are the steps I have taken to protecting my data files.

    Backing up my files

    Step 1: Backing up my files

    I have always had a backup process in place but it did require some manual intervention. I wanted to make a more automated backup process. A process that not only included a second local copy, but also an offsite copy of the files.

    Several months ago I setup and Plex Media Server using a desktop that I bought off eBay. The desktop is more than powerful enough to stream media from Plex to any device in my home. Since it won’t be streaming movies constantly, I decided to also use the server as my file storage.

    Local drive mirroring

    My Plex media files are stored on a Western Digital Duo hard drive enclosure. The two hard drives in the enclosure are mirrored using Stablebit DrivePool. I decided to use DrivePool to also mirror my data files from one external hard drive onto another. The drive mirroring provides redundancy in case one drive fails. With DrivePool running, I automatically have two copies of my data locally by simply copying the files to my drive.

    On top of that, I also use Stablebit Scanner to scan my data files external hard drives once a month. Stablebit Scanner also monitors the S.M.A.R.T. data on the drives and reports any issues to me through email. This setup allows me to be proactive in resolving any problems, to avoid any chance of losing data.

    Offsite backup

    The next step is to have my files automatically backup offsite to the cloud. My cloud storage service of choice is Backblaze. I have been using Backblaze for many years without any issues.

    Once I copy my files to my DrivePool drive, the Backblaze service automatically finds the changes and then backs up those same files to the cloud. At the moment I have almost 700 GB (241,740 files) backed up with Backblaze. I can access my files from anywhere even from my mobile devices.

    So I now have two local copies of my data and an offsite copy of the same files. I also have an external hard drive that I store offsite that I update once a month with any changes.

    Of course, all this will be moot if I also didn’t protect my files from malware on my local network and computers.

    Restricting access to the server and files

    Step 2: Restricting access to the server and files

    One of the best ways you can protect your data files is to prevent users from accessing the server. You can also provide read-only access to the files. This is what I have done with my server and files.

    Standard user account but not logged in

    The one issue I have is that I am storing my files on a media server that can be access from devices on my network. This can be an issue if a security issue is discovered in the Plex application. Such an issue could allow a miscreant, or malware, to gain access to my files.

    I reduce the chances of a malware from using Plex to gain access to my files by simply running Plex under a standard user account. This account can’t access my data files. If something tries to exploit a security hole in Plex, and attempt to access the server using the same account that Plex uses, they would be limited to what they can do.

    To add to the user access, I also don’t log into the server, unless I need to manage things on the server. Since everything on the server runs as a service (Backblaze, Stablebit DrivePool, and Stablebit Scanner), I don’t need to log into the server to ensure my data is backed up – it happens as long as Windows is up and running.

    Read-only access to my files

    When I need to access my data files, I map a drive letter to a share on the server from my desktop. The user I use to map to the server has read-only access and can’t change any data file. This means that if malware exists on my desktop, it can’t modify my data files because they are read-only.

    I treat the folders that contain my data files as a master copy. I rarely change the master copy of a file. In fact, when I edit my photos, I use Lightroom, which doesn’t make any changes to my photos. Lightroom simply stores the changes in a database file and then applies the changes internally in Lightroom.

    If I do need to make changes to a file, I will copy the file locally and then make the changes. I never make changes to the master file directly.

    Of course, this begs the question as to how do I modify or add files to the server if I connect using an account that is read-only? Simple – I use a staging area.

    Using a staging area

    Step 3: Using a staging area

    Since I connect to the data files with an account that is read-only, making changes to my files (such as my Lightroom database) is not possible.

    The way I get around this is I use a separate folder as my staging area.

    What is a staging area?

    The staging area is simply a write-able share on the server that is monitored by a service on the server for changes. When files are added to the staging area, the service will move the files to the proper folder within the data folder.

    How my staging area works

    The files are moved, and not copied because once all the files have been processed by the service, the staging area will be empty. Moving the files helps to prevent malware from making changes to any file after it has been moved. This prevents the staging service from updating malware-changed files from being copied over any master file.

    Is this system perfect protection from malware? Nope, but it does reduce any chances of infecting my data files. The entire file moving process from the staging area to the master files area takes seconds. The short time a file is in the staging area may prevent malware from changing the file before being moved. Once the file has been moved, it is now in the read-only share and can’t be changed.

    While this may seem like a tedious way of copying my files to the server, it really isn’t. I just need to map the staging area share on my desktop and copy the files. Everything else – the move to the master files folder, the mirroring, and the cloud backup – are done automatically for me.

    Bringing it all together

    While I have taken steps to protect my data at a network and computer level, I wanted to do more to protect my data files. Using a desktop computer I can easily have my data mirrored locally and backed up offsite automatically.

    Restricting access to my data files, I can make it more difficult for any malware within my network to change my files. By using a staging area, I can add and update my data files without removing any of the restrictions.

    I will continue to make necessary security changes as the world of security (or insecurity) changes.

    Do you have data files that you need to keep safe? If so, how do you keep the files safe?

  • 3 Types of Passwords That Are Way Too Easy to Guess

    3 Types of Passwords That Are Way Too Easy to Guess

    Put in the wrong hands, your employees’ login credentials can be the key to a massive security leak. Though you can set up every possible security system, you may be at a loss if your employees’ passwords are too easy to guess.

    Even the strongest firewalls and encryption software in the world won’t be able to do anything if somebody was able to log in by guessing and inputting somebody’s credentials.

    Here are a few of the most embarrassing passwords that are so easy to crack that people shouldn’t have bothered setting them at all:

    1. Sequential letters or numbers

    According to an article on The Telegraph, the password “123456” and its variants are still in the top five list of most common login credentials. But this predictability did not appear to be limited to numbers, as letters next to each on the keyboard were just as popularly used, such as “qwerty.”

    In fact, some users put some effort into mixing it up by typing in “abc123” or “qwerty123456.” While the idea is there, these are the first combinations that hackers would try, and unfortunately, they more than often succeed in breaking into accounts because of their login credentials’ simplicity.

    2. What it says on the tin

    Coming in at number two on the list, “password” is still one of the most common combinations used (if one could even call it that), despite the fact that it is the number one word most hackers would try first.

    We could give credit to those who tried to mix it up by using “passw0rd” instead, except that it’s still in the top 25 worst offenders. While “login” is a little more creative, that’s probably not too hard to guess, either.

    Unfortunately for those who plead by using “letmein,” they won’t be able to get back into their accounts once they’ve been compromised due to the fact that it’s also a common key.

    3. Common dictionary words

    Baseball and football must really be so ingrained in the subconscious of US citizens that they have decided to use them as the digital key to their accounts. Unfortunately, these two words are in the top ten list of most commonly used credentials, too.

    “Welcome” is nice to hear, but your employees won’t see this greeting if they get locked out of their accounts for using such a simple key.

    The Takeaway: Passwords should be hard to guess (for obvious reasons)

    These are just a few of the most common offenders when it comes to passwords that are way too easy to guess, even for people who aren’t considered seasoned hackers.

    To add even more protection, tell each department not to let their browsers, programs, or PCs automatically log in or save their user credentials. This will add another hurdle for hackers trying to get into your online accounts.

    It may be a little more inconvenient, but the extra few seconds they’ll take to re-input their details could save your business millions of dollars in possible data breach damages.

  • Identifying Malware on Your Computer

    Identifying Malware on Your Computer

    Cybersecurity is a growing threat, and hackers and cybercriminals are making their malware increasingly complex and difficult to detect.

    And unfortunately, many websites and companies are even having difficulty keeping track. According to published data, as many as 600,000 Facebook websites get hacked a day, and even major brands like the New York Times aren’t unsusceptible to attacks.

    But most general internet users aren’t well-versed in the tools to identify malware on their computers, or well-aware of what symptoms on their machine can help them identify possible issues. To here are a few tips and tricks to help you identify malware on your computer.

    Establish your computer’s baseline

    Do you know what programs and processes are running on your computer right now? Believe it or not, dozens of processes run in the background– and never show up in your taskbar. There are a few applications you can use to help you establish what your ‘baseline’ processes are: what are the normal programs your computer runs in the background when there are no issues.

    For Microsoft machines, you can use the Microsoft Process Explorer, which can tell you what processes are running… and also informs you of what the end function of all those processes are. To get a baseline, get a full list of all the processes which run when the computer is behaving normally.

    If your computer begins to slow down, or behaves erratically, call up the process explorer and compare notes. Are there additional processes running that are not described, or poorly described? Those might be good places to begin considering a malware problem.

    If you don’t run a Microsoft machine, or you want a more detailed look at your computer’s processes, there are a few alternatives: HiJackThis from Trend Micro, and GetSystemInfo from Kapersky. Both of these programs operate similarly to the native Process Explorer, but with beefed-up information. The downside is that they can be a little daunting to learn how to use if you’re a tech novice.

    Assess your computer’s vulnerabilities

    If your computer and network are less vulnerable, you’ll likely have less threats to combat! While this is usually a preventative measure, if you find out that your computer has specific vulnerabilities, it can be a sign that you need to look for possible malware.

    Luckily, most computers come with a Security Analyzer already installed in the OS which can be accessed from the control panel. But if you’d like a stronger option, there are a few reputable third-party scanners.

    Secunia Inspection Scanners scan far more than the base security analyzer in microsoft products, and also help to inform users how to correct any vulnerabilities they find in great detail. Luckily, Secunia products are also rather intuitive and easy to use.

    Using vulnerability scanners in conjunction to other anti-malware products is crucial for ensuring greater success at identifying malware on your computer.

    Your antivirus and anti-malware products

    No one using the internet should be using a computer without antivirus and anti-malware; while no one program can catch everything, the more layered your systems of security are, the more difficult it will be for malware to get a foothold on your computer… and the easier it will be for you to find and correct!

    There are many companies which provide antivirus for pc; and different options are better for different kinds of users. But since a great deal of malware presents itself as free antivirus products, it’s important to do your due dilligence, and get your antivirus from a reputable source.

    A great place to start is to look at the published results of antivirus efficacy tests, which rank software based on their response to common bugs, viruses, and other issues.

    Running scans on your security suite software uses heuristics to detect known malware; and some can alert you when they discover malware organically, while others must be told to run dedicated scans.

  • How I Backup Data Files Automatically So I Won’t Worry About Losing Files

    How I Backup Data Files Automatically So I Won’t Worry About Losing Files

    Protecting your data files with a good data backup plan is one of the most important tasks you can perform to keep your data safe from hard drive failure, malicious software, or just accidental file changes or deletions.

    For me, I have been talking about various data backup plans since I started this blog, and with over 600GB of personal photos and videos stored on an external hard drive, I also take data backup very seriously.

    I recently bought and setup a Plex media server that I use to stream my media throughout my home. After setting up Plex I also decided that the server would also make a good data backup server as well.

    After some extensive research, I managed to create a server that provides redundancy for both my Plex media files and my personal data files. The server will also backup data files automatically online while keeping them safe from malicous software that may be installed on another computer on my LAN.

    The data backup plan requirements

    When I decided to use my Plex media server as a data backup server I wanted to ensure that three data backup requirements were met:

    1. All data files need to be protected from accidental changes and deletions.
    2. Allow digital photos from non-connected devices (digital cameras) to be added.
    3. Photos and videos from smartphones and tablets need to be copied automatically to the server.
    4. A second local copy of the data files needs to be automatically created.
    5. All data files need to be automatically uploaded to cloud storage.
    6. All hard drives containing the data files need to be monitored.

    The requirements list that I created was a result of years of backing up my data, and then looking at how I could do it better. Unfortunately, at the time I didn’t have the equipment to satisfy all the requirements, but with my Plex media server, I realized that I could probably accomplish what I needed.

    Let’s look at each of the requirements so I can explain how I managed to satisfy each one.

    All data files need to be protected from accidental changes and deletions

    1. All data files need to be protected from accidental changes and deletions

    The most important requirement when storing my data files is to ensure they are protected from accidental changes and deletions. This requirement needs to address both user and software changes and deletions.

    When I just had my desktop and an external hard drive, I would simply turn off my hard drive when not in use. The issue was when it was on and connected to my desktop and the entire hard drive could be written to without any issue.

    This meant that I could accidentally change or delete files, or any malicious software that was installed could do the same thing.

    To avoid the same problems with my Plex media server, I connect the external hard drive to the Plex media server, create a share to the drive containing my data files that I can then access from my desktop using a local Plex media server account.

    Note:

    My Plex media server runs without any logged in user, and I never access the Internet from the server. The only time I log into the server is when I need to perform some maintenance.

    I changed the permissions on the share to allow read-only access for the local Plex media server account that I use to access the share from my desktop.

    Note:

    By default, Windows creates shares with the group “Everyone” having access to the share. This is insecure, so take the time to remove “Everyone” from the share permissions and manually add the users and groups that need access.

    This prevents me, or any software running on my desktop, from changing any data on my data share. Of course, this also means I can’t add any new files to the share, or make any changes to any of the files, if needed.

    Allow digital photos from non-connected devices to be added

    2. Allow digital photos from non-connected devices to be added

    The first requirement and this one seems to be at odds with how I can access my data files. While my data files are protected when the files are accessed from my desktop, or another machine on my network, I still need to be able to add new files or make occasional changes to existing files.

    How to protect my files, while at the same time allowing me to add files or make changes?

    Simple – create a staging area.

    The staging area is a write-able share on the server that points to a folder on the server. This folder only contains the data files that will be moved to the actual data files external hard drive location.

    Basically, when I want to add new files, or replace files that already exist on the server’s external hard drive, I simply connect to the staging share, create the folder structure I want to create on the external hard drive, and then copy the files.

    I created a small application that is running as a service on the server that monitors the staging folder. If any files are detected in the staging folder or any subfolders in the staging folder, the service will move the files from the staging folder to the external hard drive automatically. The entire process is fairly quick and requires no interaction from me other than copying the files into the staging folder.

    The best part is that the share that contains my actual data files can remain read-only from the desktop as all the updating takes place directly on the server, and not from my desktop. The only share that is write-able is the staging share.

    Since the files are moved from the staging share to the actual data files folder very quickly, any malicious software, such as ransomware, that could be running on a machine that is connected to the staging share, may not have enough time to modify all of the files, or may not be able to modify any files.

    While the staging share takes care of manually backing up photos, I also needed to be able to backup photos and videos from mobile devices, as well.

    Photos and videos from smartphones and tablets need to be copied automatically to the server

    3. Photos and videos from smartphones and tablets need to be copied automatically to the server

    Many of the new photos I backup are taken with a smartphone. Sometimes my kids also take photos from a tablet, or two. At the moment I have two iPhones, an iPad, an Android smartphone and an Android tablet that can have new photos or videos stored that need to be backed up.

    My requirement was to create an automatic process for backing up all photos and videos from mobile devices to the server. Finding the easiest and automatic method to perform such a task did require some research, but I managed to find an app that runs on both iOS and Android.

    PhotoSync, while not free, makes it easy to backup all photos and videos from my mobile devices to my Plex media server very easily. There is an app for both iOS and Android, and the look and feel is very similar on each platform.

    Using this app to backup to my server did require me to install a free Windows application called PhotoSync Companion. The Windows application that is available from the links on the PhotoSync website didn’t allow my to run as a service on Windows, meaning I had to have a user logged in on the server to have the PhotoSync Companion application running all the time.

    I contacted technical support for PhotoSync, and very quickly I was informed that there is a Windows service version of the PhotoSync Companion. The only issue is that I can’t send files to my mobile devices with this version as I could with the standard Windows application. This didn’t matter to me as I only need to send photos and videos to the server, and not the other way around.

    Once the PhotoSync Companion service was installed on my server, configured it to point to the staging folder as the destination folder to copy the files from the mobile devices. From there, the same service application that monitors the staging folder will then move the files to the correct folders.

    The PhotoSync app keeps track of which files have already been copied so it won’t recopy any files again, which is good because it would keep recopying the files to the server since the files get moved by the staging folder monitor service on the server.

    I could, however, manually re-select the files for recopy if I wish.

    Now that I have managed to copy files to the correct location on the server, I wanted to then create a local duplicate copy of the files so I would lose any files if a hard drive failed.

    A second local copy of the data files needs to be automatically created

    4. A second local copy of the data files needs to be automatically created

    Let me be blunt: all hard drives will fail. It is a fact of computing, and is something that you need to prepare for if you value the data stored on a hard drive. This is is one of the main reasons for backing up data.

    This is also the reason I decided to invest in a second hard drive for my data files.

    For years I relied on a single external hard drive, but last year that hard drive began to show signs of failing. The S.M.A.R.T. data on the hard drive began showing issues related to hard drive failure. To avoid losing data, I bought a new Western Digital My Book 3TB and copied my data files to it. All my data was copied without issue.

    This year I bought a second Western Digital My Book 3TB to act as a mirror to the first – meaning the two drives were an exact copy of each other. But I wanted to have the mirroring done automatically so I wouldn’t have to manually, or have my staging application, copy the file to each hard drive.

    I had been using a great piece of software called Stablebit DrivePool to mirror my Plex data drives, so I decided to do the same with my data files drives.

    I setup a drive pool and included both of my data file external hard drives in the pool. A drive pool is simply a virtual hard drive that combines the available storage of any drives you add to the pool. In my case, the drive pool equaled just under 6TB – the combined storage space of the two My Book external hard drives.

    Once the pool was created, I then enabled 2x duplication on the pool. This tells DrivePool to duplicate each file in the pool. Because I have two drives in the pool, each file is copied to both drives.

    When my staging folder monitor service moves a files to the data files directory in the pool, DrivePool will then copy the file to the second hard drive automatically.

    If one drive in the pool starts to fail, I can still access my data files from the other hard drive, while I replace the damaged drive with a new one, and then DrivePool will then mirror the files to the new hard drive automatically.

    While having duplicate files locally protects me from one hard drive failure, it won’t protect me if something were to happen to my home. This is where cloud storage comes in.

    All data files need to be automatically uploaded to cloud storage

    5. All data files need to be automatically uploaded to cloud storage

    I have talked about why I use Backblaze as my cloud backup provider and implementing their backup service into my automatic backup workflow was the easy part. Backblaze was already backing up my data automatically anyway.

    I moved my Backblaze account from my desktop to my server, and setup the folders that I wanted to backup within the Backblaze application. Since I now store my data files in a drive pool, I simply added the folders from the pool to Backblaze for monitoring.

    When I add a file to the drive pool, Backblaze will automatically backup the file to the cloud storage without any manual effort on my part.

    This was the easiest requirement that I completed because of the fact that Backblaze handles the automatic backup, all I had to do was tell it what folders I wanted to backup.

    Now that all the automatic file backup was in place, I wanted to add one more requirement to help monitor the integrity of the hard drives. If a hard drive is about to fail, I would like ample opportunity to copy off my data files before it really does fail.

    All hard drives containing the data files need to be monitored

    6. All hard drives containing the data files need to be monitored

    Along with DrivePool, Stablebit also offers a utility that will automatically scan and monitor the health of hard drives called Stablebit Scanner. I bought both applications together, since they work together and there is a substantial discount when buying both together.

    Note:

    Each machine that uses DrivePool and Scanner will need a separate license. After the first machine, there is a discount in license fee for each additional machine. The license is a lifetime license, so you get all future upgrades.

    Stablebit Scanner essentially monitors the S.M.A.R.T. data, temperature, and the availability of all hard drives connected to a machine. The application will also run scans of the drive to ensure there are no issues, as well.

    If there are any issues with a hard drive, such as a high temperature, a drive disconnection, or S.M.A.R.T. data warnings, Scanner will send me an email that describes the issue. This helps me stay ahead of any serious problems.

    Scanner and DrivePool are also closely integrated. If Scanner detects that a hard drive looks to be failing, DrivePool will stop copying files to that hard drive, and duplicate files to another free hard drive in the pool.

    If Stablebit Scanner detects that the temperature of a hard drive is getting high, DrivePool will throttle any activity on the drive until the temperature returns to a more normal operating temperature.

    The monitoring and email alerts have worked well since I started using Scanner. I received a few temperature warning emails when I first setup my data file drive pool. All the file copies causes the temperature of one of the drives to reach the warning temperature.

    I received another email when I accidentally turned off the power strip connected to the external hard drives for a fraction of a second. There was no impact to the drive pools because the hard drives briefly turned off.

    One of the best features of both DrivePool and Scanner is that I can install a second copy of each application on my main desktop, and then connect to the server to see the statuses of my drive pools and the hard drive monitoring data.

    No additional license is required for using the applications in this manner from my desktop.

    Summary of how I backup data files automatically

    I have been backing up my data files since 2002 (the year I bought my first digital camera and began taking photos), and over the years I have been developing and modifying my backup process.

    Since buying and setting up my Plex media server in December 2015, I realized I could use it to incorporate a more automatic approach to backing up and protecting all of my files.

    Today, I am able to keep my data files protected, access them in a read-only manner from any device on my network, while being able to add additional files at any time. All of the mobile devices can now backup both photos and videos to the server

    All data files on the server will automatically be duplicated to a second local hard drive, and then automatically uploaded to Backblaze.

    With Stablebit Scanner running on the server, I will be able to replace hard drives before they fail. All of this has been working flawlessly to keep my irreplaceable data files safe and secure.