Tag: Wireless Router

  • How to Create a Secure Wireless Router Setup

    How to Create a Secure Wireless Router Setup

    We live at a time when the “Internet of Things” is starting to gain traction in our life.  It seems every new product sold today can easily connect to the Internet through a wireless connection, which is usually a wireless router. Of course, as with most things created, it may seem like a good idea to be able to get access to your devices remotely, it also means that malicious users may also be able to gain access to your devices.

    I have many devices in my home that connect to my wireless router, and while I am always conscious about security, I am confident in my devices being protected when connected to the Internet. While nothing is ever 100% secured, there are several steps you can take to make sure you do a proper wireless router setup. Ensuring the security of your wireless devices starts with your wireless router.

    (more…)

  • How to Secure the Linksys EA4500 Wireless Router

    How to Secure the Linksys EA4500 Wireless Router

    Wireless routers, by default, are unsecured when you connect a router for the first time. This is important to know as you will need to take the necessary steps to secure any wireless router that you have just purchased.

    With regards to Linksys routers, the steps to secure the router are very similar, so if you have trouble finding proper steps to secure your Linksys router, you can usually follow steps for another Linksys router.

    To make it easier for owners of the Linksys EA4500 wireless router, I will provide the steps to secure the router below.

    Steps to Secure the Linksys EA4500 Wireless Router

    If you have owned a Linksys router in the past, the steps I outline below make look familiar, that is because the firmware that is included with the various Linksys routers look very similar.

    I have divided the steps into several sections to make it easier to follow, and to indicate what tasks each group of steps perform.

    Loading the Router’s Web Interface

    Before securing your Linksys EA4500 you will need to access the Web interface. This is done by opening a Web browser and navigating to the router’s Web interface.

    Note:

    I suggest that you use Internet Explorer, if available, to access the Web interface. Many users have reported problems with accessing the Web interface for a router with other Web browsers.

    1. Open you Web browser and then enter 192.168.1.1 in the address bar.
    2. The router will then prompt for a user name and password. Leave the user name field blank, and type “admin” (without the quotes) in the password field.

    Change the Router Password

    Once you have access to the Web interface, the first steps you should perform are to reset the password needed to access the Web interface. Unfortunately, you can’t change the user name with the stock firmware, buy making the password long and complex should provide enough protection.

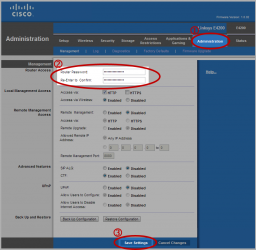
    1. Click the “Administration” tab from the menu at the top.
    2. Next, if the “Management” page isn’t display, then click the “Management” link at the top.
    3. In the “Router Access” section, enter a new password for the router, and then enter the same password in the second field to confirm.
    4. Click the “Save Settings” button at the bottom.
    5. The router will then save the new password, and you will be required to re-login again with the new password. The user name will still be blank.

    Setup the Wireless Network

    The steps outlined in this section are probably the most important steps to follow. These steps will secure your wireless networks from unauthorized users. Failure to perform these steps will allow anyone access to your wireless network.

    The Linksys EA4500 allows devices to connect to it on either the 2.4 GHz or 5 GHz frequency. In order to make a device connect to either frequency without having to change networks, we will be making both frequencies use the same network name (SSID).

    1. Log into the router, if you haven’t already done so, and then click the “Wireless” tab at the top.
    2. By default, Wi-Fi Protected Setup (WPS) is selected, which is unfortunate because WPS is not secure. Click the “Manual” option to switch from WPS.
    3. For both the 5 GHz and 2.4 GHz sections use the following settings:
      • Network Name (SSID): The name for your network. This is the name that will appear in the list of wireless networks that can be detected by wireless devices.
      • Security Mode: WPA2 Personal or WPA Personal.
      • Passphrase: Enter a long and complex string of characters, numbers and symbols. This is the most important element to secure your wireless network.
    4. Click the “Save Settings” button at the bottom to save your security settings.

    After you perform the steps outlined in “Setup the Wireless Network”, you can then select you wireless network from the list of available networks and then enter the passphrase that you have created. Anyone that connects to the wireless router will need to enter this passphrase – unless you setup guest access within the router.

    At this point your Linksys EA4500 wireless router is secured, and no unauthorized users should be able to gain access to your network or router.

  • FAQ: Securing Your Wireless Network

    FAQ: Securing Your Wireless Network

    Ever since I have been writing posts about securing home wireless routers, I have been asked many questions about such security. Many of the questions were the same, such as what happens if you forget your router’s password, while others have been about how best to secure a wireless router.

    Since I have received quite a few questions over the years, I decided to gather the questions in a post and then add my answers to those questions. Of course, if you have additional questions you can continue to send them to me, or write them in the comments section of this post.

    (more…)

  • Why Your Wireless Network May Not Be As Secure As You Think

    Why Your Wireless Network May Not Be As Secure As You Think

    I have written several posts on securing a wireless router. I have even written posts that provide step-by-step detail on how to secure specific models of wireless routers. While you should enable WPA2 and use a strong passphrase, that may not be enough to keep your wireless network protected by unauthorized users.

    In many routers manufactured today, there is a known issue related to a technology that has been pushed by the wireless industry to make setting up and securing a wireless network easier. Unfortunately, this new technology has also opened up a large security hole that can allow unauthorized users access to your wireless network – even if you secured your network with WP2 and a strong passphrase.

    WPS – WiFi Protected Setup

    When wireless networks started to become popular, many people weren’t aware of the security that needed to be implemented in order to protect their network. Most people were just used to use standard network routers where you just plugged in a computer using a network cable and everything was good to go.

    Unfortunately, with wireless, security is vital. Anyone with a wireless network card that is within range of your wireless router can connect to your network. The problem is that many people don’t understand how to properly secure a wireless router. Let’s face it, many people don’t want to navigate through an array of confusing options and try to understand terms like WPA, WPA2, AES, TKIP, etc.

    In 2007, the WiFi Alliance created WiFi Protected Setup (WPS) that provides an easy way for someone to configure and setup security on a wireless network. The way WPS works is a wireless router is shipped with a personal identification number (PIN) – usually 8 digits in length – that is printed on a sticker on the router. With WPS, a user can then enable encryption for the wireless network by pressing a button on the router and then entering the PIN in the network’s setup wizard.

    While this sounds like a great way of connecting devices to a wireless network easily, there is one issue: is can easily be hacked. WPS was created with usability in mind and not security.

    In December 2011 researcher Stefan Viehböck reported a flaw that showed brute-force attach feasible against WPS. This flaw allows unauthorized users to gain access to a wireless network.

    While the PIN is an 8 digit number, the last digit is a checksum of the first 7 digits, which leaves 107 = 10,000,000 possible PIN numbers. The issue is that the router will confirm validity of the first half (4 digits = 10,000 possibilities) and the second half (3 digits = 1,000 possiblities) separately, which reduces the number of possibilities to guess to about 11,000. Since WPS doesn’t lockout after several incorrect attempts, it wouldn’t take long for a device to guess the correct PIN and gain access to the wireless network..

    Protecting Your Network

    The issue with WPS is that many routers may have it enabled by default – even if you have used the feature or not. This makes your wireless network vulnerable to a brute-force attack.

    The only solution, at the moment, is to disable WPS from within the router’s administrative dashboard. Some routers provide an option to disable WPS, while others require a firmware update. My Linksys E4200 required a firmware update to disable WPS.

    If you are unsure of whether your router provides the ability to disable WPS, you should ask the manufacturer, or use their support forums and ask other owners. You may have to update the firmware on your router, as I had to do.

    While WPS provides an easy way to attach devices to your wireless network, the lack of security in such a feature, in my opinion, far outweighs the usability. I suggest you manually attach devices to your network, once the network is secured, and turn off WPS instead.

  • How to Secure the D-Link DIR-615 Revision E Wireless Router

    How to Secure the D-Link DIR-615 Revision E Wireless Router

    As with all wireless routers sold, the D-Link DIR-615 Revision E isn’t sold in a secured fashion. The security of the wireless router is the responsibility of the owner.

    While securing a wireless router may seem like a daunting task, most home wireless routers require the same settings to be changed to secure the router and wireless network.

    What needs to be changed for the D-Link DIR-615 wireless router are broken down into three sections, that will hopefully help to understand what is being changed on the router.

    To secure the D-Link DIR-615 wireless router, use the following steps:

    Note:

    Before securing your router ensure that you are connected to the router using a network cable, and not connected using wireless. Also, when accessing the administrator dashboard, it is best to try using Internet Explorer. Many router dashboards tend to work best with this Web browser.

    1. Changing Administrator Credentials

    The first thing you should do when securing your wireless router is to always change the admin password. Passwords will have a well-publicized default password for the admin account on your router, so changing it will make it difficult for unauthorized individuals to gain access to your router.

    Changing the admin password will only affect logging into the dashboard of your router – where the router settings are located. This won’t secure your wireless network, which is outlined in the next section.

    To change the admin password on the DIR-615 version E3, use the following steps:

    1. Open your Web browser and navigate to http://192.168.0.1. The login page will be displayed on the screen.
    2. Select “Admin” from the “User Name” dropdown list.
    3. Keep the “Password” field blank.
    4. Click the “Login” button.
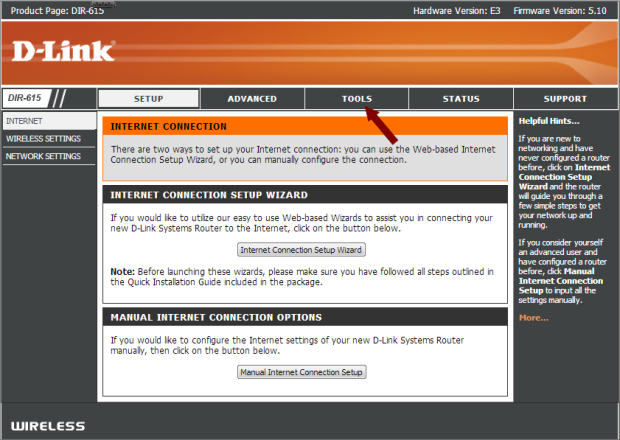
    5. From the top menu, click the “Tools” option.
    6. DIR-615 - Tools Option

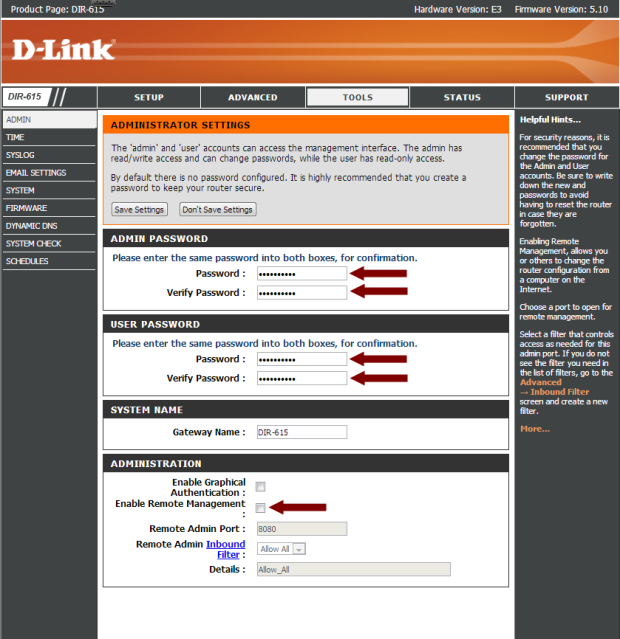
    7. Under the “Admin Password” section, enter a new password for the administrator. Ensure the password is long and complex to make it secure.
    8. Under the “User Password” section, enter a new password, but make it different than the admin password.
    9. In the “Administration” section, use the following options:
      • Enable Remote Management: Unchecked.
      • DIR-615 - Administrator Settings

      • Click the “Save Settings” button at the top of the page to save the passwords.
      • Wait for the settings to save, and then log in with the new admin password.

    2. Securing the Wireless Network

    After changing the admin password to your wireless router, you can now go ahead and secure the wireless network. By securing the wireless network, this will prevent unauthorized users from connecting to your network.

    To secure your wireless network, use the following steps:

    1. Log in to the router with the “Admin” user if you have not already done so. Once the “Setup” page is displayed, click the “Manual Internet Connection Setup” button.
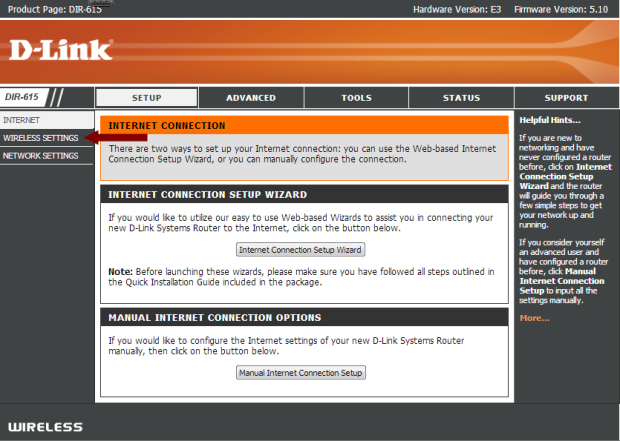
    2. From the left menu, click the “Wireless Settings” option.
    3. DIR-615 - Wireless Settings

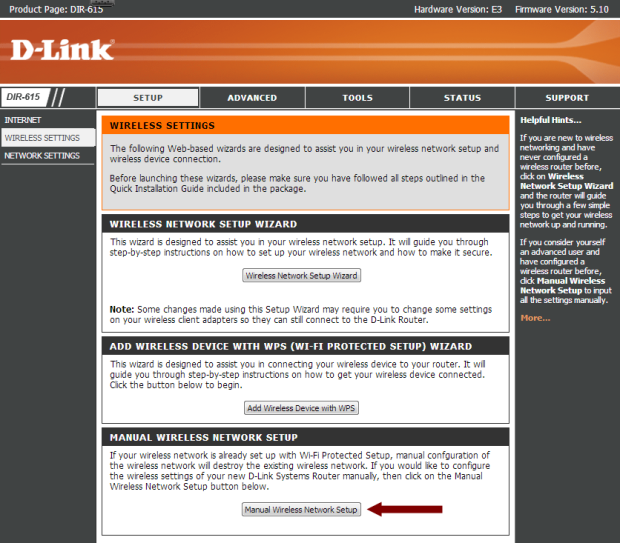
    4. Next, click the “Manual Wireless Network Setup” button near the bottom of the page.
    5. DIR-615 - Manual Wireless Network Setup

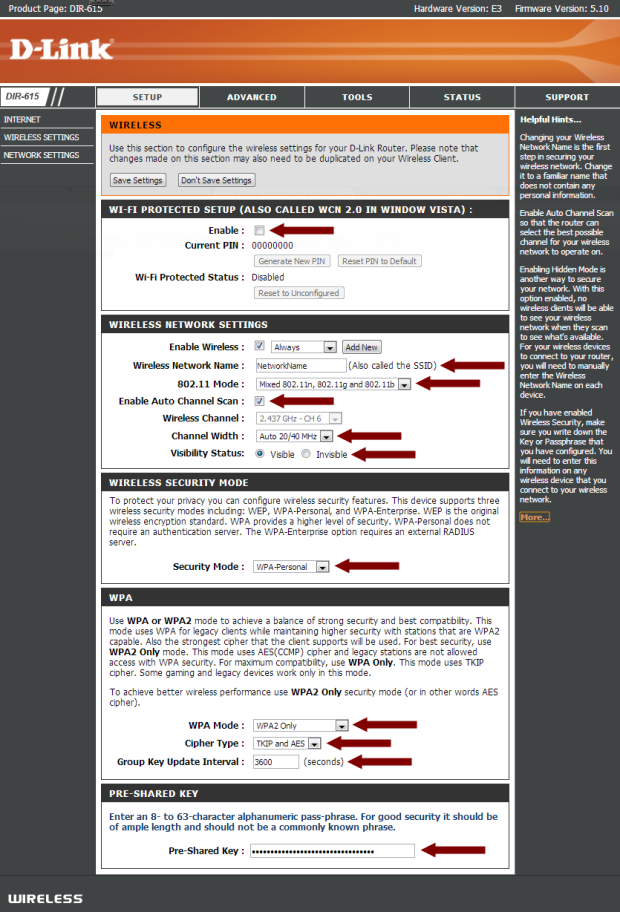
    6. In the “Wi-FI Protected Setup” section use the following options:
      • Enable: Uncheck
    7. In the “Wireless Network Settings”, use the following options:
      • Enable Wireless: Checked
      • Wireless Network Name: Enter a name for your wireless network
      • 802.11 Mode: Mixed 802.11n, 802.11g and 802.11b
      • Enable Auto Channel Scan: Checked
      • Channel Width: Auto 20/40 MHz
      • Visibility Status: Visible

      Note:

      There is always some debate about hiding – not broadcasting – your SSID. The truth is not broadcasting the SSID does nothing to secure your network. Hackers can see both visible and hidden SSIDs with the tools/applications they use. While the average user may not use such tools, they won’t be able to gain access to your wireless network if you have it secured with WPA/WPA2 and a good passphrase.

    8. In the “Wireless Security Mode” section, use the following options:
      • Security Mode: WPA-Personal
    9. In the “WAP” section, use the following options:
      • WPA Mode: WPA2 Only (If you have issues connecting with this option, then try “Auto (WPA or WPA2)” instead.)
      • Cipher Type: TKIP or AES
      • Group Key Update Interval: 3600
    10. In the “Pre-Shared Key” section, use the following options:
      • Pre-Shared Key: Create a long and complex key that will be used to gain access to your wireless network. This is the main security for your wireless network, so the longer the better.
    11. DIR-615 - Wireless

    12. Click the “Save Settings” button at the top of the page.

    At this time your wireless network is now secured. To connect a wireless device to your network, you wll need to selected the SSID from the list of wireless networks, and then enter the pre-shared key you created.

    3. Additional Security Settings

    There are a few additional security settings that you can do to provide even more security.

    1. Log into your wireless router using the “Admin” user and password.
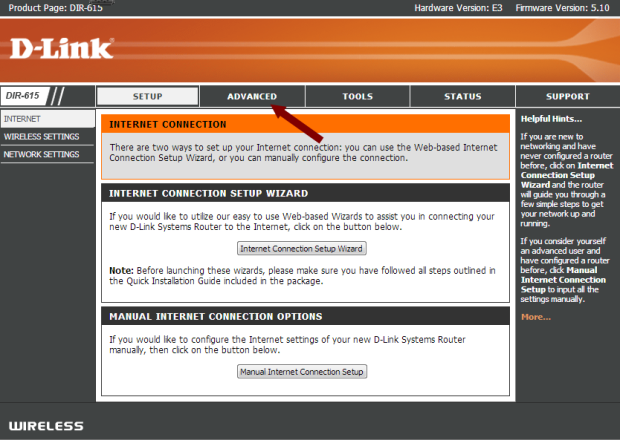
    2. From the top menu, click the “Advanced” option.
    3. DIR-615 - Advanced Option

    4. From the left menu, click the “Advanced Network” option.
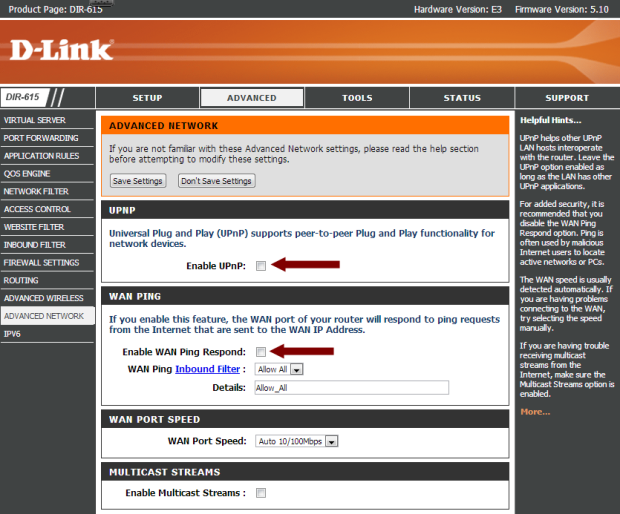
    5. In the “UPNP” section, use the following options:
      • Enable UPNP: Unchecked
    6. In the “WAN Ping” section, use the following options:
      • Enable WAN Ping Respond: Unchecked
    7. DIR-615 - Advanced Network Options

      Note:

      The following settings are optional, and unless you are comfortable with changing IP addresses, I suggest you leave them as the default and skip the next two sections.

    8. From the top menu, click the “Setup” option.
    9. From the left menu, click the “Network Setings” option.
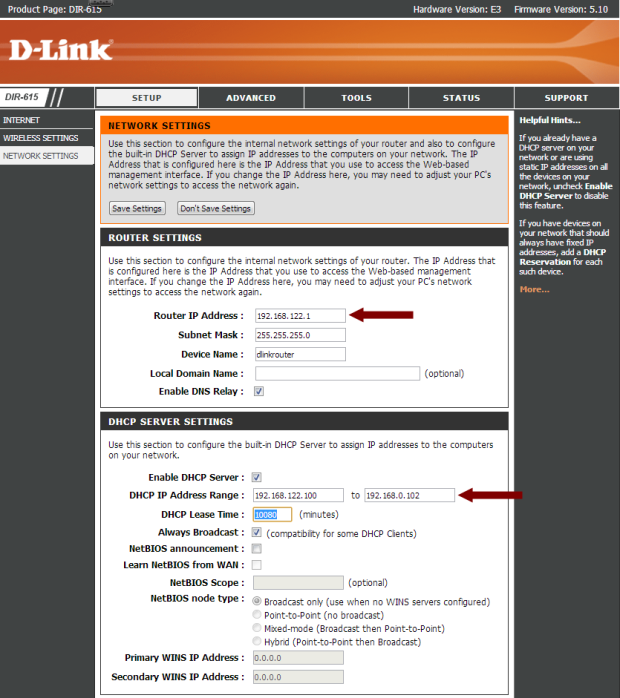
    10. In the “Router Settings” section use the following options:
      • Router IP Address: Change to something like 192.168.22.1
    11. In the “DHCP Server Settings”, use the following options:
      • DHCP IP Address Range: Set the range to the number of devices you will connect to your network. For example, if you changed your rotuer IP address to 192.168.22.1, and you have 3 devices, then set the range 192.168.22.100 to 192.168.22.102
    12. DIR-615 - Network Settings Options

    At this point your D-Link DIR-615 is about as secure are you can get it. You can feel comfortable that only authorized users will be able to log into your wireless network.

  • Linksys E4200 Wireless Router Review

    Linksys E4200 Wireless Router Review

    After about 6 years, my Linksys WRT54G finally packed it in, so I went out and bought myself a Linksys E4200 dual band wireless-N router. I have several laptop computers and a media player that have wireless-N adapters, so the new router will be a welcome change.

    Besides the added benefit of being able to connect using the 802.11n standard, the Linksys E4200 wireless router has a few additional features that were available on my previous wireless router. After I got the router up and running, I began to explore some of the additional features to see how well they worked. Considering this is one of Cisco’s top performance home wireless routers, I expected big things from it.

    Setting Up the Linksys E4200 Wireless Router

    The package contents were basically the standard items: the Linksys E4200 wireless router, a power cable, a network cable, and a CD containing the Cisco Connect software. I haven’t used any software that came with any of my routers in the past, so I really couldn’t see myself using this one. Although I may explore the software in the near future, for reasons you will read later.

    The router itself is smaller than my previous WRT54G router. While the width and length is about the same, the Linksys E4200 is slimmer, and there are no antennae sticking out from the top. This means that when I reach behind my desktop, I don’t have to worry about knocking into them.

    The setup of the router was pretty straight forward, and I set it up manually as I usually do. I basically logged into the router’s dashboard through my Web browser and configured the security settings for the wireless network.

    The dashboard, while it has change slightly from the WRT54G, basically looks the same, which made it easy for me to find my way around. The biggest change that I say while I configured my wireless network was the fact that you can create two separate wireless networks – one for 5 GHz, and a second for 2.4 GHz. Since this router is dual-band, devices can connect to the router on either frequency at the same time.

    Since I only wanted to manage one network, I changed the settings for both the 5 GHz and 2.4 GHz bands to be identical. Doing this didn’t cause a problem, and I was able to connect both wireless-N and wireless-G devices to the different frequencies without any problems.

    The one thing that bothers me about the Linksys routers is the inability to change the dashboard user ID. You can change the password easily, but the actual user ID you use to log into the dashboard can’t be changed from being blank. I have seen other routers that provide this ability, and I hope that Cisco will change this for future routers.

    Router Performance

    So far, I have been pleased with the speed of the router. I have a hard-wired desktop connected directly into the Linksys E4200 router, and it seems faster when downloading from the Internet. Although I haven’t done an actual speed test, the computer seems more responsive overall.

    A wireless-N laptop connects to the router at faster than the 54 Mps rating of a wireless-G connection. Although, the one aspect that I am disappointed with is the range the router has. From the opposite side of the house, the laptop connects with 3 out of 5 bars within Windows 7. The WRT54G router connected with the same number of bars, so there really isn’t an improvement in the connection range with the Linksys E4200. I am a little disappointed in this as I thought I would have a better connection to the router, and because of this I my connection speed is 74 Mbps. This is still better, however, than what I would have received from the WRT54G at 5 bars.

    Linksys E4200 External Hard Drive Connection

    The Linksys E4200 wireless router includes a USB port on the back next to the ethernet ports. This allows you to connect an external hard drive to the router and then share the data on the hard drive to the computers that are connected to the router.

    While this is a huge selling point for me, it was a nice feature that I was looking forward to trying. As I don’t have a NAS (network attached storage) device, having the Linksys E4200 router and my external hard drive act as one was a nice bonus.

    After setting up my router, I connected an external hard drive into the router and the router immediately identified the drive. I was able to setup user IDs and shares for the hard drive so I could connect to the hard drive from other computers. When I tried to map to a share on the hard drive, my desktop couldn’t connect to the share. I also tried to connect to the share from a laptop, and it, too, couldn’t connect. I decided to wait a few days and try again.

    The next time I tried, the Linksys E4200 wireless router couldn’t even detect the external hard drive, so I couldn’t even manage the shares. I unplugged the hard drive and plugged it back into the router, but the router still couldn’t find the hard drive.

    I saw read about a few people online that have also had this issue, so it appears to be a common problem. With the latest firmware update, you can also connect a printer to the router using the same USB port. I haven’t tried this, and from what I have read, you need to use the Cisco Connect software to get the printer sharing to work.

    Linksys E4200 – Pros

    • Dual band (2.4 and 5 Ghz) that allows you to connect to either band to avoid interference.
    • Ability to setup a separate network for each band.
    • Easy to configure – dashboard very similar to previous Linksys routers.
    • Connected to my ISP without any problems.
    • Connected wireless-G and wireless-N devices without any problems.
    • Lower profile – no antennae sticking out from the top.

    Linksys E4200 – Cons

    • No ability to change the router’s user ID.
    • The range isn’t much better than my 6 year old router.
    • Couldn’t get an external hard drive to connect to the router.

    With the exception of the external hard drive issue, I find the Linksys E4200 wireless router to be a good router. I was disappointed in the range of the router, but I do like the dual-band feature, and I had no issues with connecting any device to the router. If you can get the Linksys E4200 wireless router for a good price, I suggest you pick one up.
  • How to Reset the Linksys E4200 Wireless Router

    How to Reset the Linksys E4200 Wireless Router

    There may be times when you may need to reset the Linksys E4200 wireless router back to factory defaults. You may need to do this if there is a problem with the router, or you forget the administrative password needed to access the router’s setup pages.

    Once you have reset the Linksys E4200 wireless router, it is important that you take the time to secure the Linksys E4200 wireless router. The reason for this is because once the router is reset, it is no longer secured. There are two methods to reset the router, and both are explained below.

    The Two Methods to Reset the Linksys E4200 Wireless Router

    There are two methods that you can use to reset your wireless router. The first method requires physical access to the router to press the reset button. The second method requires you to login to the router’s administrative web pages.

    The steps to use both methods are as follows:

    Reset the Wireless Router Using the Reset Button

    1. Turn the router upside down.
    2. On the bottom, press and hold the reset button for 5-10 seconds.

    Reset the Linksys E4200 Wireless Router Using the Browser-Based Utility

    The second method involes actually logging into the router’s administrative pages. Obviously, if you forgot the router’s password, you will need to use the first method to reset the router.

    1. Open a web browser and navigate to http://192.168.1.1, or whatever the IP address of your router.
    2. Enter the user name and password for the router.
    3. Select “Administration” from the top menu, and then select “Factory Defaults” from the submenu.
    4. Click the “Restore Factory Defaults” button.
    5. In the popup message window, click the “OK” button.

    The post explained two methods that you can use to reset your wireless router. Once the router has been reset, it is important to ensure you take the necessary steps to secure the router once you reset the Linksys E4200 wireless router.

  • How to Secure the Linksys E4200 Wireless Router

    How to Secure the Linksys E4200 Wireless Router

    As with any wireless router, it is important that you ensure you secure the Linksys E4200 wireless router to prevent unauthorized users from accessing your network. Ensuring that your wireless router is secure is the first step to keeping your data and private information safe.

    Included with this router is a CD-ROM that contains the Cisco Connect software that allows you to setup your router. This post, however, will provide the manual steps you can take to manually secure the Linksys E4200 wireless router.

    Steps to Secure the Linksys E4200 Wireless Router

    The steps outlined below will help you to secure the Linksys E4200 wireless router. Ensure you follow the steps exactly, and if you think you have missed a step, or are having problems, you can always reset the router back to factory defaults and start again.

    Note:

    When accessing the router’s administrative web pages, I recommend that you use Internet Explorer if it is installed. It seems many of the administrative pages in routers tend to be more compatible with Internet Explorer.

    1. Open up your web browser and then go to 192.168.1.1.
    2. When the router prompts you for a user name and password, leave the user name blank and type “admin” as the password.

    Change the Router Password

    1. Click the “Administration” tab the top, and then click “Management”.
    2. In the “Router Access” section, enter a new password for your login, and then enter the same password a second time to confirm it.
    3. Click the “Save Settings” button and then re-login with the new password. The user name will still be blank.
    Linksys E4200 Wireless Router - Changing the Administrator Password
    Linksys E4200 Wireless Router – Changing the Administrator Password
    (Click to enlarge)

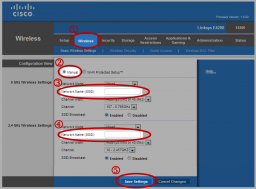
    Set Network Name

    1. Click the “Wireless” tab, which should display the “Basic Wireless Settings” page.
    2. Select “Manual” for “Configuration View”.
    3. In the “Network Name (SSID)” field, in the 5 GHz Wireless settings section, enter a name for your network.
    4. In the “Network Name (SSID)” field, in the 2.4 GHz Wireless settings section, enter a name for your network.
    5. Note:

      You can use the same network name for both the 5 GHz and 2.4 Ghz settings. Doing so will allow devices to use either frequency band when connecting.

    6. Click the “Save Settings” button.
    Linksys E4200 Wireless Router - Setting the Network Name
    Linksys E4200 Wireless Router – Setting the Network Name
    (Click to enlarge)

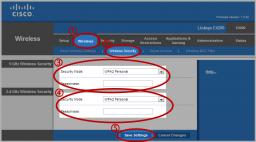
    Secure the Linksys E4200 Wireless Router

    1. Click the “Wireless” tab.
    2. Next, click the “Wireless Security” option.
    3. In the 5 GHz section, for the “Security Mode” drop-down list, select “WPA2 Personal” or “WPA2/WPA Mixed Mode” for the best security, and enter a long passphrase that will be used to connect to your wireless network.
    4. Repeat the same steps for the 2.4 GHz section. If you used the same network name for both the 5.5 GHz and 2.4 GHz, then use the same passphrase, otherwise you can specify a different passphrase.
    5. Note:

      When creating a passphrase the length of the passphrase is important. The longer the passphrase, the better.

    6. Click the “Save Settings” button.
    Linksys E4200 Wireless Router - Setting the Wireless Security
    Linksys E4200 Wireless Router – Setting the Wireless Security
    (Click to enlarge)

    After following the above steps, you should now have a secured router. If you have problems in the future, you can reset the router and follow the steps again to secure the Linksys E4200 wireless router.