Category: Networking

Posts that discuss networking hardware, such as routers, switches, and network adapters can be found under this category.

  • How To Access Blocked Websites: All You Need To Know

    How To Access Blocked Websites: All You Need To Know

    It can be seriously annoying not being able to access a website because it’s blocked, particularly if you need to get something done urgently.

    Yet it can happen so often, public spaces will often deny access to certain websites on their WiFi, including sites such as Facebook, betting sites and other aspects of social media.

    However, there are ways around this and if you’re clever enough you can open up the web to whatever you need.

    Use a VPN

    If you’re looking how to accessed block websites, one of the best places to start is using a VPN.

    A Virtual Private Network essentially gives you a secure connection to a different network in the internet, enabling you to access websites that would be otherwise blocked.

    What that does is place your IP address somewhere completely different, bypassing the network you’re actually connected to.

    This is also great for streaming the likes of Netflix and BBC iPlayer even if you’re not on the correct country. Website namely Top50VPN listed best VPN for streaming that can be used and well-recommended.

    Proxy websites are another way around accessing blocked websites and are incredibly easy to use.

    There are hundreds of proxy websites out there which will give you unrestricted access to the internet. How this works is the proxy basically camouflages the blocked site allowing you to use them.

    Switch your Nnetwork proxy

    In many cases, such as in schools or offices, your network may have multiple proxies.

    This could mean that while a website might be blocked on one proxy, it may not be on another. Switch them around and you could be given open access to the internet.

    It’s relatively easy to switch, all you need to do is head to the connection settings and select the other proxy. It really is that simple.

    Use an IP anonymizer

    An IP anonymizer will keep you anonymous online and is worth using simply for that. However, if you use one then you can also access blocked websites.

    It’s a double win in this case too as you’ll also avoid any tracking on the network as you’re accessing the blocked websites via a piece of kit that will keep you in the shadows.

    Use IP over URL

    It’s usually the URL which gets blocked on networks so by using the IP instead you may be able to access these blocked sites.

    To get the IP of a website, you can use “nslookup” followed by the domain name which will reveal this.

    From there just paste the IP address into the browser and it could open up otherwise blocked sites.

  • How to Secure the D-Link DIR-615 Revision E Wireless Router

    How to Secure the D-Link DIR-615 Revision E Wireless Router

    As with all wireless routers sold, the D-Link DIR-615 Revision E isn’t sold in a secured fashion. The security of the wireless router is the responsibility of the owner.

    While securing a wireless router may seem like a daunting task, most home wireless routers require the same settings to be changed to secure the router and wireless network.

    What needs to be changed for the D-Link DIR-615 wireless router are broken down into three sections, that will hopefully help to understand what is being changed on the router.

    To secure the D-Link DIR-615 wireless router, use the following steps:

    Note:

    Before securing your router ensure that you are connected to the router using a network cable, and not connected using wireless. Also, when accessing the administrator dashboard, it is best to try using Internet Explorer. Many router dashboards tend to work best with this Web browser.

    1. Changing Administrator Credentials

    The first thing you should do when securing your wireless router is to always change the admin password. Passwords will have a well-publicized default password for the admin account on your router, so changing it will make it difficult for unauthorized individuals to gain access to your router.

    Changing the admin password will only affect logging into the dashboard of your router – where the router settings are located. This won’t secure your wireless network, which is outlined in the next section.

    To change the admin password on the DIR-615 version E3, use the following steps:

    1. Open your Web browser and navigate to http://192.168.0.1. The login page will be displayed on the screen.
    2. Select “Admin” from the “User Name” dropdown list.
    3. Keep the “Password” field blank.
    4. Click the “Login” button.
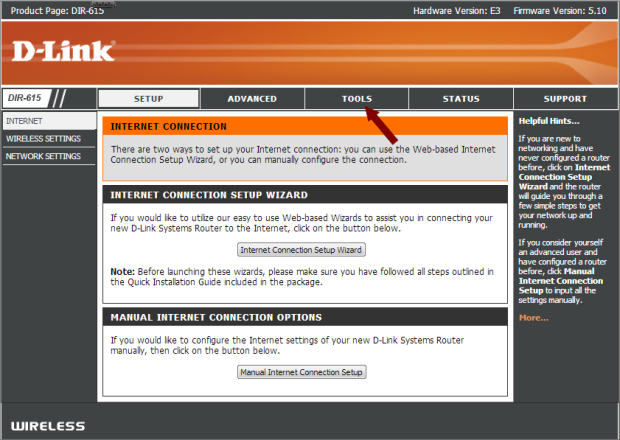
    5. From the top menu, click the “Tools” option.
    6. DIR-615 - Tools Option

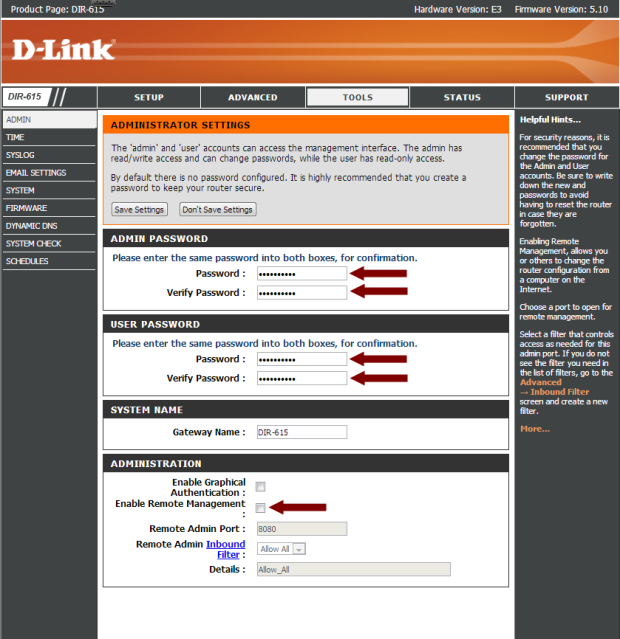
    7. Under the “Admin Password” section, enter a new password for the administrator. Ensure the password is long and complex to make it secure.
    8. Under the “User Password” section, enter a new password, but make it different than the admin password.
    9. In the “Administration” section, use the following options:
      • Enable Remote Management: Unchecked.
      • DIR-615 - Administrator Settings

      • Click the “Save Settings” button at the top of the page to save the passwords.
      • Wait for the settings to save, and then log in with the new admin password.

    2. Securing the Wireless Network

    After changing the admin password to your wireless router, you can now go ahead and secure the wireless network. By securing the wireless network, this will prevent unauthorized users from connecting to your network.

    To secure your wireless network, use the following steps:

    1. Log in to the router with the “Admin” user if you have not already done so. Once the “Setup” page is displayed, click the “Manual Internet Connection Setup” button.
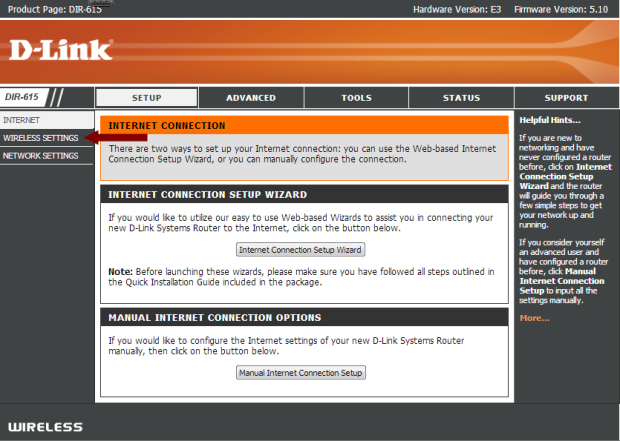
    2. From the left menu, click the “Wireless Settings” option.
    3. DIR-615 - Wireless Settings

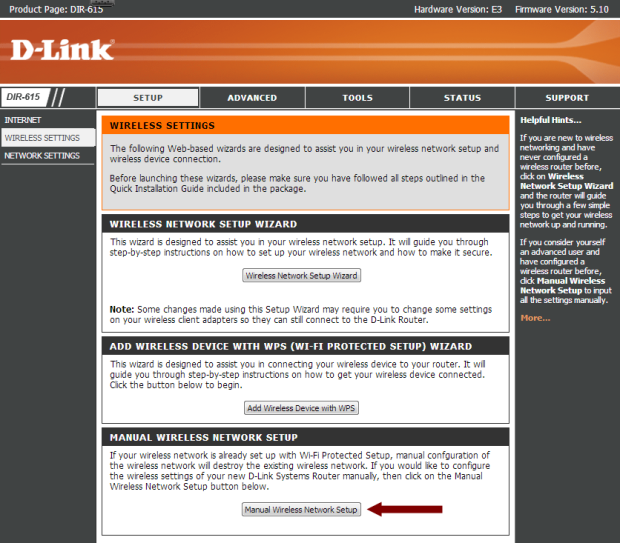
    4. Next, click the “Manual Wireless Network Setup” button near the bottom of the page.
    5. DIR-615 - Manual Wireless Network Setup

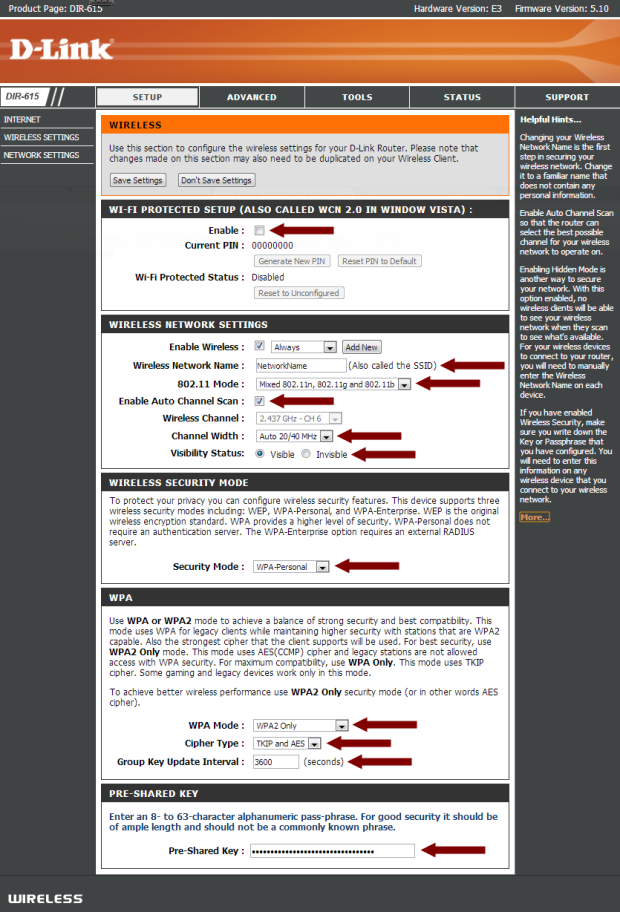
    6. In the “Wi-FI Protected Setup” section use the following options:
      • Enable: Uncheck
    7. In the “Wireless Network Settings”, use the following options:
      • Enable Wireless: Checked
      • Wireless Network Name: Enter a name for your wireless network
      • 802.11 Mode: Mixed 802.11n, 802.11g and 802.11b
      • Enable Auto Channel Scan: Checked
      • Channel Width: Auto 20/40 MHz
      • Visibility Status: Visible

      Note:

      There is always some debate about hiding – not broadcasting – your SSID. The truth is not broadcasting the SSID does nothing to secure your network. Hackers can see both visible and hidden SSIDs with the tools/applications they use. While the average user may not use such tools, they won’t be able to gain access to your wireless network if you have it secured with WPA/WPA2 and a good passphrase.

    8. In the “Wireless Security Mode” section, use the following options:
      • Security Mode: WPA-Personal
    9. In the “WAP” section, use the following options:
      • WPA Mode: WPA2 Only (If you have issues connecting with this option, then try “Auto (WPA or WPA2)” instead.)
      • Cipher Type: TKIP or AES
      • Group Key Update Interval: 3600
    10. In the “Pre-Shared Key” section, use the following options:
      • Pre-Shared Key: Create a long and complex key that will be used to gain access to your wireless network. This is the main security for your wireless network, so the longer the better.
    11. DIR-615 - Wireless

    12. Click the “Save Settings” button at the top of the page.

    At this time your wireless network is now secured. To connect a wireless device to your network, you wll need to selected the SSID from the list of wireless networks, and then enter the pre-shared key you created.

    3. Additional Security Settings

    There are a few additional security settings that you can do to provide even more security.

    1. Log into your wireless router using the “Admin” user and password.
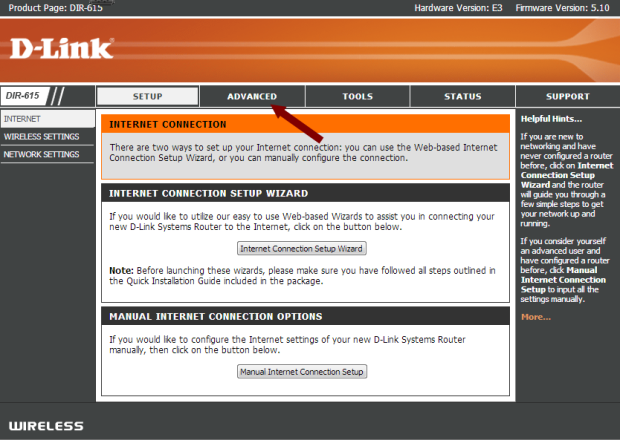
    2. From the top menu, click the “Advanced” option.
    3. DIR-615 - Advanced Option

    4. From the left menu, click the “Advanced Network” option.
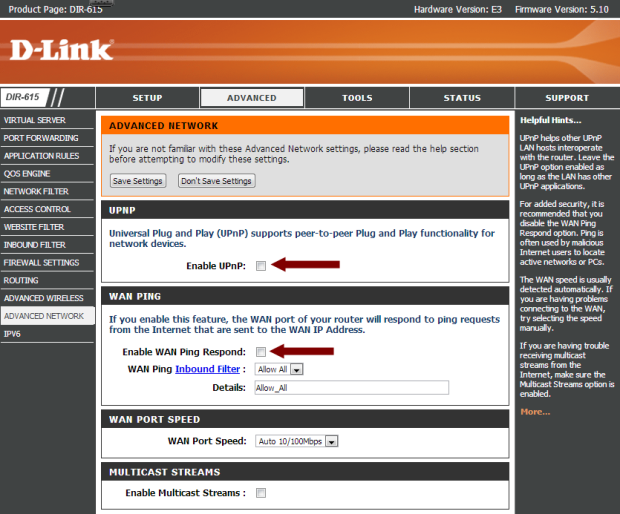
    5. In the “UPNP” section, use the following options:
      • Enable UPNP: Unchecked
    6. In the “WAN Ping” section, use the following options:
      • Enable WAN Ping Respond: Unchecked
    7. DIR-615 - Advanced Network Options

      Note:

      The following settings are optional, and unless you are comfortable with changing IP addresses, I suggest you leave them as the default and skip the next two sections.

    8. From the top menu, click the “Setup” option.
    9. From the left menu, click the “Network Setings” option.
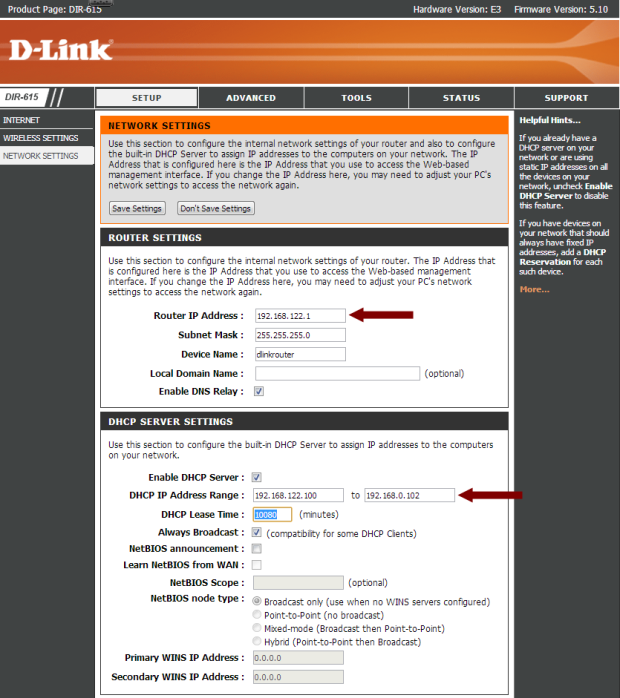
    10. In the “Router Settings” section use the following options:
      • Router IP Address: Change to something like 192.168.22.1
    11. In the “DHCP Server Settings”, use the following options:
      • DHCP IP Address Range: Set the range to the number of devices you will connect to your network. For example, if you changed your rotuer IP address to 192.168.22.1, and you have 3 devices, then set the range 192.168.22.100 to 192.168.22.102
    12. DIR-615 - Network Settings Options

    At this point your D-Link DIR-615 is about as secure are you can get it. You can feel comfortable that only authorized users will be able to log into your wireless network.

  • Rural Broadband Options – What’s Available?

    Rural Broadband Options – What’s Available?

    Just a decade ago the average time spent online per day by any one person was 46 minutes, now it’s a staggering 4 hours (or half of the average working day!). Facebook has 900 million members (300 times bigger than Friendster was in 2002), the average time to download a song has decreased from 13 minutes to 18 seconds, and the devices we used primarily for texting and phone calls have evolved into mini computers giving us internet access almost anywhere.

    However, for many people developments in speed and accessibility are still hanging about in 2002. You may think it only applies to less fortunate areas of the world too, but what if I told you it was happening on your own doorstep?

    The gap between cities and rural areas continues to grow when it comes to online access. Whilst built up areas striving in population and business are receiving fibre optic broadband and 4G networks, some areas of the countryside are struggling to hit anything faster than the 56k modem speeds we consider ancient.

    (more…)

  • How to Give Your WiFi Signal a Boost

    How to Give Your WiFi Signal a Boost

    The following are a sign you may need to give your WiFi signal a boost – Status: Connected. Signal strength: Low.

    If you’re sick of seeing those words, you need to learn how to give your WiFi signal a boost! Keep reading this article to find out our top 8 tips.

    (more…)

  • Is Mobile Broadband Taking Over Wireless Broadband?

    Is Mobile Broadband Taking Over Wireless Broadband?

    The rate at which mobile broadband has grown over the years is stunning, and there are even people speculating that it is only a matter of time before it becomes the dominant form of internet connection.

    Wireless broadband used to be all the rage, but things are changing fast, and it seems a lot more people are starting to embrace the mobile broadband internet.

    Personally, I believe it is only a matter of time before mobile broadband becomes the most used and the most reliable way to access the internet, and I also think it is a lot better than wireless broadband.

    In this article I will be giving you my opinion on wireless broadband vs. mobile broadband.

    (more…)

  • Linksys E4200 Wireless Router Review

    Linksys E4200 Wireless Router Review

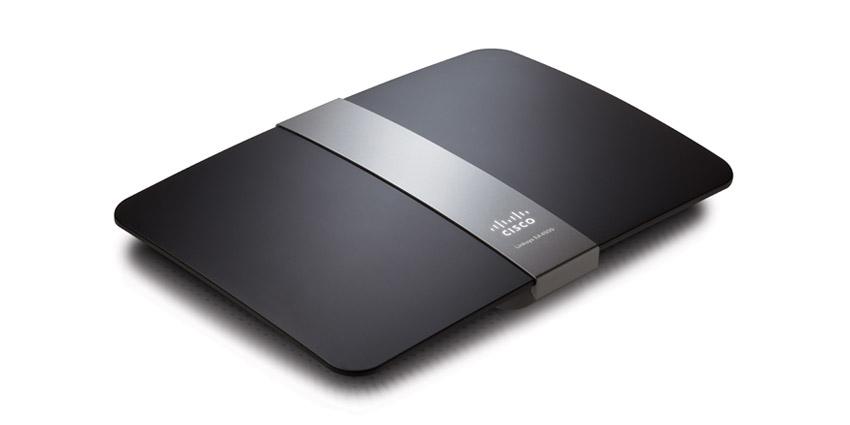
    After about 6 years, my Linksys WRT54G finally packed it in, so I went out and bought myself a Linksys E4200 dual band wireless-N router. I have several laptop computers and a media player that have wireless-N adapters, so the new router will be a welcome change.

    Besides the added benefit of being able to connect using the 802.11n standard, the Linksys E4200 wireless router has a few additional features that were available on my previous wireless router. After I got the router up and running, I began to explore some of the additional features to see how well they worked. Considering this is one of Cisco’s top performance home wireless routers, I expected big things from it.

    Setting Up the Linksys E4200 Wireless Router

    The package contents were basically the standard items: the Linksys E4200 wireless router, a power cable, a network cable, and a CD containing the Cisco Connect software. I haven’t used any software that came with any of my routers in the past, so I really couldn’t see myself using this one. Although I may explore the software in the near future, for reasons you will read later.

    The router itself is smaller than my previous WRT54G router. While the width and length is about the same, the Linksys E4200 is slimmer, and there are no antennae sticking out from the top. This means that when I reach behind my desktop, I don’t have to worry about knocking into them.

    The setup of the router was pretty straight forward, and I set it up manually as I usually do. I basically logged into the router’s dashboard through my Web browser and configured the security settings for the wireless network.

    The dashboard, while it has change slightly from the WRT54G, basically looks the same, which made it easy for me to find my way around. The biggest change that I say while I configured my wireless network was the fact that you can create two separate wireless networks – one for 5 GHz, and a second for 2.4 GHz. Since this router is dual-band, devices can connect to the router on either frequency at the same time.

    Since I only wanted to manage one network, I changed the settings for both the 5 GHz and 2.4 GHz bands to be identical. Doing this didn’t cause a problem, and I was able to connect both wireless-N and wireless-G devices to the different frequencies without any problems.

    The one thing that bothers me about the Linksys routers is the inability to change the dashboard user ID. You can change the password easily, but the actual user ID you use to log into the dashboard can’t be changed from being blank. I have seen other routers that provide this ability, and I hope that Cisco will change this for future routers.

    Router Performance

    So far, I have been pleased with the speed of the router. I have a hard-wired desktop connected directly into the Linksys E4200 router, and it seems faster when downloading from the Internet. Although I haven’t done an actual speed test, the computer seems more responsive overall.

    A wireless-N laptop connects to the router at faster than the 54 Mps rating of a wireless-G connection. Although, the one aspect that I am disappointed with is the range the router has. From the opposite side of the house, the laptop connects with 3 out of 5 bars within Windows 7. The WRT54G router connected with the same number of bars, so there really isn’t an improvement in the connection range with the Linksys E4200. I am a little disappointed in this as I thought I would have a better connection to the router, and because of this I my connection speed is 74 Mbps. This is still better, however, than what I would have received from the WRT54G at 5 bars.

    Linksys E4200 External Hard Drive Connection

    The Linksys E4200 wireless router includes a USB port on the back next to the ethernet ports. This allows you to connect an external hard drive to the router and then share the data on the hard drive to the computers that are connected to the router.

    While this is a huge selling point for me, it was a nice feature that I was looking forward to trying. As I don’t have a NAS (network attached storage) device, having the Linksys E4200 router and my external hard drive act as one was a nice bonus.

    After setting up my router, I connected an external hard drive into the router and the router immediately identified the drive. I was able to setup user IDs and shares for the hard drive so I could connect to the hard drive from other computers. When I tried to map to a share on the hard drive, my desktop couldn’t connect to the share. I also tried to connect to the share from a laptop, and it, too, couldn’t connect. I decided to wait a few days and try again.

    The next time I tried, the Linksys E4200 wireless router couldn’t even detect the external hard drive, so I couldn’t even manage the shares. I unplugged the hard drive and plugged it back into the router, but the router still couldn’t find the hard drive.

    I saw read about a few people online that have also had this issue, so it appears to be a common problem. With the latest firmware update, you can also connect a printer to the router using the same USB port. I haven’t tried this, and from what I have read, you need to use the Cisco Connect software to get the printer sharing to work.

    Linksys E4200 – Pros

    • Dual band (2.4 and 5 Ghz) that allows you to connect to either band to avoid interference.
    • Ability to setup a separate network for each band.
    • Easy to configure – dashboard very similar to previous Linksys routers.
    • Connected to my ISP without any problems.
    • Connected wireless-G and wireless-N devices without any problems.
    • Lower profile – no antennae sticking out from the top.

    Linksys E4200 – Cons

    • No ability to change the router’s user ID.
    • The range isn’t much better than my 6 year old router.
    • Couldn’t get an external hard drive to connect to the router.

    With the exception of the external hard drive issue, I find the Linksys E4200 wireless router to be a good router. I was disappointed in the range of the router, but I do like the dual-band feature, and I had no issues with connecting any device to the router. If you can get the Linksys E4200 wireless router for a good price, I suggest you pick one up.

  • Fix: The Settings Saved on This Computer Do Not Match the Requirements of the Network

    Fix: The Settings Saved on This Computer Do Not Match the Requirements of the Network

    In some of my posts regarding securing a wireless router, I am occasionally asked about solving the following error message:

    The settings saved on this computer do not match the requirements of the network.

    While I haven’t experienced this error, a quick search online has revealed that it can be a common error to receive when connecting to a wireless network. When solving errors that you receive after making changes, it is important to understand what changes you have made, and how they would affect your wireless connection. While everyone’s wireless network configuration may be different, let’s look at the possible changes that could cause the above error.

    Computer Settings Don’t Match the Wireless Network.

    There are many settings that you can change within your wireless router. Most routers contain the same settings, such as security type, and encryption algorithm, and it is important that when you change these settings that you also change them within your operating system.

    When changing the settings on your wireless network, you must ensure that the settings in your router match those in your operating system. As I mentioned above, all wireless networks will have different settings, but the following list are some settings that you should ensure match between your operating system and your network:

    • Ensure that the DHCP settings match. Most home networks would have this set to automatic.
    • The security type (WEP, WPA, WPA2) is set properly. For most home users the WPA/WPA2 type will probably be set to “Personal.”
    • The encryption algorithm (AES, TKIP) is set properly. Like the security type, this setting can be found within your router.
    • The passphrase associated with your wireless network was entered properly in your operating system when connecting to your network.

    The above list probably contains the most common settings that could cause an issue when attempting to connect to your wireless network. Ensuring that the settings defined within your wireless router match the network settings defined within the operating system will ensure that you don’t have any connectivity issues.

  • Getting Your Smartphone to Work as a Wireless Broadband Modem

    Getting Your Smartphone to Work as a Wireless Broadband Modem

    Most Internet service plans for modern Smartphone’s are powerful full-featured services that can handle much more than the light Web surfing that most of us throw at it.

    In fact, a mobile’s online access is often robust enough to facilitate an entire home or even small office network. Many of the newest cell phones even come with built-in Wi-Fi hotspots that make using it as a wireless broadband modem as easy as using an actual wireless broadband modem.

    (more…)