Tag: Windows 10

  • Windows 10 Displays Black Screen at Startup

    Windows 10 Displays Black Screen at Startup

    After a few months, my desktop recently updated to Windows 10 version 1903, and after upgrading to that version refused to boot up properly. The machine would show the Windows logo, and then immediately display a black screen. The screen wasn’t blank because I can move the mouse cursor around the screen, but couldn’t do anything else on the computer.

    The issue persisted after countless restarts to try and determine the issue, and while I did manage to find a workaround, the issue for me still remains unresolved.

    The Windows 10 Black Screen

    I have been running Windows 10 on my desktop for a few years. Up until recently, I haven’t had any real issues with this version of Windows. I replaced my almost 9 year old hard drives with a single solid-state drive (SSD) last year without any issues. I also replaced my graphics card without any problems.

    It wasn’t until last week when I had my first real issue with running Windows 10 – continuously got a black screen when Windows started up. The black screen appeared before I the log in prompt appeared.

    As I mentioned above, I was able to move the cursor around the screen, but nothing else. I tried various options to try and resolve the issue, including:

    Repair Windows
    I attempted to repair Windows, or restore the last system backup, which was done before the last update. The startup repair didn’t find any issues, and for some reason the system restore failed. I figured I needed to take more drastic action.
    Reinstall Windows 10
    Since I had my data backed up, it wasn’t hard for me to reinstall Windows. I had an older image of Windows 10, so when I installed Windows I knew it would need a big update. Windows 10 installed fine, I was able to log in, but after I ran the update to 1903, it immediately display the black screen again after the update restarted the machine.
    Reinstall onto the old hard drive
    I thought maybe there was an issue with the SSD drive, so I decided to reconnect one of the older hard drives and then reinstall Windows. This time I had the most recent image of WIndows (version 1903), but as soon as I installed that version of Windows, I immediately got the black screen.

    After the black screen appeared when I installed Windows for the second time, I realized that the issue was with the 1903 version of Windows 10 and my machine. It is hard to debug the machine, however, when I can’t log into the machine.

    The most difficult part, was it was hard to find a resolution online, as many solutions involved being logged into Windows, which was a problem I was having on my desktop.

    The workaround

    Eventually, I did find a workaround to my issue, but unfortunately, I don’t have the URL to the website that provided the workaround. I call it a workaround because I haven’t really solved the issue, I just manage to get my desktop up and running again.

    The workaround was to simply turn off my desktop, and then pull the power plug out of the power supply unit (PSU) from my computer. Wait for 30 seconds, re-connect the power plug into my computer and turn it back on.

    After doing so, my desktop immediately restarted and the Windows log in prompt was displayed on the screen. I was able to log into Windows and once again use my machine.

    As I have mentioned, this is a workaround as I don’t know why my machine displayed a black screen, and why removing the power plug from my computer, waiting 30 seconds, and then connect the power plug again resolved the black screen issue.

    Until I figure out the issue, for now I’ll have to use the workaround if I encounter the black screen again.

    If anyone can provide more information about this issue, feel free to leave a comment below.

  • Fix: Folders Loading Slowly in Windows Explorer

    Fix: Folders Loading Slowly in Windows Explorer

    When I reinstalled Windows 10 on my desktop I noticed the issue of folders loading slowly in Windows Explorer when I tried to view their contents. The issue was very noticeable as it took several seconds to the display the files within a folder, and accessing multiple folders became frustrating.

    I hadn’t experienced this issue in the past, at least not when I upgraded from Windows 7 to Windows 10, so I didn’t know what the solution to the problem was.

    After some quick research I managed to find a solution, which I outline below.

    Quick Access – not so quick

    While I thought about the usual culprits to Windows being slow, such as the Windows Search, I had that service enabled in Windows 7 and Windows 10 previously without any issue. I figured that it had to be something else.

    It turned out I was right.

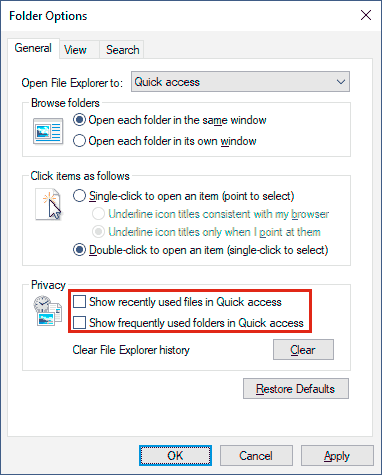
    The culprit was the Quick Access options under the General tab in the Folder Options. Once I cleared those options, Windows Explorer was loading folders quickly again.

    To change the Quick Access options, use the following steps:

    1. Open Windows Explorer by typing Windows Key+E.
    2. At the top of Windows Explorer, click the View tab, and then click the Options button. The Folder Options dialog should now be displayed.
    3. On the General tab, uncheck the following two checkboxes under Privacy:
      • Show recently used files in Quick Access
      • Show frequently used folders in Quick Access
      • Unchecking the Quick Access options.
        The Quick Access options in the Folder Options in Windows Explorer.
    4. After unchecking the checkboxes, click the OK button to save your changes.

    What the above options does is show the recently used files and folders in the Quick Access list at the top of the folders list in Windows Explorer. I usually like to customize the list to what I actually need to access on a frequent basis, so turning of this option was beneficial to me. I was actually getting annoyed ad folders and files appearing in the list.

    After stopping Windows 10 from showing recently used files and folders in the Quick Access list, the problem of folder loading slowly in Windows Explorer was no longer an issue for me.

  • Fix: Prevent Hard Drives from Going to Sleep in Windows 10

    Fix: Prevent Hard Drives from Going to Sleep in Windows 10

    After recently upgrading my Plex Windows 10 machine, I had an issue where I couldn’t prevent hard drives from going to sleep on that system. After the system restarted, a few hours later I would get an email from Stablebit Scanner indicating that one or more of my drives were no longer connected.

    With the exception of the system drive, all other drives connected to the system were USB-connected external hard drives. I couldn’t connect to the drives, and the lights on the drive casing indicated that they were in sleep mode.

    I hadn’t experienced anything like this since I setup the system over one year ago. After some investigation I found out that there are actually several settings, in two locations, in Windows 10 that I needed to change in order to prevent the hard drives from going to sleep.

    I detail the steps below.

    Changing the power plan

    The first setting I had to change was the USB suspend setting in the Windows 10 power options. This does require an administrator to change, but you will be prompted to enter the administrator password if you are logged in as a standard user.

    1. Click Start->Settings->System->Power & Sleep to display the options to change the power and sleep settings.
    2. Click the Additional power settings link under Related power settings. The Power Options window will appear.
    3. From this window, Click the Change plan settings link beside the power plan you wish to change.
    4. From the power plan window, click the Change settings that are currently unavailable link, and enter the administrator password when prompted.
    5. Click the Change advanced power settings link to display all the power options for the plan.
    6. From the power plan window, click the Change settings that are currently unavailable link, and enter the administrator password when prompted.
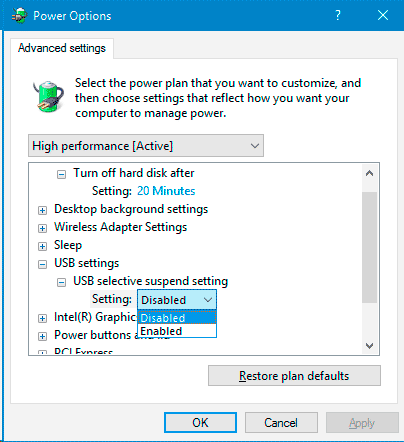
    7. Expand the USB settings and then the USB selective suspend setting option.
    8. Change the Setting value to Disabled.
    9. Power Options - USB Setting
      Disabling the suspend setting in the Power Options for Windows 10.

    USB controller device settings

    While I thought changing the USB suspend option would solve my problem, the USB-connected hard drives still were put to sleep by Windows 10. At this point, I decided that there must be another setting that caused this problem. After a bit more research online, I did find something that led me to the setting that solved the issue – disabling the ability for Windows 10 to turn off the device from the USB controller settings.

    To make these changes, you can use the following steps:

    1. Click Start and then type computer management. When Computer Management appears in the search results, right-click it and then select Run as administrator.
    2. Enter the administrator password and click the Yes button to open the Computer Management window.
    3. In that window, click Device Manager to display a list of all the devices installed on your system, organized in various categories.
    4. From the list of categories on the right, click the Universal Serial Bus controllers category to display all the devices in that category.
    5. Right-click each item in the list, and the select Properties from the context menu that appears. A properties dialog will appear.
    6. If the properties windows contains a Power management tab, then click that tab. If it doesn’t, then close the window and repeat the previous step for the next device in the list.
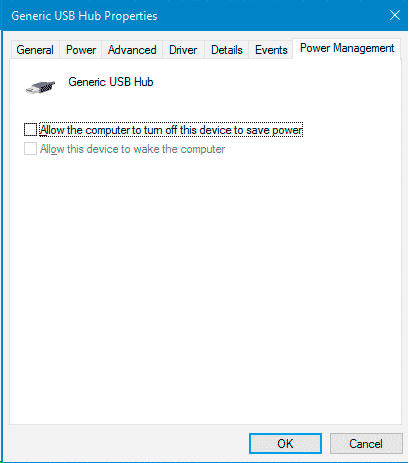
    7. In the Power management tab, uncheck the Allow the computer to turn off this device to save power option.
    8. USB Hub Power Management Properties
      The USB Hub power management properties with turn off device option turned off.
    9. Click the OK button to save the changes.
    10. Repeat steps 5 to 8 for each device under the Universal Serial Bus controllers category.

    With these two settings set to prevent hard drives from going to sleep in Window 10, you shouldn’t have an issue with any USB-connected hard drives from being disconnected.

  • How to Backup Files on Windows 10

    How to Backup Files on Windows 10

    I have talked about how I automatically backup my files from my server, but one thing I have discussed is how I backup my files from my Windows 10 desktop.

    Most of my important files are stored on my server, but I do have some data files, like game related files, that I would like to backup in case the hard drives in my desktop crash or begin causes data corruption in my files.

    In keeping with my automatic backup policy, I wanted to have my Windows 10 desktop automatically backup my files to the server, which will then backup to Backblaze. With Windows 10, it is actually easy to do.

    The steps below explain how to backup files on Windows 10 automatically.

    1. Determine where you want to store the files. If you plan to backup the files to an external hard drive, then connect the hard drive into the Windows 10 computer. For network shares, you will need to setup the share on the machine that contains the share and set the permissions.
    2. On the Windows 10 computer, click the Start button and select Settings->Update & Security->Backup.
    3. Click the Add a drive option.
    4. Select either the external drive or a network path for your backups.

      Note:

      If you chose to use a network path to store your backups then you may be prompted to enter the user ID and password to use to connect to the network share. Check the remember checkbox to ensure the credentials are stored so they will always be used to connect to the share and your backups will work without any interruption.

    5. By default, the backups will run every hour and will keep the backups forever. If you you would like to change this, click the More options option.
    6. From the More options window you can change how often the backup is run, how long to keep the backups, additional folders to backup and which folders to exclude. Pay attention to which folders are being backed up and ensure that all folders you want to backup are included.
    7. From this point you can click the Back up now button or wait for the next scheduled backup.

    At this point your Windows 10 computer will now automatically backup your data to the location you specified, at the scheduled time you specified.

    As I mentioned earlier, I backup my files to my server, which will automatically make of a second copy of the files on a second external hard drive, and then backup to the cloud with Backblaze.

    Do you automatically backup your computer? If so, how do you do it?

  • How to Disable Audio Enhancements in Windows 10

    How to Disable Audio Enhancements in Windows 10

    Knowing how to disable audio enhancements in Windows 10 can become useful if the audio enhancements cause a spike in CPU usage – usually audiodg.exe causing high CPU usage in Windows 10. There could be a variety of reasons why, such as incompatible drivers, corrupted files, or you just don’t want Windows to apply its own enhancements to the audio.

    If you would like to disable the audio enhancements in Windows 10, you can use the following steps:

    Disable Audio Enhancements in Windows 10

    Disabling the audio enhancements in Windows 10 is very similar to Windows 7, so if you have done so in the past, then you should have no issue following these steps. If you haven’t you should still be able to easily follow the steps as it isn’t difficult to disable the audio enhancements.

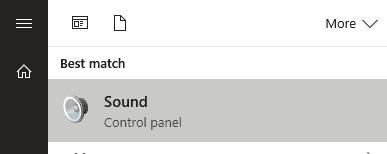
    1. Click the Windows 10 start button and then type Sound. Click the Sound option from the search results.
    2. The Windows 10 Sound Control Panel applet.
      The Windows 10 Sound Control Panel applet in the Search resuls.
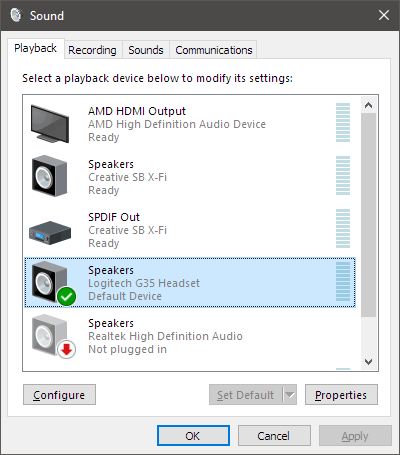
    3. In the Playback tab, right-click the audio device you would like to disable the audio enhancements for, and then select Properties.
    4. Windows 10 Sound applet
      The Sound window in Windows 10 showing the installed audio devices.
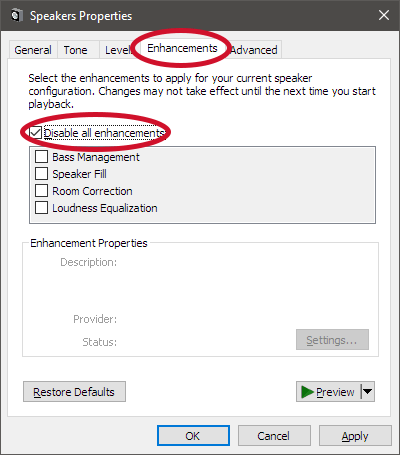
    5. Click on the Enhancements tab to display all the available audio enhancements
    6. Click the Disable all enhancements checkbox. The enhancements list should now become greyed out.
    7. Audio Enhancements Disabled in Windows 10
      All audio enhancements disabled for the audio device in Windows 10.
    8. Click the OK button to close the Properties window.
    9. You can use steps 2 – 5 for any other audio device you wish to disable audio enhancements for. When done, click the OK button to close the Sound window.

    If audiodg.exe in Windows 10 causing issues with Windows audio enhancements, using the above steps should help alleviate the issue until a solution is found. You can also just leave the enhancements disabled and use the enhancements that come with your audio device instead.

  • Fix: Windows 10 Update is Stuck on Downloading

    Fix: Windows 10 Update is Stuck on Downloading

    There may be a time when the Windows 10 update is stuck on downloading an update and doesn’t progress beyond that point. I have recently experienced this issue on a laptop where Windows Update wouldn’t progress beyond the downloading part of the update.

    I did manage to fix the issue and update the laptop. Below are the steps that I used to correct the problem.

    Fixing the Windows 10 Update Issue

    In order to correct the issue you must first restart Windows into Safe Mode. This will ensure that any necessary files and directories that we need to change are not in use by the Windows update service or other services.

    Once Windows 10 has restarted into Safe Mode, the second part is to modify some directories used by the Windows Update that may contain corrupted data.

    These two steps are outlined below.

    Booting into Safe Mode

    To boot Windows 10 into Safe Mode, use the following steps:

    Note:

    Once you restart you computer into Safe Mode, log in using the administrator account in order to continue with the fix.

    1. Press the Windows Key+I to open Settings. You can also click the Start button and then select Setting.
    2. From the Settings window, click Update & security.
    3. From the options on the left, click Recovery.
    4. Under Advanced startup click Restart now.
    5. After the PC restarts to the Choose an option screen, select Troublshoot > Advanced options > Startup Settings > Restart.
    6. From the Startup Settings screen, press 6 for Enable Safe Mode with Command Prompt.

    Fixing the Windows Update Directories

    Now that the computer has restarted in Safe Mode and the command prompt window is displayed, do the following:

    1. Type: [code language=”shell”]ren %systemroot%\System32\Catroot2 Catroot2.old[/code]
    2. Type: [code language=”shell”]ren %systemroot%\SoftwareDistribution SoftwareDistribution.old[/code]
    3. Restart the computer.

    Check for Windows 10 Updates

    Once the computer has restarted you can check for any Windows 10 updates using the following steps:

    1. Press the Windows Key+I to open Settings. You can also click the Start button and then select Setting.
    2. From the Settings window, click Update & security.
    3. On the left click Windows Update and then click Check for updates.

    Windows Update will now check for any updates and should begin downloading any that are found. It could take some time for the checking to be completed, but once it is done, there should be no issue with downloading the updates.