After recently upgrading my Plex Windows 10 machine, I had an issue where I couldn’t prevent hard drives from going to sleep on that system. After the system restarted, a few hours later I would get an email from Stablebit Scanner indicating that one or more of my drives were no longer connected.
With the exception of the system drive, all other drives connected to the system were USB-connected external hard drives. I couldn’t connect to the drives, and the lights on the drive casing indicated that they were in sleep mode.
I hadn’t experienced anything like this since I setup the system over one year ago. After some investigation I found out that there are actually several settings, in two locations, in Windows 10 that I needed to change in order to prevent the hard drives from going to sleep.
I detail the steps below.
Changing the power plan
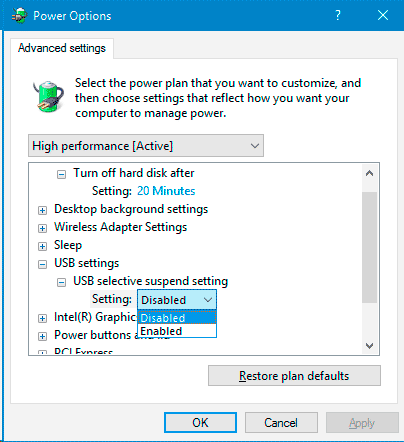
The first setting I had to change was the USB suspend setting in the Windows 10 power options. This does require an administrator to change, but you will be prompted to enter the administrator password if you are logged in as a standard user.
- Click Start->Settings->System->Power & Sleep to display the options to change the power and sleep settings.
- Click the Additional power settings link under Related power settings. The Power Options window will appear.
- From this window, Click the Change plan settings link beside the power plan you wish to change.
- From the power plan window, click the Change settings that are currently unavailable link, and enter the administrator password when prompted.
- Click the Change advanced power settings link to display all the power options for the plan.
- From the power plan window, click the Change settings that are currently unavailable link, and enter the administrator password when prompted.
- Expand the USB settings and then the USB selective suspend setting option.
- Change the Setting value to Disabled.
USB controller device settings
While I thought changing the USB suspend option would solve my problem, the USB-connected hard drives still were put to sleep by Windows 10. At this point, I decided that there must be another setting that caused this problem. After a bit more research online, I did find something that led me to the setting that solved the issue – disabling the ability for Windows 10 to turn off the device from the USB controller settings.
To make these changes, you can use the following steps:
- Click Start and then type computer management. When Computer Management appears in the search results, right-click it and then select Run as administrator.
- Enter the administrator password and click the Yes button to open the Computer Management window.
- In that window, click Device Manager to display a list of all the devices installed on your system, organized in various categories.
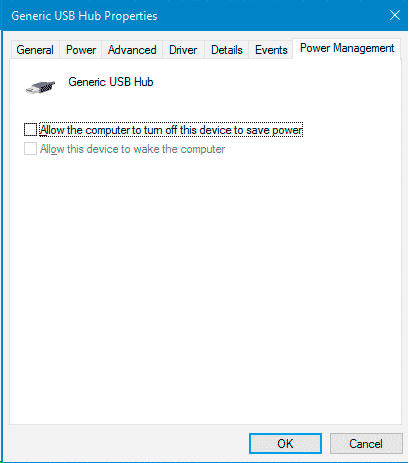
- From the list of categories on the right, click the Universal Serial Bus controllers category to display all the devices in that category.
- Right-click each item in the list, and the select Properties from the context menu that appears. A properties dialog will appear.
- If the properties windows contains a Power management tab, then click that tab. If it doesn’t, then close the window and repeat the previous step for the next device in the list.
- In the Power management tab, uncheck the Allow the computer to turn off this device to save power option.
- Click the OK button to save the changes.
- Repeat steps 5 to 8 for each device under the Universal Serial Bus controllers category.
With these two settings set to prevent hard drives from going to sleep in Window 10, you shouldn’t have an issue with any USB-connected hard drives from being disconnected.