Blog

  • 5 Vital UX Tips to Optimize your eCommerce Store Conversion Rate

    5 Vital UX Tips to Optimize your eCommerce Store Conversion Rate

    When it comes to running an online store, there are multiple considerations you need to take into account. SEO and advertising of various kinds are crucial for driving higher levels of quality traffic to your store but the question then is how to convert that traffic into sales.

    One key aspect to this is the quality of user experience (UX) your site possesses. A website that takes UX seriously and takes steps to improve it, will always fare better than one that neglects it.

    With that in mind, here’s how to improve the UX of your online store and boost your conversion rate.

    1. Keep it simple

    One of the most important things to remember is that a potential customer’s time is precious; if they can’t find what they’re looking for easily, they will simply go elsewhere.

    Therefore, good UX web design is all about making the shopping experience as clear, simple, and hassle free as possible. For online stores, this involves carefully categorizing your catalog in order to make your products as easy to navigate and identify as possible.

    Try adding filters to these category pages, so users can further narrow their search by criteria such as size, color, technical specifications (where applicable), and so on.

    This way, your visitors will find it a breeze to browse your wares and find what they’re looking for.

    2. Catch the eye

    In exactly the same way as a brick and mortar store, digital ‘window dressing’ and product display is crucially important to encourage people to buy.

    This starts with the design of your website, which is important not only to look attractive, but also to display your brand identity and convey an impression of your intended niche.

    For example, if you sell street fashion, a stylishly designed site indicates your fashion credibility to your audience. If you’re not so technically savvy, this can still be achieved by utilizing eCommerce website packages like this one, most of which allow you to freely customize the appearance of your site.

    3. Checkout

    The checkout is an integral component of your eCommerce store. Shopping cart abandonment figures from Black Friday in 2016 show an overall rate of 63.8% on desktop and a staggering 78.1% on mobile.

    To combat these odds, the first thing you’ll need is an SSL certificate to prove that users’ payment data is protected; without the padlock symbol in the address bar, shoppers won’t trust your service.

    Second, make the process as fast as possible; this means on a technical level (using a reliable host for example), and in terms of structure. Ask yourself whether each step is necessary and streamline your checkout for speed.

    Another useful tip is to quote the delivery cost upfront, where possible. If you can show the customer the total cost without them having to navigate too far through the checkout, they’re more likely to convert.

    4. Functionality

    It’s a major turnoff for potential customers when the nuts and bolts of your website don’t work properly. Why waste time on a buggy website when you can quite easily shop with a competitor instead?

    Do everything you can to reduce your page loading time, for example, including compressing images or enlisting the help of plugins if you’re based on WordPress.

    With constantly changing stock, online stores can also be susceptible to broken or misdirected links, so make sure to regularly check that all your navigation elements work.

    Crucially, your eCommerce store must be mobile friendly, ideally with a responsive design to automatically adapt your website to any screen size. Your customers’ experience should be equally pleasant, no matter what device they visit on.

    For a tutorial on how to do responsive design, see W3Schools.

    5. Help

    The key to this point is to provide your customer with all the assistance they could need, either to in-still confidence in a purchase or resolve any issue that may arise. Beyond detailed product descriptions, your first port of call should be a dedicated FAQ for your site to deal with common questions.

    It’s extremely reassuring for a customer, and far easier to answer their question without having to pick up the phone or write an email.

    Of course, sometimes direct communication is necessary, so incorporating live chat is well worth considering in addition to telephone, email, and social media.

    So long as you have the people-power to manage it, live chat is a great way to quickly nip any potential issues in the bud.

    This attitude towards customer service should also extend to after a purchase; always clearly state where you can be contacted so the customer doesn’t feel forgotten.

  • How Companies Secure Their Networks in 2017

    How Companies Secure Their Networks in 2017

    Those who work in industries — whether it’s in retail advertising, corporate communications, the financial sector, or a healthcare setting such as a hospital — know how critically important it is to ensure that sensitive information remains secure.

    Whether you are going to be dealing with your company’s confidential client information, or you have been trusted with access to an individual’s banking or healthcare records, it is vital that the network your workplace relies on is effective and secure at all times — your organization’s reputation and customers’ trust in you ultimately depends on it.

    A business’ success can entirely depend on a trusted network as well. For instance, in order to remain one step ahead of competitors in a crowded marketplace, it is essential for retail companies to constantly remain vigilant: they must work to safeguard their information and ensure that sales figures and prices remain secure.

    In a retail context, it is particularly important for companies to keep a tight grip on what their prices will be on big shopping days, so competitors don’t price their goods or services similarly and effectively take away customers.

    So in today’s digital world, what can companies do to ensure their network will remain secure? Retail companies are just one example of the type of organization that would benefit from a securely managed network.

    Prominent, large companies that have more than one office will need to make their data available to all employees in as efficient a manner as possible. You might assume that such a problem would fall into the hands of a large company’s pre-existing IT department.

    However, IT departments at large organizations frequently face competing priorities that make it difficult to find the time to regularly manage IT infrastructure. As a result, many companies choose to seek out a third-party organization to securely manage their network, so that their IT department has time to focus on company growth, and can remain available to handle other challenges at hand.

    Today, more and more companies are turning to secure cloud solutions to enhance the way they do business. Modern businesses rely on virtual data centres to ensure that important private information — which their employees will need to be able to access in whichever location they are working — is stored as efficiently as possible.

    This is becoming particularly important in an age of globalization and digitization, when more and more employees are required to travel for business, and continue to work remotely. Of course, depending on what your business does, you will have different needs than others in respects to what and how much information needs to be stored.

    A virtual data centre offers resources such as memory, storage and bandwidth that are able to accommodate what it is you are specifically looking for.

    If you work in a large company, your IT department will have a better understanding about what those specific needs may be — a virtual data centre solution is often designed with the idea that it will be managed by an IT department.

  • 7 Places to Look for Reviews Before Downloading an App

    7 Places to Look for Reviews Before Downloading an App

    Welcome to the world of smartphones, operating systems and applications. If you don’t live under a rock you must know that your device can’t operate without an app.

    Tablets or phones running an operating system may be home to two million applications, if that was possible. From food and travel to childcare and iBanking – applications have revolutionised the way we perform daily tasks.

    But how to know which app is the best for you? Many people abide by word of mouth regarding apps and go on to download the one every other person keeps recommending.

    But then again – how does the word get out about an app and where should you always go to consult if you are looking to find a genuine app that turns your phone into a TV remote?

    Simple – you follow the list curated specially to fulfill all your interrogative needs regarding applications and their reviews.

    Good app reviews are a bit hard to find because most of the apps are free, and users prefer directly downloading an app, rather than taking time to read reviews.

    Other apps aren’t free and ask for a few bucks in exchange for the tools they offer. That’s when you really worry about user reviews and get cautious before spending your money.

    You can visit the places mentioned below to get trusted reviews on apps, since they’re all credible sources with a daily readership of thousands.

    1. Google

    Quite naturally, everyone goes to the popular search engine to enter the question they want answered in mere seconds. But whatever you see in the search results may not be very much true.

    So just in case you are looking for app reviews, make sure you ask Google, and in the search results, look for websites like:

    • PC Mag
    • Tech Crunch
    • Gizmodo
    • The Verge
    • The Guardian Tech
    • CNET
    • MacWorld

    These platforms are a dream for app developers to be featured on. If you are reading a review here, chances are that you are hearing from the right people about the right thing.

    2. YouTube

    The famous video uploading medium has plenty of trusted sources that give reviews about apps all the time. Some are YouTubers who have a dedicated account to reviewing apps and can take requests.

    Others mostly review apps based on their priority in the app store lists.

    Some of the popular reviewers are listed below:

    • Soldier Knows Best
    • Locker Gnome
    • Tys iPhone help
    • The iPod Kid
    • AppStore Reviewer
    • iTouch iPodz
    • Phone Arena
    • Bbs iPod touch help
    • Unique App’s
    • AppVee
    • Ultimate Phone Reviews

    3. Paid sites

    There are websites which take a fee from developers and then review the site for them. These websites have a daily visitor count in thousands and any app that goes up on their ‘featured’ section surely gets a bunch of downloads.

    For you, a common user, it means that you have access to genuine reviews that a first-timer like you wrote about an app. Here is a small list of paid review sites:

    By paid app you should only assume that they take the review process very seriously and what you read there is a product of someone’s genuine efforts.

    4. Free review sites

    There are also free app review sites that do it for the love of tech. These websites aren’t scammy, and are in fact very helpful.

    All you have to do is to visit their site and search for the app you want a reviews of. Take a look at the following sites:

    5. Appstore reviews

    App stores are the home of an app. Naturally, a user turns to the reviews and ratings mentioned below for a quick idea about the app.

    App stores try to make the app info look more appealing by adding small video tutorials about what the app will look like. What you should do is to make sure you read the developer history.

    Follow the developer’s website and make sure take a detailed survey. You can even reach them out individually.

    There is a small percentage of people who post fake reviews on all the app stores, turning a positive and pleasant experience into a haunting worry.

    All the developers have nightmares regarding them. This is why you, as a user, should always second check by reaching out to the developer.

    Apple keeps an eye out for fake reviews and so do Google and Windows, but until this evil is totally caged, do your research. Learn more about why you shouldn’t trust app store reviews.

    6. Appstore sites

    Apple, Google and Windows have dedicated sites to help app developers with queries. They have scheduled hours and an efficient customer service.

    Developers usually post an app they want the store to review. Later it will be put up on the app stores. You can check them out here:

    • Apple: Apple has a great section for reviewing apps. They will do it to check if the apps are free of harmful and offensive material. Some developers linked to Apple may invite you to use Test Flight – a platform made for pilot projects and research on upcoming apps.
    • Google: The great developer blog has all the info you need about app reviews, be it games or spreadsheets. There are professionals talking about stuff that can’t be wrong in any way. Go take a look at the blog.
    • Windows: You can visit windows central which is a highly interactive platform and fulfils all your needs. There are dedicated sections for all windows places and you can go check out trusted app reviews. Windows also launched a new app store platform for its current breed of desktops, and they require apps too now, so you can check out the best and the worst apps made for every device.

    7. Blogs

    By blogs it doesn’t mean the developer blogs, but the blogs coming out from common people with a flair for technology and apps.

    These are key influencers in the field and regularly review apps for the benefit of all.

    • You can check Guardian blogs which get contributions from popular bloggers.
    • The Apps World blog is also great, snf that will help you a lot in your selection process.
    • Do visit Apptamin which is a great guide for users and developers too.
    • Apps Blogger is also another blog of many that had great app reviews and stays relevant to the current app store trends.

    Gamers have their different universe in apps and YouTubers know that well. Be it interactive games like Big Barn World, Harvest Frenzy or fighting games like Grand Theft Auto.

    These reviewers cover all. Here is a list of some:

    • Touch Arcade: It is the oldest game app reviewing site.
    • iMore: It has been reviewing quality content since 2007.
    • 148Apps: It has a how to section, a price drop section and also dedicated sections for games.
    • Pocket Gamer: This UK-based site covers a wide spectrum of games on all platforms.

    Hopefully these places will help you out when you are desperate to look for a trusted review related to apps. Whatever source you follow, make sure you read up well and research on multiple platforms before downloading apps.

    About Erica Silva

    Erica Silva is a blogger by choice. She loves to discover the world around her. She likes to share her discoveries, experiences and express herself through her blogs.

    Find her on Twitter:@ericadsilva1

  • How to Save Vimeo Videos as MP3s Using Movavi Screen Capture

    How to Save Vimeo Videos as MP3s Using Movavi Screen Capture

    As one of the popular video sharing platforms, Vimeo definitely has quite a lot of great content published on it. However what often stands out about it compared to most of its rivals is the fact that unlike them it is possible to download and save videos – assuming you’re a subscriber and the video owner allows it.

    That being said if you wanted to save a Vimeo video as an MP3 (i.e. audio only), then you’d have to download and then convert it into an audio file using a file converter.

    Rather than having to sign up for an account, check the video’s privacy settings and then download and convert the video, it is actually a lot easier to just use Movavi Screen Capture to begin with as it will let you do all of that without half the hassle.

    By using Movavi Screen Capture to grab the Vimeo video directly from your screen, you won’t need to sign up and can save any video you want as an MP3 directly. To save Vimeo to MP3 just:

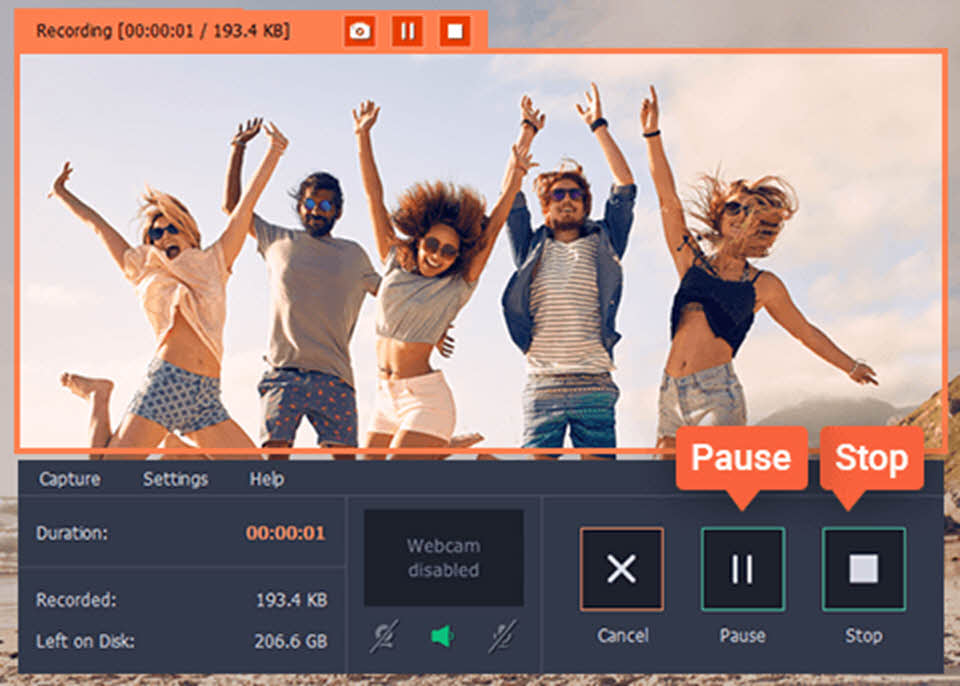
    1. Launch Movavi Screen Capture and select Record screen in the main menu.
    2. Set the capture frame as and how you please (it doesn’t matter since you will be saving it in an audio-only format).
    3. Check that the System Audio icon is highlighted (click it once if not) so that the audio from the Vimeo video is captured.
    4. Click REC and play the video at the same time.
    5. Click Stop when you want to stop the recording.
    6. Click Save as and select MP3 from the list of formats available then click Save.

    Of course if you want you could save the Vimeo video itself – just be sure that the capture frame is set up to record the area where it is playing, and select a video format (such as MP4) instead of MP3 when you’re saving it.

    Alternatively you could use the presets to automatically set up the optimal video format and settings for a specific device or platform.

    At the same time it would be worth your while to explore the other features in Movavi Screen Capture and use them to set the frame rate, capture keyboard and mouse actions, trim out unnecessary content, control the audio levels, and so on.

    All said and done it should be clear just how much more convenient it is to be able to grab any videos off Vimeo and save them as MP3s using Movavi Screen Capture directly.

    Once you try doing so for yourself, odds are you won’t want to use any other method because of how fast and easy it is.

  • Which Programming Languages are Best for an eCommerce Site?

    Which Programming Languages are Best for an eCommerce Site?

    There’s more than one way to build an eCommerce website. eCommerce websites are built on many different platforms, and through different programming languages on the backend.

    The programming language you choose has to be able to handle all the functions and aspects of your growing eCommerce store.

    If you are familiar with or interested in programming languages, you may wonder which language you should use to build your eCommerce website. There are many different languages to choose from, each with its own benefits and drawbacks.

    Keep in mind, you don’t have to code your entire website yourself. You’ll soon see why many entrepreneurs who are not familiar with code use an eCommerce builder to create their website instead. It’s simpler, easier, and helps you get on with building your business faster.

    However, if you have a dedicated programmer on staff, or aren’t too shabby writing code yourself, there are certainly benefits to programming your ecommerce website yourself; among them, ultimate customization and complete ownership of your process.

    So if you do decide to take the programming reigns yourself, consider the following languages that can help you do so.

    PHP

    PHP, or hypertext preprocessor, is one of the simplest server-side programming languages in existence. It’s fairly easy to learn php 5 online to get started. Plus, it was designed specifically for web development.

    WordPress is largely built with PHP, so you could definitely use it to create a blog, website, or eCommerce store.

    Ruby

    Ruby is a general purpose programming language. It’s concise, readable, and easy-to-learn. But don’t let its simplicity fool you! It’s a very powerful programming language.

    Many hosted eCommerce platforms are built with Ruby.

    Ruby on Rails is a popular web framework built using Ruby programming language. Ruby itself is most commonly used in Rails applications to create all kinds of things online.

    Python

    Python is a very popular general purpose programming language. You can create web pages, games, even a search engine using Python. Python is easy to read and easy-to-learn, especially for first-time coders.

    You can express your ideas with fewer lines of code. Plus, Python is allowed to run on various systems with fewer limitations.

    Django

    The Django web framework is built using Python programming language. It’s a free and open-source web framework touted as “the web framework for perfectionists with deadlines.”

    With Django, you can build better web apps quickly with less code. It could be a compromise for someone looking to code their own website, without having to reinvent the wheel.

    Java

    Java is used everywhere online. It’s a server-side programming language that powers large scale websites with a heavy traffic. It’s no wonder that Java is one of the top programming languages for eCommerce websites.

    Java is versatile, compatible, and functional for so many different applications. You can use Java to code software, apps, and websites. Plus, it works across devices!

    The easy way

    Here’s the question: do you really want to code an entire eCommerce website? Are you looking for a challenge? Do you want to flex your coding muscles? Or are you looking to build an eCommerce business?

    Some coders might enjoy the challenge of coding an eCommerce website, but for most business builders, there are easier ways to get an eCommerce store off the ground.

    You can certainly use a programming language to customize your website, but starting with a framework instead of from scratch can save you a load of headaches.

    Remember, there are no “best” programming languages. There are best programmers. Choose the programming language you know best or hire the best programmer you can.

    That is, if you’d like to build from scratch at all.

    However, the temptation to get down to business faster by opting for a hosted platform is always there.

    In the end only you’ll know your immediate and long-term goals, and weighing whether to go hosted or self-hosted for your eCommerce undertaking depends on it!

  • How to Backup Files on Windows 10

    How to Backup Files on Windows 10

    I have talked about how I automatically backup my files from my server, but one thing I have discussed is how I backup my files from my Windows 10 desktop.

    Most of my important files are stored on my server, but I do have some data files, like game related files, that I would like to backup in case the hard drives in my desktop crash or begin causes data corruption in my files.

    In keeping with my automatic backup policy, I wanted to have my Windows 10 desktop automatically backup my files to the server, which will then backup to Backblaze. With Windows 10, it is actually easy to do.

    The steps below explain how to backup files on Windows 10 automatically.

    1. Determine where you want to store the files. If you plan to backup the files to an external hard drive, then connect the hard drive into the Windows 10 computer. For network shares, you will need to setup the share on the machine that contains the share and set the permissions.
    2. On the Windows 10 computer, click the Start button and select Settings->Update & Security->Backup.
    3. Click the Add a drive option.
    4. Select either the external drive or a network path for your backups.

      Note:

      If you chose to use a network path to store your backups then you may be prompted to enter the user ID and password to use to connect to the network share. Check the remember checkbox to ensure the credentials are stored so they will always be used to connect to the share and your backups will work without any interruption.

    5. By default, the backups will run every hour and will keep the backups forever. If you you would like to change this, click the More options option.
    6. From the More options window you can change how often the backup is run, how long to keep the backups, additional folders to backup and which folders to exclude. Pay attention to which folders are being backed up and ensure that all folders you want to backup are included.
    7. From this point you can click the Back up now button or wait for the next scheduled backup.

    At this point your Windows 10 computer will now automatically backup your data to the location you specified, at the scheduled time you specified.

    As I mentioned earlier, I backup my files to my server, which will automatically make of a second copy of the files on a second external hard drive, and then backup to the cloud with Backblaze.

    Do you automatically backup your computer? If so, how do you do it?

  • 33 Tips for Selling Items on eBay

    33 Tips for Selling Items on eBay

    eBay provides all the tools necessary to sell or auction of items for either an individual or a business. While it has been around for many years, eBay still remains near the top for selling items on the Web.

    While it may seem like an item can sell pretty quickly on eBay, you will face some competition from others that may be selling the same or similar items. To help you sell your items quickly, and for the most money, here are 33 tips for selling items on eBay.
    33 Tips for Selling Items on eBay

    Listing the item

    1. Follow eBay’s rules on listings. eBay has rules for listings that you will need to follow. If you don’t adhere to the rules your may find your item removed from eBay or even your account being revoked.

    2. Use the right keywords in your listing. Keywords are the key to appearing in both eBay’s and the search engines’ search results. While you shouldn’t get too crazy with your listing title, ensure that you include the manufacturer, item type, size, and color in the description.

    3. Don’t use very large words. When describing the item, try to write at an 8th grade level to allow anyone to understand the item. If you use large, complex words that some may not know, you may lose potential customers.

    4. Do your reasearch. With the vast amount of information on the Internet it is important to understand exactly what your are selling and how much it is actually worth. While everyone wants to make money, but if you ask too much for an item then it may not sell. On the flip side, if you ask too little, then you are short-changing yourself.

    5. Take it as constructive criticism. When listing items on eBay, you will receive feedback – both positive and negative. The key is to take any feedback as constructive as possible. When you reply, be courteous and try to read between the lines of all the negativity and make changes to your listings, if possible.

    6. Be as honest as possible. While you may not enjoy adding details about any defects or flaws with your item, it is important to be as honest about the item to potential buyers. It may help to even include photos of the flaws to illustrate your point. This will help buyers understand exactly what they are buying, as well, as perhaps build up reputation for future purchases.

    7. Make your listing look professional. Take the time to ensure your listing looks as good as possible. This includes a clear, well-written description, and good photos. Treat your listing as a business – especially if your business relies on selling items on eBay – and get people to trust you.

    8. Choose optimal start and end times. According to statistics, most people will be buying on eBay in the evening hours, so it would be wise to start your auction at night. Also, ending your auction at night is also beneficial as that will be when most people will be bidding.

    9. Don’t inflate the shipping costs. I can’t tell you how many times I have seen cheap items that cost huge amounts to ship. Don’t list your items for cheap and expect to cover the costs with shipping. This is dishonest, and will get people to distrust you very quickly.

    10. Provide clear return policies. Regardless of the product, defects and issues will happen. Ensure that you clearly indicate any return policy, if applicable, in the listing so the bidder knows exactly what to expect if there is a problem with the product.

    11. Practice good customer service. The more you list on eBay the more questions or issues could come up. It is important to respond to any question from bidders’ in a timely and courteous manner. Also, if issues in the product do come up, ensure you honor the return policy that you have communicated in your listing.

    12. Accept PayPal as payment. While some people may be against using PayPal, when it comes to eBay almost everyone uses PayPal for sending and receiving money. PayPal adds more piece-of-mind to a buyer as they don’t need to worry about sending credit card information to the seller. Plus, using PayPal on eBay allows the buyer to pay for the item in only a few clicks.

    13. Encourage feedback from the buyer. eBay is built on reputation and having buyers record positive feedback will go a long way to establishing your eBay account as trustworthy. Trust is everything when selling items on eBay.

    Taking pictures of the item

    Taking pictures of the item

    14. Take the time for better photos. When taking photos of your items, don’t just pull out your smartphone and snap a photo. Take the time to properly display your item, and take the best photo possible. Buyers will usually view items that have better photos.

    15. Use fill-flash when possible. If you take photos of an item with direct, harsh light, such as outside, then turn on the flash on your camera to fill in the shadow areas. This will reduce the dark shadows and provide more details to your item.

    16. Use a digital camera. While smartphones have become popular cameras because of their convenience, a digital camera still provides the best way of taking photos. With digital cameras you can control pretty much all photograph settings, which gives you complete freedom over the final photo.

    17. Use a tripod. For the best photos possible, always use a tripod when taking pictures of your objects. This will ensure that the item will be sharp in the photo, helping to create the best photo possible.

    18. Use the lowest ISO setting. While a higher ISO setting allows you to take photos with less light, when it comes to the items you list on eBay, you want the best quality photo possible. A lower ISO setting will produce much less noise, better colors and sharper images. Since you should be using a tripod, using the lowest ISO setting on your camera is possible.

    19 Take photos of items against a plain background. When taking photos of the items, don’t use a busy or distracting background. For many small items, a simple white or black piece of cardboard will work really well in keepin the focus on the item.

    20. Zoom in on the item. If the item has intricate details, take close-up photos of the item to provide the buyer with a good view of the various detail. You may also want to take close-ups of any defects of the item to provide more information to the buyer so they have a better understanding of what you were describing in the listing.

    21. Adjust the white balance. For items that are color-specific, don’t just use the auto white balance on the camera as the colors of the item may not be accurate. It would be better to understand how to set the custom white balance on your camera to get the colors as accurate as possible.

    22. Learn how to take photos of your items. Tips can only go so far when it comes to taking photos, so learning and understanding how to take pictures is important. For those that are beginners, I recommend Scott Kelby’s Digital Photography Boxed Set. The books are written with beginner’s in mind so it is easy to understand and provides information on taking many different types of pictures.

    Shipping the item

    Shipping the item

    23. Ship the item quickly. It is important to reduce the amount of time for a bidder to receive the item. While you may not have total control over the item in transit, but you can ensure that you send the item out for delivery as quick as possible. Waiting a few days to ship an item can cause an item to be late for delivery if the bidder wants the item before a specific date.

    24. Have shipping supplies on hand. One way to help ship the item quickly is to have the shipping supplies available before the item is even sold. This ensures that you can package the item as quickly as possible and have it sent out for shipping.

    25. Take pride in your packaging. When packaging a product, ensure that you use good, strong packaging material to avoid anything from opening during transit. Package the item to ensure that it can’t easily move around and break while it is being shipped and then also provide a packing slip. You may want to even order custom shipping boxes to brand your boxes.

    26. Print out the shipping labels from home. eBay provides a convenient way to print out the shipping labels from home. In addition to the shipping label, eBay also allows you to print out the custom forms right at home.

    27 Provide insurance for valuable items. If the item you have sold is valuable, provide shipping insurance, if possible. This will give the buyer piece of mind that the item they just purchased is covered in case there is an issue during shipping.

    28. Provide tracking information. If at all possible, provide tracking information to the bidder so they can find out where their package is located and the possible date of the package arrival.

    29. Generate repeat business on eBay. Include a business card or a thank you note in the package to help remind the buyer where they bought the item and who shipped it quickly.

    30. Use delivery confirmation on the package. While you don’t like to think buyers are unscrupulous, but the reality is that there will be some buyers that are like that. By using delivery confirmation, you can be sure that the buyer has received the package to avoid the buyer claiming that they didn’t receive the package.

    31. Use signature confirmation for valuable items. For items that are more than $250 you should use signature confirmation, especially if the item was paid using PayPal. The reason for this is that the buyer can claim the item was never received and PayPal will reimburse the money to the buyer.

    32. Reuse packaging material. If you are an occasional eBay seller, and don’t have a business on eBay, you should save packaging material (boxes, bubble wrap, etc.) from online orders you receive online. This will save you some money and possible time where you don’t have to go out and buy packaging material.

    One final tip:

    33. Have fun! You should keep a positive attitude about selling items on eBay and enjoy the process. If you have fun selling items, and hopefully making money too, then it will show in how you list your items and reply to bidders and buyers.

  • How to Disable Audio Enhancements in Windows 10

    How to Disable Audio Enhancements in Windows 10

    Knowing how to disable audio enhancements in Windows 10 can become useful if the audio enhancements cause a spike in CPU usage – usually audiodg.exe causing high CPU usage in Windows 10. There could be a variety of reasons why, such as incompatible drivers, corrupted files, or you just don’t want Windows to apply its own enhancements to the audio.

    If you would like to disable the audio enhancements in Windows 10, you can use the following steps:

    Disable Audio Enhancements in Windows 10

    Disabling the audio enhancements in Windows 10 is very similar to Windows 7, so if you have done so in the past, then you should have no issue following these steps. If you haven’t you should still be able to easily follow the steps as it isn’t difficult to disable the audio enhancements.

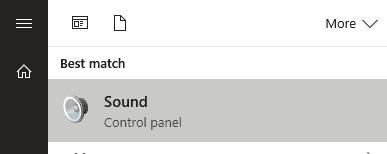
    1. Click the Windows 10 start button and then type Sound. Click the Sound option from the search results.
    2. The Windows 10 Sound Control Panel applet.
      The Windows 10 Sound Control Panel applet in the Search resuls.
    3. In the Playback tab, right-click the audio device you would like to disable the audio enhancements for, and then select Properties.
    4. Windows 10 Sound applet
      The Sound window in Windows 10 showing the installed audio devices.
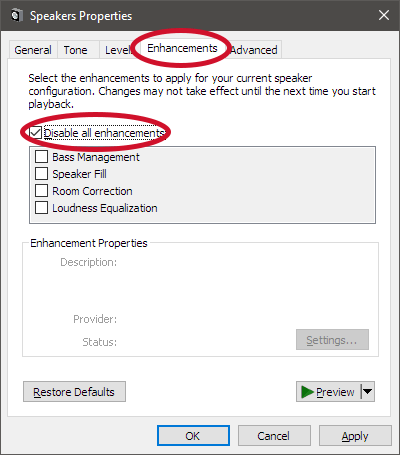
    5. Click on the Enhancements tab to display all the available audio enhancements
    6. Click the Disable all enhancements checkbox. The enhancements list should now become greyed out.
    7. Audio Enhancements Disabled in Windows 10
      All audio enhancements disabled for the audio device in Windows 10.
    8. Click the OK button to close the Properties window.
    9. You can use steps 2 – 5 for any other audio device you wish to disable audio enhancements for. When done, click the OK button to close the Sound window.

    If audiodg.exe in Windows 10 causing issues with Windows audio enhancements, using the above steps should help alleviate the issue until a solution is found. You can also just leave the enhancements disabled and use the enhancements that come with your audio device instead.