Blog

  • Designing Web Pages: Tables or CSS

    There is some debate recently about the best method to design and layout a Web page. Traditionally, HMTL tables have been used to handle the layout of a Web page. Today, however, a new layout method is gaining more popularity which uses CSS (Cascading Stylesheets).

    Which method is the best way of designing a Web page? I will explain both methods in this post and provide my own opinion. This post, however, won’t explain how to create the HTML files as I’ll save that for a future post.

    Using HTML Tables

    If you view the source of many Web pages on the Internet, you will probably see the entire layout of the page constructed using tables. Tables have been the main method of providing the layout of a Web page since they were first introduced. They make it easy to provide a header, footer, and content sections to a page.

    Recently, however, many Web designers have been declaring that tables should only be used to display tabular data. This makes sense as many applications, such as Excel and database GUIs have a structured table look. The Web designers also state that the look and feel of a Web page should be separated from the HTML Web page.

    The advantage to using tables is that they are easy to use. You define a table (<tabl>), then a row (<tr>) and finally a cell (<td>). You can span rows across columns and columns across rows to make cells larger. Formatting a table can be accomplished in the HTML code itself, or a CSS file.

    Another advantage to tables is that all browsers in use today support tables. This means that a visitor won’t get a mangled Web page when it is viewed in their browser.

    A disadvantage of using tables is they need to download the entire HTML first before they are rendered. This is because the browser can’t be sure how the table will look until the entire HTML can be rendered. As more people switch to broadband Internet, this will probably be a moot point.

    I have designed many Web pages using tables, and have had no problems. I have, however, started to design Web pages using the new method: straight CSS with no tables.

    Using CSS

    The second method of laying out a Web page is using pure CSS and not tables. This method has been gaining popularity, especially among the processional Web designers.

    So how exactly is CSS used to layout a Web page? The answer: through the use of division tags (<div>). These tags are used to divide your Web page into various sections. One large section will contain all the sub-sections, which is usually called the container. Within the container you may have header, footer, navigation and content sections. The look and positioning of these sections is defined by the CSS.

    The CSS as I mentioned earlier is an acronym for Cascading Stylesheets. These are text files placed on a Web server that are downloaded along with the HTML file. A CSS file contains definitions, known as styles, which provide the look and feel of your Web site. The best part about using CSS files is that you only need to change one file when you want to change the look of your entire site. For those that manage thousands of Web pages, this can be a huge time saver.

    One disadvantage to using CSS to layout your Web pages is that not all Web browsers support all the CSS style tags. Your Web pages may not display nicely to visitors on older Web browser. With each new version of a browser, this becomes more of a moot point.

    I currently use the CSS method for Technically Easy, which is also my first site designed in this manner.

    The Verdict

    I usually call the last section in my posts "Summary" but this time I think I’ll provide my verdict, or opinion. I have used both methods to design Web pages, and have seen the advantages and disadvantages to both.

    I decided to go with CSS for my new sites since that looks like the future of Web pages. I have accepted the risk that for many visitors on older browsers, the Web pages may not display correctly. I have also examined my Web site statistics and realized that for the most part my visitors are using newer browsers. I have tested my CSS site on IE 6.0+, Firefox 2.0+ and Opera 9.0+, and haven’t had any problems.

    If you are a beginner to Web page designing, I suggest you use tables since they are easier to work with. Once you become familiar with HTML and CSS, you can then try using CSS for the layout, if you choose. I do recommend, however, that you learn CSS quickly and apply that to your Web pages as it can make changing the look of your entire site easier.

    In the end, I don’t think it really matters which method you choose, as no one cares what your Web page source looks like. All that matters is that you Web pages display correctly.
  • AOL Users – Multiple IP Addresses

    A few days ago I was in a forum and someone mentioned that they noticed a discrepancy in their Web server logs. A visitor to their Web site was an AOL user, but they appeared to be making several requests from different IP addresses.

    If you are on dialup, you will probably get a different IP address each time you connect to your ISP, however, it won’t change as long as up don’t log off. How did the AOL user have multiple IP addresses even if they didn’t log off? I will explain that phenomenon in this post.

    AOL Proxy Servers

    Unlike regular dialup users, AOL users don’t get assigned an IP address that will show up in a Web server’s log file. This is because when an AOL user makes a request over the Internet; the request goes through what is known as a proxy server.

    A proxy server is a server that acts as an intermediary between a user and the Internet. This allows an enterprise to control security, caching and provide administrative support. The proxy server is the access point to the Internet from the internal network of an enterprise.

    How does this relate to AOL users? When a user connects to AOL, they receive an IP address from AOL. When they make a request to a Web site, the request is sent to the proxy server. The server then sends the request to the respective Web server. By this time the request has the IP address of the proxy server, and not of the AOL user.

    The Web server completes the request and sends the information back to the IP address of the proxy server. The proxy server then determines which user requested the data, and then forwards the information to the AOL user.

    If the AOL user makes another request, it can be sent to a different proxy server with a different IP address. The Web server will then receive a request from the same user, but this time the IP address will associated with the new proxy server. In this scenario, the AOL user has made two requests to the same Web server, but from two different IP addresses.

    Issues with AOL Proxy Servers

    There have been some issues related to the AOL proxy servers and AOL users. One issue is that Webmasters can’t get accurate data about their Web traffic. Usually, Web traffic data uses the IP address to determine unique users. If you get one user requesting data through multiple proxy servers, each with their own IP address, your Web data may indicate more users.

    Another issue has to do with the actual IP addresses themselves. Many times a Web site might prevent traffic from a specific IP address from accessing their site. If a Web site bans an IP address from one of the proxy servers, any requests by AOL users that are sent through that proxy server won’t be able to access the Web site. This has frustrated many AOL users in the past.

    Summary

    Since AOL uses proxy servers to connect their users to the Internet, you may see multiple IP address from a single user in your Web logs. Each request from an AOL user can come from a different IP address depending on which proxy server the request is sent through. Besides the skewed Web stats from the multiple IP addresses, AOL users can be frustrated if a Web site has banned any traffic from one of the proxy server’s IP address.

  • Overview of Various Image File Formats

    There are many different image file formats in use on Web pages today. Each file format has its advantages and disadvantages, and can be used for specific images. For those that use digital cameras you may be familiar with one format, while you may have heard of others.

    In this post I will provide an overview of the different formats including their advantages and disadvantages.

    (more…)

  • Network Glossary of Terms

    I have written several posts regarding networking your home computers to the Internet. With more and more people using broadband as their Internet connection, it is becoming more common to see home LANs to allow multiple computers to connect to one Internet connection. To setup a network, it is also important to understand some of the terminology used so you have a better understanding of what is involved in establishing a home LAN.

    In this post I will provide a glossary of networking terms (alphabetically) that you will see when creating a home network. This will be helpful when you configure your router but are unsure of a specific networking term.

    Networking Terminology

    AES – An acronym for Advanced Encryption Standard. A symmetric encryption algorithm used to protect data. This is aimed at replacing DES. It is one of the encryption options for a wireless network when WPA or WPA2 is used.

    DHCP – An acronym for Dynamic Host Configuration Protocol. This is a communications protocol that allows network administrators manage and automate the assignment of IP addresses through a network. Every time a device connects to the network with DHCP it can be assigned a different address.

    DNS – An acronym for Domain Name System. This is a system that translates the Internet domain names into their respective IP addresses. This information is usually stored in a database and a service will then lookup the IP address for a specific domain name. When an address is type in a Web browser, a DNS lookup is performed to find the actual IP address.

    Gateway – A network point that acts as the entrance to another network. The router acts as the gateway to your local network, when you access the Internet through the router.

    IP Address – Short name for Internet Protocol Address. This is a series of four numbers separated by dots, for example 192.168.1.1. Every computer connected to a network has its own unique IP address.

    LAN – An acronym for Local Area Network. This is a network that covers a small, local area such as a home or office. A LAN network can be configured to transfer data at a high rate of speed.

    SSID – An acronym for Service Set Identifier. A unique keyword of up to 32 characters (letters or numbers) that a wireless network card can connect to. For home users, this identifier can be set within a wireless router. This SSID of a wireless network can be broadcast to all computers within range of the signal to allow the computers to connect to the network.

    TKIP – An acronym for Temporal Key Integrity Protocol. A security protocol designed to replace WEP on wireless networks without replacing legacy hardware. If can select TKIP when you specify WPA within your wireless router.

    WAN – An acronym for Wide Area Network. Unlike a LAN, a WAN covers a much larger geographical area, and is usually comprised of one or more LANs.

    WEP – An acronym for Wired Equivalency Protocol. A security protocol that provides a minimal level of security for a wireless network. It has flaws that skilled hackers can exploit. Use WPA if both your router and computers of capable of using it.

    WPA – An acronym for Wi-Fi Protected Access. This is a replacement data encryption method that replaces the much weak WEP protocol. It is an improvement over WEP because it uses dynamic keys when encrypting the data. This is done by utilizing TKIP to encrypt the data.

  • Vista Power Saving Settings – Increase Laptop Battery Life

    In a previous articles titled Conserving Your Laptop Battery Power I listed several tips you can use to help conserve your laptop battery. The tips in that post can be applied not only Vista, but also previous versions of the Windows operating system.

    In this post, however, I will discuss a new utility within Vista to help you get even more time out of your laptop battery.

    (more…)

  • Securing the Linksys WRT54G Wireless-G Router

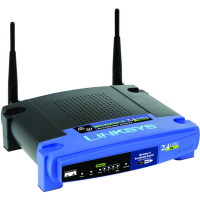
    Securing the Linksys WRT54G Wireless-G Router

    I discussed establishing good wireless network security in a post titled Securing a Wireless Network, but now I will discuss securing the Linksys WRT54G wireless-G router. I currently have a Linksys WRT54G Wireless-G router. When I work from home I use this router to connect to work through VPN, and have done it without any problems. It has made a great cable router for my broadband connection.

    The big issue with wireless networks is security. As anyone with a wireless network card within a few hundred feet of your router can connect to your router. To prevent this from happening, it is important to secure your router.

    Securing the Linksys WRT54G Wireless-G Router

    Note:

    If you need to reset your router back to the factory defaults, then please read How to Reset the Linksys WRT54G Wireless-G Router.

    To secure your Linksys WRT54G wireless router, follow these steps:

    1. Open your Internet browser and enter the following in the address bar: http://192.168.1.1.
    2. Note:

      If you have changed the IP address of your wireless router, enter that into the address bar. By default, the address is 192.168.1.1.

    3. Enter the user ID and password for your router. If you haven’t changed it, the default password is “admin”. We will change it later if you haven’t already changed it.
    4. You should now see the “Basic Setup” Web page display in your browser. Scroll down the page until you see “Maximum Number of DHCP Users”.
    5. This option will assign a specific number of IP address to computers. If more than this number of computers tries to connect to your router, they will not be able to.

    6. Count the number of computers that will connect to the router, and type it into the “Maximum Number of DHCP Users textbox”.
    7. Scroll down to the bottom of the Web page and click “Save Settings”. Once the settings have been saved, click “Continue” to return to the Web page.
    8. At the top of the Web page, click the “Administration” option in the menu bar.
    9. On the “Management” Web page, you should see two password text boxes. This is where you should change your administrative password. Type in a new secure password into both boxes. If you need help creating a secure password, please read Creating Secure Passwords.
    10. Once you have changed your password, click “Save Settings” at the bottom of the Web page.
    11. You may be prompted to login again, if you are then enter you new password in the password field.
    12. Navigate back to the “Management” Web page by clicking the “Administrative” option in the menu.
    13. We will now encrypt your connection to your router setup from your computer. To do this click the “HTTPS” checkbox next to the “Access Server” option.
    14. Once again, click the “Save Settings” button at the bottom of the Web page.
    15. You won’t get the settings saved page again because the URL in the address bar is not longer correct. Since you have changed your connection to HTTPS, it you need to specify that in the address when you connect to the router setup.

    16. In your browser, change the address to: https://192.168.1.1.
    17. If you get a security error, ignore the error and continue to the Web page.

    18. Login with your password and then click the “Wireless” menu option.
    19. Beside the “Wireless Network Name (SSID)” option, type in a name for you network connection.
    20. Click the “Save Settings” button and the “Continue” button to return to the “Basic Wireless Settings” page.
    21. Click the “Wireless Security” sub-menu option at the top of the page. This is where we will provide the most important security setting.
    22. Next to “Security Mode”, select “WPA – Personal” from the drop-down list. If you have trouble connecting to your wireless connection, you can try selecting “WEP”, but your connection will be much less secure. For more information about WEP and WPA please read Wireless Security: WEP and WPA.
    23. Next to “WPA Algorithms”, select “AES”. Once again if you have trouble connecting to your wireless router, select “TKIP”.
    24. Now you must get very creative. Specify a long “WPA Shared Key” with a mix of upper and lower case letters, numbers and punctuation. Once again, please read Creating Secure Passwords for tips on how to do this. In this case the longer the better.
    25. Make sure you write down this key somewhere, either on a piece of paper or in a text document on your computer. You will need this information when you connect to your wireless network.

    26. Click the “Save Settings” button at the bottom of the Web page, and then the “Continue” button.

    Now you are all done securing your wireless router and network. All you need to do is connect to your network, and enter your “WPA Shared Key” exactly as you specified it. I won’t go into detail on how to connect to your wireless network, as I will save that for another post.

    Wireless Router Security Connection Questions

    Question: How come we didn’t disable the SSID broadcast? Won’t that help with securing my wireless connection?

    Answer: It has been mentioned many times that disabling your SSID broadcast will help secure your network. The reality is that those who attempt to get into your wireless network will be able to easily pick up or SSID whether it is broadcasted or not.

    You may also have problems connecting to your wireless router if you disable the broadcasting of your SSID. I keep it enabled.

    Question: Why don’t you filter who connects to your wireless router using the MAC address by turning on MAC address filtering?

    Answer: This is another tip you may see on the Internet about securing your wireless network. There are a few problems with turning on the MAC address filtering.

    The first problem is that a hacker can easily spoof a MAC address, and therefore bypass the MAC filtering. The second is that you need to manage the MAC addresses of all network cards attempting to connect to your router. Since it really doesn’t provide a lot of security, it is just easier to keep it turned off.

    Question: Why do you specify to use WPA – Personal first, and not WEP?

    Answer: The reason is that WPA is much more secure than WEP, and therefore you should use that security mode over WEP. An experienced hacker can easily crack WEP encryption so it doesn’t provide as strong security as WPA. If you can’t use WPA, use WEP because it is still better than nothing.

    After following the steps, you should now be confident knowing that you have established a good wireless network security which provides a secure Internet connection through your Linksys WRT54G Wireless-G router.

  • Stop Programs from Running When Windows Starts

    One of the many complaints users have of Windows is the slow start times they may experience. Some of the time, the slow start time is due to the number of programs that are loaded when Windows starts up. These programs will sometimes create an icon in the system tray near the time in the lower right part of the screen. Others may load but give no indication that they are loaded, except when viewing the processes.

    There may also be times when one of the applications causes your system to crash. The reality is that most of those programs don’t need to start up, but are there to make your life easier. In this post I’ll explain several ways of preventing those programs from loading when Windows starts.

    (more…)

  • What is a Device Driver?

    You have probably connected several devices to your computer, a printer, scanner, or digital camera, and sometimes Windows would recognize the device without difficulty. Other times, however, the device was now recognized by Windows, and you couldn’t use the device.

    The reason Windows couldn’t recognize the device was because it didn’t have a device driver for it. This is required by all devices that are connected to your computer, both internal and external. In this post, I will describe what a device driver is, as well as what it does.

    Interacting with Hardware

    There are many types of hardware that you can connect to your computer. Hardware such as video or sound cards are connected directly to the motherboard inside of your case, while printers and scanners are connected externally into one of the ports. The problem is how does an operating system know how to talk to the hardware if it is all different. Answer: through the use of device drivers.

    A device driver, or just driver, is a computer program that allows software interact with hardware. Typically, the software that talks to the device driver is the operating system, such as Windows. Essentially, the driver is an instruction manual that provides information to the operating system on how to communicate and use the device.

    Installing Device Drivers

    If the operating system needs to use a driver to talk to a device, how is the driver installed? There are many ways a driver is installed.

    If the device you are connecting is older than the version of Windows, chances are that Windows already contains the necessary driver. Once you connect your device, then Windows will detect it and install the drivers automatically. You may be prompted to insert the Windows CD/DVD.

    Most devices also include a CD that includes such things as applications and manuals. Also on the CD are drivers for specific operating systems that you can install. These drivers should be installed if the operating system is older than the device. Since the device wasn’t around when the operating system was created, then it obviously wouldn’t have the drivers. Follow the instructions included with your device to install the drivers.

    You can also navigate to the vendor’s Web site of your device online and download any updated drivers. Once downloaded you just run the application and the drivers are installed.

    It is important to keep your device drivers updated as they may help fix any issues you may be having. Sometimes Windows Update will install an updated driver. You can also go to the vendor’s Web site and see if they have a new driver available for download.

    Summary

    Device drivers are used by the operating system to communicate with a piece of hardware. Anytime you install a new piece of hardware, you will also need to install the device driver associated with that hardware.

    There are many ways of installing the driver. The operating system can install the driver if it has one, install the driver from the CD that came with the device, or download the driver from the vendor’s Web site.