
Virtual Private Network, or a VPN server, is an Internet-based private network that is set up between several computers. With recent news that the NSA monitors a great deal of Internet-based communication, setting up a private network to give an extra layer of privacy between yourself and government agencies overstepping their bounds can’t hurt. A VPN might sound complicated to set up at first, but the advantages are well worth the effort you put into the server search and configuration.
Blog
-
Fix: My Keyboard Keys are Messed Up
Occasionally, I have been having a problem with my keyboard when in some applications. Sometimes as I am working in Firefox when I try to insert a punctuation symbol such as a double quote (“) another character – È – would be displayed on the screen. When I switched to another application the double quote would appear properly.
As this would happen on a frequent basis at times, I would get frustrated as I would need to restart Firefox to have the keys return to normal. I figured that this was a Firefox issue, so I didn’t look it up, but just restarted Firefox each time. When I finally researched the problem I found that it was related to Windows and the language settings within Windows.
Correcting the Messed Up Keys
If you have found a similar problem of punctuation keys not displaying the correct symbol on the screen, you have probably pressed the shortcut keys to switch between input languages or keyboard layout. This is easy to do as the shortcut keys are close to each other on the keyboard:
Switch Input Language: CTRL + SHIFT
Switch Keyboard Layout: LEFT ALT + SHIFT
If you don’t want to use either a different input keyboard or keyboard layout you can disable the shortcuts by using the following steps:
Note:
The steps below are for Windows 7. While I haven’t tried the steps on Windows Vista or Windows 8, they may be the same, if applicable, for those versions, as well.
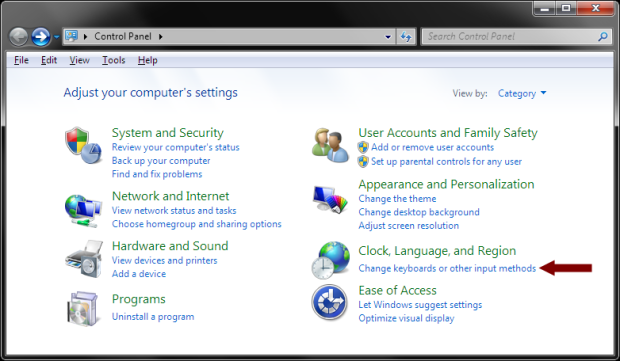
- Click the Windows orb in the lower-left corner to display the menu and the select “Control Panel” from the menu.
- In the “Control Panel”, click the “Change keyboards or other input methods” option under the “Clock, Language, and Region” section.
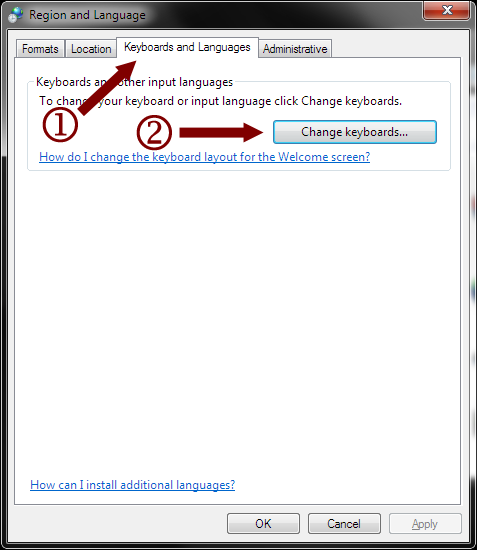
- Under the “Keyboards and Languages” tab, click the “Change keyboards…” button.
- Select the “Between input languages” option in the “Hot keys for input languages” list and then click the “Change Key Sequence…” button.
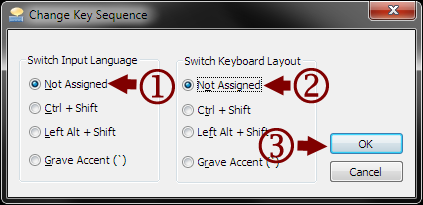
- For both “Switch Input Language” and “Switch Keyboard Layout” select the “Not Assigned” option. Click the “OK” button to save your choice.
- The value “(None)” should be displayed under “Key sequence” beside the “Between input languages” option. Click “OK” again to save your choice and close the window.

Once you have performed the above steps you should no longer be able to switch languages or keyboard layouts accidentally within an application.
-
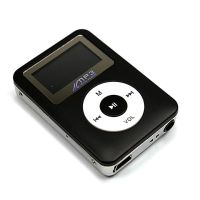
Tmart 8GB Simple MP3 Player Review
I remember way back in the 1990s when MP3 files first started to become popular. Computers back then didn’t have large hard drives, and external drives weren’t as readily available as they are today. Playing music on compact discs was the best way to listen to music. When the MP3 file started to become popular people gravitated to that format because you can easily have good quality music using a fraction of the storage space of a CD.
When Apple released their iPod music player and iTunes, MP3 files really took off, and soon portable music was easier than ever to enjoy. While the iPods are still popular today, some may not want to spend so much for a music player, and may be looking for a much more affordable option. This is where something like the 8GB Black Simple Fashionable Exterior Plump MP3 Player could fill the needs of some.
-

Outrun 2 Arcade Machine
Through life we are offered a wealth of different investment opportunities; a new boiler, 3D television, overseas property or even in the form of having a child. Investments can be damaging to the wallet, so one must always choose wisely in order to not be financially broken.
However, when a person sees this awe-inspiring Outrun 2 machine retailing at nearly £68,000 – they simply weigh up their possible investments, turn to their partner and state ‘We don’t really need a kid anyway…do we?’.
The Outrun franchise is perhaps one of the most well-known arcade racing games there ever was. Owning this machine is a statement of both your past as a youngster pumping his last twenty pence coins into the original game and as the present man who can afford such a grandiose machine for his own home.
-

Guidelines for Working with a Professional Copywriter
Professional copywriting services can be a very vital asset for any business. A good copywriter has the capacity to create great copy which will boost the sales of your products and services. Once you have identified such an individual, you need to handle them well so as to build a long-term, mutually beneficial relationship. Here are some guidelines for dealing with a professional copywriter.
-

BYOD Rules, Network Security & Your Business
The integration of sophisticated interfaces in modern devices has made it difficult to draw a line between personal and business usage. Nearly a decade back, it was fairly easy to differentiate between data/software/applications targeted or being used at an enterprise level and those at a personal scale.
The data that is being circulated around can be classified as business and non-business. Each has its own specific attributes with respect to sharing and security management. For instance, under no circumstance would you want enterprise data (account information, client detail, etc.) to be circulated freely.
-
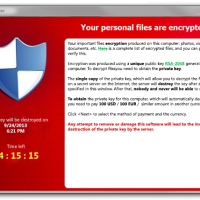
CryptoLocker – Holding Your Computer for Ransom
In September 2013 a new type of malware was discovered to be making the rounds in computers running Microsoft Windows. This new malware is not really a virus because it typically requires a user to open an infected e-mail. What makes this malware particularly dangerous is what it does once it infects your computer – it holds your files for ransom.
This may sound funny at first, but this type of malware – called ransomware – is very serious. The malware that was recently discovered is called CryptoLocker, and has begun causing pain for many users around the world.
Money for Your Data
In case you haven’t heard about ransomware, it is malware that infects your computer and then restricts access to your computer. Once the restrictions are in place, the malware will then request a ransom to remove the restrictions. If the ransom is paid, the restrictions are removed.
With CryptoLocker, the restrict is access to your data files. When CryptoLocker infects your computer it will then silently begin encrypting your local data files without you even knowing your files are being encrypted. While you may have an anti-virus product installed, it may not detect CryptoLocker, or it may detect the malware once files have been encrypted.
When CryptoLocker encrypts files on your computer, it uses what is called a public key, which it obtains by connecting to a command-and-control server online. In order to decrypt the data, a private key is needed, which is stored on a command-and-control server. The private key is, therefore, never stored locally, so you can’t decrypt the data yourself. Decrypting the data yourself is impossible without the private key.
Once your data is encrypted, you are presented with a message to send a specified amount of money to remove the encryption. The amount of money is about $100 USD or $300 USD. The payment is to be made through MoneyPak, Ukash, cashU or Bitcoin. After a specific time without payment, the key that is used to decrypt your data is destroyed and your data can’t be decrypted.
What files does CryptoLocker encrypt? Files with these extensions 3fr, accdb, ai, arw, bay, cdr, cer, cr2, crt, crw, dbf, dcr, der, dng, doc, docm, docx, dwg, dxf, dxg, eps, erf, indd, ????????.jpg, ????????.jpe, img_*.jpg, kdc, mdb, mdf, mef, mrw, nef, nrw, odb, odc, odm, odp, ods, odt, orf, p12, p7b, p7c, pdd, pdf, pef, pem, pfx, ppt, pptm, pptx, psd, pst, ptx, r3d, raf, raw, rtf, rw2, rwl, sr2, srf, srw, tif, wb2, wpd, wps, x3f, xlk, xls, xlsb, xlsm, and xlsx. This is a long list is contains most common data files that everyone uses.
Not only can the data files on your local, internal hard drive be encrypted, but it has also been reported that files on attached external hard drives and network drives can also be encrypted.
Protecting Yourself From CryptoLocker
The best defense, as it is with most malware, is to ensure you don’t open strange e-mail messages. With CryptoLocker, it is send through well-crafted e-mail messages.
The e-mail messages may inform you about a customer support-related issue, or perhaps a message from a courier company, such as Fedex, UPS, etc. The e-mail messages will include a ZIP attachment that contains the CryptoLocker program. The program itself is disguised as a PDF File – including the PDF icon – but has a name like FORM_101513.pdf.exe.
As I mentioned above, if you don’t recognize the e-mail, or it doesn’t make any sense to you, just delete the e-mail without opening it.
Also, you should ensure that you always backup your data. I recommend you use Backblaze (I use them) to backup your files. If CyrptoLocker, or other malware, destroys your files, then you can always restore them with Backblaze.
-

How to Backup Your Files for Years to Come
It is amazing how fast life can go by sometimes. I was recently looking at some of my digital photos and realized that I have over 28,000 digital photos saved since 2002. That was the year I bought my first digital camera. Back then I didn’t realize how many I would actually accumulate, but after starting a family since that time, the number of photos has grown exponentially.
Photos aren’t something that I can recreate, which means that if I lose one, it is lost forever. If you are like me and have kids, losing photos is probably something you hope will never happen – because you can’t retake the picture. As I was going through my photos I am always glad that I have a good backup process in place that allows me to enjoy the same photos 11 years after they were taken. Having a backup process is the reason that I know I can view these photos 11 years into the future and beyond.