Tag: USB

  • Top 4 Issues with Peripherals You Can Come Across

    Top 4 Issues with Peripherals You Can Come Across

    You may be fully satisfied with your flawlessly working Mac until some unexpected, unexplainable issues pop up. One of the most frequent causes of concern is the trouble with peripherals. Such problems may reveal themselves differently, ranging from a dead USB port to non-detected Bluetooth headphones. Any connectivity problem like this can be quickly addressed with the help of DIY means, which we disclose in this article to help you manage minor Mac issues without engaging costly repair services.

    Unresponsive USB

    The simplest answer to a question of failing USB connection is the malfunctioning of the device itself. It often happens that low-quality, cheap USB devices fail all of a sudden, so your Mac is not to blame for the absent connection. So, it would be best if you double-checked whether the USB flash drive works well or whether the cable you’re using is in working condition before suspecting any Mac problems.

    If the peripherals are in good working condition (and are compatible with your Mac’s settings), it’s time to suspect internal issues. To clarify the reason for the failing operation, you need to reset the Mac SMC or the device’s NVRAM/PRAM. These two core features of your iOS are responsible for the fundamental properties of the system’s functioning, so by returning to the default settings, you can quickly get your Mac’s USB functionality back to order.

    Bluetooth headphones

    Bluetooth headphones are a great invention improving the user experiences, but once something goes wrong, you may find it a bit harder to get things straight. First, you need to check whether your headphones are sufficiently charged and operate without failure. It’s also vital that their discoverable mode is turned on.

    If the headphones are double-checked but still don’t appear in the list of connected devices, it’s time to reboot your Bluetooth on a Mac. Turn the function off and on, trying to reconnect the headphones again.

    If none of the methods mentioned above works, it’s time to restart your Mac entirely. Turn your Bluetooth function on, remove some Bluetooth devices from the list (if you’re currently using too many), and restart the computer once again. Additional measures may include finding and disabling interfering apps and looking for the Apple updates for your iOS, which may revive the Bluetooth function.

    Managing several devices

    Once you see that the USB port stopped working and you have several peripherals turned on simultaneously, it’s better to turn all devices except for the tested one off. Once this is done, you’ll see much clearer whether the problem is in the USB port of your Mac or some other intervening device, such as a USB concentrator.

    Dead USB-C port

    The latest generation of Macs has only USB-C ports to ensure your device’s connectivity with peripherals, so it’s vital to ensure that they work at all times. Otherwise, you might lose a significant portion of your gadget’s functionality. Once you notice that your USB-C port has stopped working correctly, you need to restart your Mac to revive its performance and get rid of some cumbersome processes that drag its CPU and harm its core features.

    After the “shock” of the abrupt shutdown and reboot, the USB-C port is naturally expected to start working again (if it was some minor technical glitch). If it doesn’t, you can take more advanced measures, such as resetting your SMC responsible for the core functions of the battery, fans, and ports. An SMC reboot can revive these functions and get your Mac back to normal functioning.

    As you can see, Mac users often come across some problems with peripherals, which may be quickly resolved with simple troubleshooting. No need to rush to a local repair service; you can rectify your Mac’s performance on your own.

  • Fix: Prevent Hard Drives from Going to Sleep in Windows 10

    Fix: Prevent Hard Drives from Going to Sleep in Windows 10

    After recently upgrading my Plex Windows 10 machine, I had an issue where I couldn’t prevent hard drives from going to sleep on that system. After the system restarted, a few hours later I would get an email from Stablebit Scanner indicating that one or more of my drives were no longer connected.

    With the exception of the system drive, all other drives connected to the system were USB-connected external hard drives. I couldn’t connect to the drives, and the lights on the drive casing indicated that they were in sleep mode.

    I hadn’t experienced anything like this since I setup the system over one year ago. After some investigation I found out that there are actually several settings, in two locations, in Windows 10 that I needed to change in order to prevent the hard drives from going to sleep.

    I detail the steps below.

    Changing the power plan

    The first setting I had to change was the USB suspend setting in the Windows 10 power options. This does require an administrator to change, but you will be prompted to enter the administrator password if you are logged in as a standard user.

    1. Click Start->Settings->System->Power & Sleep to display the options to change the power and sleep settings.
    2. Click the Additional power settings link under Related power settings. The Power Options window will appear.
    3. From this window, Click the Change plan settings link beside the power plan you wish to change.
    4. From the power plan window, click the Change settings that are currently unavailable link, and enter the administrator password when prompted.
    5. Click the Change advanced power settings link to display all the power options for the plan.
    6. From the power plan window, click the Change settings that are currently unavailable link, and enter the administrator password when prompted.
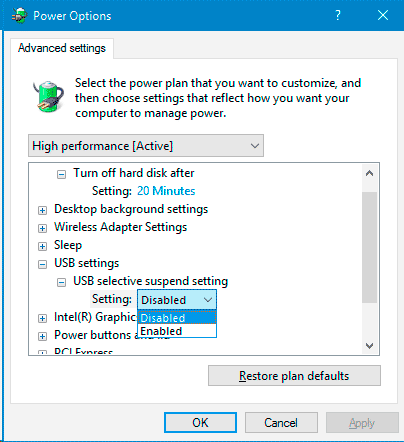
    7. Expand the USB settings and then the USB selective suspend setting option.
    8. Change the Setting value to Disabled.
    9. Power Options - USB Setting
      Disabling the suspend setting in the Power Options for Windows 10.

    USB controller device settings

    While I thought changing the USB suspend option would solve my problem, the USB-connected hard drives still were put to sleep by Windows 10. At this point, I decided that there must be another setting that caused this problem. After a bit more research online, I did find something that led me to the setting that solved the issue – disabling the ability for Windows 10 to turn off the device from the USB controller settings.

    To make these changes, you can use the following steps:

    1. Click Start and then type computer management. When Computer Management appears in the search results, right-click it and then select Run as administrator.
    2. Enter the administrator password and click the Yes button to open the Computer Management window.
    3. In that window, click Device Manager to display a list of all the devices installed on your system, organized in various categories.
    4. From the list of categories on the right, click the Universal Serial Bus controllers category to display all the devices in that category.
    5. Right-click each item in the list, and the select Properties from the context menu that appears. A properties dialog will appear.
    6. If the properties windows contains a Power management tab, then click that tab. If it doesn’t, then close the window and repeat the previous step for the next device in the list.
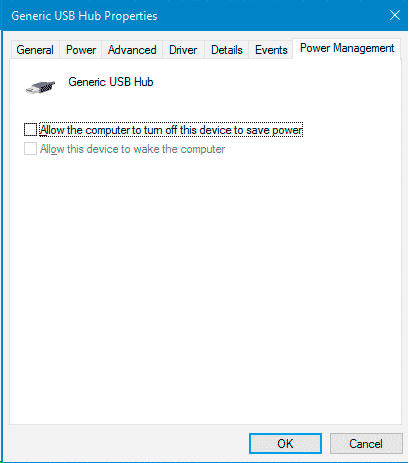
    7. In the Power management tab, uncheck the Allow the computer to turn off this device to save power option.
    8. USB Hub Power Management Properties
      The USB Hub power management properties with turn off device option turned off.
    9. Click the OK button to save the changes.
    10. Repeat steps 5 to 8 for each device under the Universal Serial Bus controllers category.

    With these two settings set to prevent hard drives from going to sleep in Window 10, you shouldn’t have an issue with any USB-connected hard drives from being disconnected.