Blog

  • 5 Video Camera Filters and When to Use Them

    5 Video Camera Filters and When to Use Them

    Most people don’t realize that shooting a video isn’t as easy as writing a script and having it acted out. A lot of thought goes into video angle, filters, lighting, and more. Video camera filters are an essential tool needed to make people and scenery look good in videos. Here are five you need to own, and when to use them.

    1. Ultraviolet (UV) Filters

    UV filters remove UV light from the sun, but leave visible light alone. Videos are a lot more sensitive to UV light than the human eye. Without a UV filter, videos can appear blue tinged or washed out. Most of the time, you can add a UV filter as a protective film on your lens and use other filters along with it.

    When to use it: When you are filming outdoors and there is a lot of sunlight. A sign that you need a UV filter is when all of your actors are squinting.

    2. Polarizing Filters

    Polarizing filters are similar to UV filters. They remove polarized light, which is uneven lighting caused by reflected light from the sun or other sources. With a polarizing filter, you get more saturated and vibrant colors in your videos. Typically, polarizing filters mount with a rotational adjustment to account for the angle of reflecting light.

    When to use it: When faces appear uneven because of reflected light. Many photographers opt to always using a polarizing lens because of the effect on color saturation.

    3. Neutral Density Filters

    ND filters reduce hazy backgrounds created by the sun and other harsh sources of light. Essentially, they absorb light throughout the color spectrum to allow for more controlled lighting. The camera person can decide how much light to allow, based on the ND filter chosen.

    When to use it: Anytime you have harsh lighting, such as outside in the middle of the day. Sometimes you need ND filters indoors when there are fluorescent lights or uneven lighting.

    4. Diffusion Filters

    Diffusion filters create a slightly blurred effect that can give faces a glow and remove wrinkles. You can use stronger diffusion filters to create a dream effect, too. Most of the time you won’t be using a diffusion filter, but it is good for certain effects.

    When to use it: When you’re filming people and you want them to look younger and brighter.

    5. Sepia Filters

    Sepia filters change the color temperature of your video to a hazy, sepia tone. You can also get other color filters. For instance, an orange filter.

    When to use it: When you want to depict historical scenes or flashbacks.

    There are all sorts of other specialty filters you can buy, such as a star effect, fog, or various color corrections. You can even buy camera filters that graduated from one side to the other. However, the ones in this article are a great place to start if you are producing a video for the first time. Make sure to at least try an ND filter. Good luck with your video production!

  • How I do More with My Plex Media Server by Keeping it Simple

    How I do More with My Plex Media Server by Keeping it Simple

    When I was looking at setting up my Plex Media Server, the one thing that I really wanted to make sure was that I kept the entire setup simple. I wanted to set up and manage a server that could stream media files to my devices, and not much beyond that idea. This meant I didn’t need a high-end and powerful computer to accomplish the goal, but I did have to make sure the system could handle at least three media transcoding operations at a time.

    Once I had settled on the server, installed the operating system (Windows 10 Pro) the next thing I did was to decide how I wanted to set up my Plex media files. I also had some other services running on my desktop that I figured I could have my server manage, such as my regular data file management and backup. At this point I decided to look at how best to use the server to manage as much of my files as possible, while at the same time automating as many processes as possible.

    I began to think about some ideas.

    My Plex Media Server Ideas

    I was running the Plex media server from my main desktop for a year before investing in the dedicated server. All my Plex media files were stored on a Western Digital Duo 8TB external drives connected to my desktop through USB 3.0, which I wanted to keep as is.

    The Western Digital Duo external connection does contain to Western Digital Red drives, and one drive was a mirror of the other. For the mirroring, I wanted this to be more automatic, but without the use of RAID 1. On top of the automatic mirroring, I also wanted to see if I could also monitor the health of my Plex media drives so I can take action if one of the drives was having issues.

    Since my Plex usage wasn’t great, the amount of idle time on the server would be quite substantial. This go me thinking about also use the server to manage my data files, which were stored on a Western Digital My Book external hard drive, connected via USB 2.0 (my desktop only supports USB 2.0). I figured with the always on option of the server, and the USB 3.0 interface, I could move my data files external hard drive to the server as well.

    The added benefit of moving my data files external hard drive to the server is I could also monitor that drive as well to make sure that there are no issues with the drive. Between the data files external hard drive and the Plex media hard drives, the data files external hard drive is more important as it has files I can’t recreate, such as family photos and personal videos.

    To better protect my data files, I could add a second external hard drive, and mirror the current data files external to the new drive. I could also transfer my Backblaze account to the server from my desktop so my data files can always be backed up since the server is always on.

    I will continue to edit my photos on my desktop, but I will set up shares on the server that will allow me to map to the photos from the desktop for editing. This will also provide more protection for my data files from such threats as ransomware or other malware that can cause me to lose my database. I will talk more about how I handle this in another post.

    With all my ideas for my new server, it was time for me to put it into action.

    The Plex Media Server Setup

    To help understand what I would like with my Plex Media Server, here is a quick summary:

    • My Plex media files on my Western Digital Duo external drives to be mirrored automatically.
    • My personal data files on my Western Digital My Book external drive to be mirrored to a second external hard drive.
    • My personal data files to be automatically backed up to Backblaze.
    • All hard drives in my server to me monitored to make sure there are no issues.

    The good news is that all the above points can be managed with very little hardware, software, and with minimal setup. To accomplish my goal, I would need the following:

    Western Digital Duo 8TB
    This as an external enclosure that has two 4TB Western Digital Red drives. I bought this about a year ago to store my Plex media files, and I just needed to connect it to my server.
    Western Digital My Book 3TB
    I bought this drive when the 2TB Western Digital external drive that contain my data files showed signs of failing – bad sectors. That drive was over 5 years old, so it was time to replace the drive with a newer model.
    Western Digital My Book 3TB #2
    This external drive I had just bought a few days ago so I could create a mirror of the first 3TB external hard drive – the drive that has my data files.
    Stablebit DrivePool
    This is the software that is going to duplicate both my Plex media files and my data files to the correct drives automatically. Stablebit DrivePool easily combines the disk space from both external hard drives into a single drive.
    Stablebit Scanner
    Software that will easily allow me to monitor all my hard drives, and integrates effortlessly with DrivePool. Stablebit Scanner will also notify me, via email, if there are any issues with a hard drive.
    Backblaze
    My unlimited online cloud backup solution. This software runs as a service and will continuously monitor my data files for changes and then automatically upload the changes to the Backblaze cloud service.

    Before getting into the details of how it all will come together, let me show you how it will be setup with a diagram:
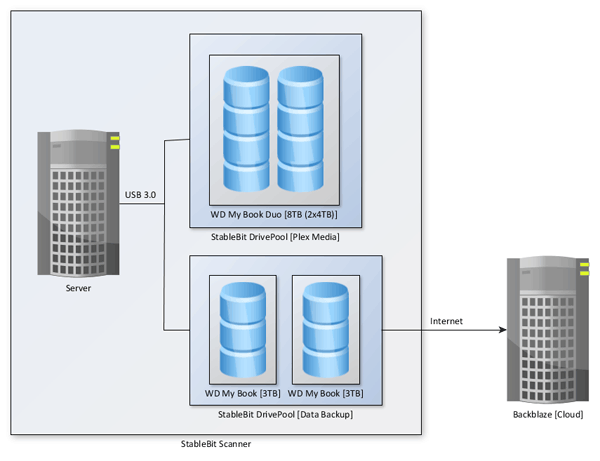
    My Backup and Plex Server

    The Plex Media Setup

    The main reason I setup the server was to host and stream my Plex media files, so I will start with the Plex media storage idea of the server. The diagram below shows what is involved with setting up my Plex media on my server.
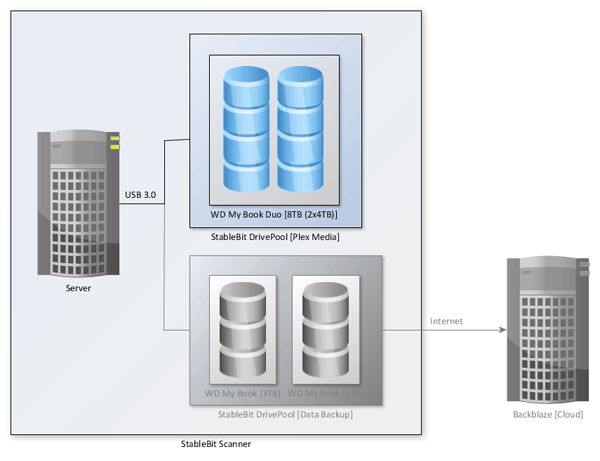
    My Server - Plex Media Storage

    All my Plex media files are stored on my Western Digital Duo external device. This device is considered a DAS (direct-attached storage), because it connects directly to my server through a USB 3.0 port instead of over the network. The device includes two Western Digital Red drives (4TB each), which I setup as JBOD (Just a Bunch of Disks). Setting up the drives in this way allows me to manage the storage setup of the disks using DrivePool

    I create a single drive pool for my Plex media files from within DrivePool and added both hard drives from the DAS to the pool. This produced a pool of 8TB in storage size. After the pool was created, I enabled duplication in DrivePool so that each file stored on one of the drives would be automatically copied to the other drive. This essentially halves the amount of storage space in the pool because each file is stored twice.

    If one of the two hard drives in my DAS was to fail, I wouldn’t lose all of my media since all files are duplicated on the other drive. It is, of course, possible for both drives to fail at the same time since they share the same DAS unit, and in such a situation I would rebuild my media libraries. I don’t consider my Blu-ray, DVD, and CD libraries to be critical enough to have a full backup solution as I do my personal data files.

    The Data Files Setup

    The most important data I have has always been stored on an external hard drive, but it was connected to my desktop . I would turn off the external hard drive when I didn’t need to get access to my data, but it would sometime annoy my wife because she couldn’t easily access digital photos. To make life easier for me, and her, I decided to connect the external hard drive that has my personal data files to the server so it can be accessed at any time.

    The diagram below shows how my data files are connected to the Plex server.
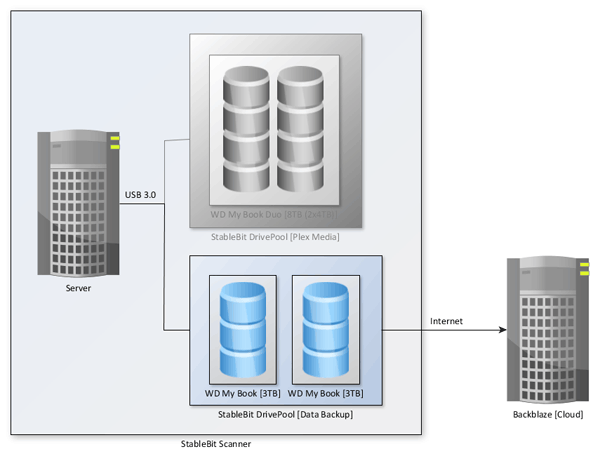
    My Server - Data Backup Storage

    After seeing how easy it was to set up and manage a drive pool for my Plex media files, I figured it would be a great option for my personal data files. I have always made multiple copies of those files, but having multiple local copies was something that I didn’t have. I purchased a second Western Digital external hard drive to contain the copies of my data files.

    My data files setup is very similar to my Plex media files, with the exception of using two external hard drives instead of a single DAS device. I create a second drive pool (the first being my Plex media), and then added the two external hard drives to the pool. Because the second external drive was new, and didn’t contain any of my data files, DrivePool took some time to copy over the files from the first drive onto the second drive after I setup file duplication.

    In addition to the two local copies, I also have an offsite, cloud copy of my files stored with Backblaze. I have had this setup on my desktop for many years, and I wanted to transfer it to my server so my data files can continue to be backed up online.

    I followed the instructions on the Backblaze website about moving my account information to the server, changed the drive in the software to point to the new DrivePool drive and then Backblaze went to work verifying that all files were backed up. After Backblaze quickly went through the list of files in the drive pool, it indicated that all files were backed up and everything was good again.

    The result of the above setup is that when I add or change a data file in the drive pool, the file will automatically be duplicated to the second hard drive by DrivePool and then automatically be backed up to the cloud by Backblaze. This means two copies of the file are automatically created without any work outside of adding or modifying the original file.

    Monitoring the Hard Drives

    The one aspect of managing my data that I had neglected in the past is to actively monitor the hard drives where my data was stored. When I setup my Plex Media server, I wanted to make sure that I also enabled monitoring so I can be more proactive of replacing hard drives that were about to fail. I was lucky with my previous external hard drive as it had just begun to fail and I was able to copy off all of my data. I didn’t want to take the chance again.

    For monitoring I installed another Stablebit application called Drive Scanner.

    Once I installed Drive Scanner on my server it immediately detected all the hard drives – both internal and external – that were connected to my server. The application began reading the S.M.A.R.T data for each drive and alerting me if there were any issues.

    Note:

    The S.M.A.R.T. data from my Western Digital external hard drives (not my Western Digital Duo) could not be read and reported by the Drive Scanner application. I had to change the partition of the external hard drives from MBR to GPT for Drive Scanner to read and report the S.M.A.R.T. data from the two external hard drives.

    The most common issue I have at the moment is the drive temperatures getting high because of all the copying, especially my data files drive when DrivePool was duplicating the data from one drive to another. When any issue happens, I receive an email from Drive Scanner that describes the issue.

    While duplicating files with DrivePool can cause the Drive Scanner to issue heat warnings, the best part of the two applications is that DrivePool will start to throttle the duplication process to help reduce the heat. The two applications work together to make sure that your drives are running without any issue. The integration between the applications is seamless and only requires both to be installed on the same system.

    In addition to the S.M.A.R.T. monitoring, Drive Scanner will also check the disks for any issues. The disk scan is set on a monthly schedule and you can see the results directly in Drive Scanner. If needed, I can also start the scan manually. If a drive once again reaches a heat warning, the scanning process will throttle in an attempt to reduce the heat. I usually only scan my drives overnight when there is very little IO on the drives.

    My Plex Media and Backup Server

    By utilizing my Western Digital Duo, two external hard drives, Stablebit DrivePool, Stablebit Drive Scanner, and Backblaze, I now have a server that can stream all my media to any device I own, as well as automatically duplicate my personal data files locally and offsite in the cloud.

    The best part is that this server is running headless (no monitor), and without any user logged in so even if Windows does reboot, such as after an update, I don’t have to remember to go and log in as everything will automatically run without any problems.

  • Create Your Personal Health Record and Take Charge of Your Health

    Create Your Personal Health Record and Take Charge of Your Health

    It’s not always easy to manage your own healthcare or that of a loved one. Between doctors’ appointments, lab and test results, and keeping track of prescription medications new and old, caring for your own health or that of a loved one can become overwhelming. But, just as technology is making all other aspects of our modern lives easier, it’s making this aspect of our lives easier too.

    EHealth software can make juggling your healthcare responsibilities easier by helping you establish and maintain a personal health record (PHR). With the help of software or an app, you can create a detailed record of your own or a loved one’s health information that will allow you, and others involved in yours or your loved one’s care, to access the information they need when they need it, quickly and easily. Your PHR can become a valuable tool to help you maintain control over your own healthcare decisions, or those of a loved one who depends on you.

    Simplify Your Medical Records

    The biggest advantage of establishing a PHR is that it puts all of your medical records and crucial information in one place and in one easily navigable format. Instead of flipping through pages and pages of medical information written out the old-fashioned way, you’ll be able to quickly search through your medical history to find the information you need. Your PHR will serve as a complement to the medical records your providers are already maintaining about you. It will let you easily share your medical information with family members and caregivers who need it.

    EHealth apps and software platforms often make things simpler and easier to manage by automatically backing up information to a secure cloud-based storage system, so that you don’t have to worry about losing your information. With one of these cloud-based systems, you or a designated advocate will be able to retrieve your information from any device.

    Build Your PHR

    Some people choose to maintain a PHR in an Excel spreadsheet or Word document that can be digitally stored and shared on a USB drive. However, these documents can become unwieldy, especially as your medical information becomes more expansive. A better option is to choose one of the many home healthcare software options available. A software program or app designed to help you create a PHR may allow you to compile information that you may want your healthcare providers to have access to, such as data about your sleep patterns or exercise habits, use of vitamins or over-the-counter medications, or family medical history.

    These software platforms typically include tools to help you enter and update health information, monitor use of medications, and even track test results, insurance payments, and more. Many programs and apps include a Web portal that could allow you to contact your doctor with questions, schedule appointments, or refill prescriptions.

    Help a Loved One

    If you’re caring for a loved one, a PHR can be invaluable for helping you keep track of that person’s needs. It’s hard enough staying on top of your own care needs sometimes, not to mention keeping another person’s allergies, medication schedules, emergency contact information, and medical history straight.

    A PHR allows you to keep track of an elderly parent’s or child’s medical information so that you can make sure he or she gets the medication he or she needs at the right times, makes it to his or her doctors’ appointments, and avoids potentially deadly allergens and other hazards. Some other common features might allow you to track blood pressure or blood glucose levels, access immunization records, and provide identifying information to make sure that home caregivers or emergency personnel who need to use the PHR are accessing the right information for the person they’re treating.

    Whether you’re looking for a way to better manage your own healthcare, or need help balancing a loved one’s care, a PHR could be the answer. A PHR provides an electronic record of a person’s health history, medications, allergies, and other important data that you build and maintain yourself; it works alongside a physician’s electronic health record (EHR) to make sure that all caregivers and emergency personnel are on the same page. The information you collect in your PHR — or that of a loved one in your care — could make all the difference when it comes to yours or their health outcome, so take it seriously and make sure it is complete and up to date.

  • 4 Profitable Ways to Monetize Your Website

    4 Profitable Ways to Monetize Your Website

    If you’re the owner of a website or blog, you know how much work goes into those all-important page views. Dedicated individuals create new and engaging content on a regular basis, carefully curate photos, and utilize social media channels to draw in visitors.

    Unfortunately, for many of these website owners and bloggers all of this hard work elicits little in the way of income. However, you’re also likely very familiar with the royalty of bloggers who are pulling in six figures per year, and others who make enough of a profit to offset the amount of work they put into their sites each month.

    How do they do it? There are several ways to monetize a blog or website, and while a great deal of your ability to do so depends on qualifiers such as Domain Authority and the amount of engagement you have with your readers, some ways of making a profit require very little work on the part of the blogger.

    If you’d like to start making money from your site or blog these are four great ways to get started. However, a great way to kick off this strategy is to look at your site as a business and as yourself as the boss. If it works out well, you could find your blog becoming your main job, enough you apply for a business credit card. Might seem far-fetched now, but it could happen.

    1. Affiliate Marketing

    Affiliate marketing is a relatively easy way to generate income from your website, especially if you have a history or product reviews or you recommend products to your readers. Essentially, your site acts as a go-between for the merchant and the buyer and you receive a percentage of the purchase prices.

    Amazon is one of the most popular merchants who utilize this method. As a blog owner you’ll place a sidebar ad on your site, and when your readers click through and make a purchase, you get paid. There are several ways to maximize this option, such as working with a niche retailer if your site is a good fit; and as passive income this type is very attractive.

    2. Google Adsense

    Working with Google Adsense is very straightforward. You simply go through their registration process and add the provided code to your website. In many cases you choose the types of companies whose ads will appear on your site, and in the case of a high-traffic site, businesses may even bid to have their ads show up on your site. Some accounts work by page views alone, and some accounts require that your readers actually click through the ads.

    The downside to this method is that it can take months to see any revenue generated, and even when you are paid, it may only be a few dollars. However, some bloggers can make several hundred dollars per month, and the key to this is increasing your page views.

    3. Sponsored Posts

    If you’re a blogger with a reasonable number of page views per month and a solid social media engagement, you could be contacted about hosting sponsored content on your site. Sponsored content usually consists of a blog post that contains one or more links to a specific company. The content is generally geared toward your niche so it appeals to your readers.

    The amount paid for sponsored content varies widely and is usually related to the stats of your site. Content marketing companies may be the ones requesting a sponsored post or the request could come from the company itself. Regardless, it’s best to be sure that the content is a good fit with the overall niche of your site.

    4. Market Your Own Services

    If you’ve built up a solid reputation as a writer or other skill that you’ve mastered via your website or blog, why not use your site as a virtual resume? Many writers, web developers, and social media specialists have honed their skills through their websites, and now offer these services to others.

    By adding a tab to your site that details your experience and references you could find yourself getting paid to do the things you’re already doing on a daily basis. Of course, it’s not always that simple. Unless you already have a large following who might take notice of your new strategy, you’ll need to do some self-promotion.

    More and more people are making a great income from their websites, and with a few of these simple strategies you could be one of them. Take some time to learn more about these options and how they might best fit with your site, and then get started on your way to a more profitable website.

  • 4 Tools That Your Growing Online Business Needs

    4 Tools That Your Growing Online Business Needs

    After all the hard work that goes into designing, setting up and promoting your online business, there is nothing more rewarding than starting to see measurable results. Whilst this may seem like the perfect time to sit back and relax, this is actually a crucial turning point; keeping pace with a growing business is essential to sustainable success. As your online company starts to gather speed, here are some incredibly useful tools you might wish to integrate.

    1. Live Chat

    Exceptional customer service is at the core of any successful business, and as your customer base expands, continued investment in quality relationships is crucial. Live chat is one of the most cost-efficient and competitive ways to further engage with customers and distinguish yours as a company that cares. The instant nature of live chat enables questions and queries to be dealt with as they arise, allowing you to respond quickly and proactively despite increased traffic, as well as enhancing the convenience factor for your customers. What’s more, it’s an easy way to incorporate a personal element even as your company grows.

    2. Accounting Software

    One of the side effects of a healthy business is an increased workload, calling for a more long-term approach to invoicing and record-keeping. A growing number of established companies are making use of online accounting software or cloud-based services which, owing to the ease of remote access, are highly beneficial for internet-based enterprises. This article provides further insight into how an integrated accounting system can enhance your burgeoning business.

    3. Professional Email Hosting

    If you haven’t already adopted a professional email hosting system, now is the time to do so. A business-orientated email package, such as those provided by 1&1, facilitates internal operations by providing multiple mailboxes as well as plenty of storage space. Additional organizational features, like the task and calendar tools, also help your business to run smoothly and streamline teamwork, regardless of location.

    4. Efficient Social Media

    As your business starts to flourish and time becomes increasingly scarce, you may find social media falling further and further down the list in terms of priority. However, as an essential means for engaging with your customers and keeping your brand relevant, it is crucial to continue to build upon your initial social media campaign. Tools such as Hootsuite make it easier to maintain a consistent social media presence, enabling you to schedule bulk posts ahead of time and across multiple platforms, so that communication with your audience remains regular despite increasing time constraints.

  • Creating My Plex Server

    Creating My Plex Server

    Just over a year ago I started out using Plex to manage my home media library. I had used a media player that had many of my ripped DVDs, and was connected to a T.V. for several years. The issue was I wanted something that would allow me to watch my movies, view my photos, and listen to my music from any of my devices that were connected to my local network. After a quick search, I discovered Plex.

    What is Plex and Why I Needed a Plex Server

    In a nutshell, Plex is a client-server-type architecture. You essentially install the Plex Media Server on a machine in your home, and the Plex apps on the devices you want to connect to the server and then you will be able to stream the media from the server to the device. Right now, my Plex clients are a desktop, two laptops, two iPhones, an iPad, an Android phone, and a Roku 3. My main method of accessing Plex is through the Roku 3 connected to my HDTV.

    On the Plex server I have ripped all my Blu-ray and some DVD discs, and installed iTunes to get access to my wife’s iTunes music, as well as linked to all my family photos and videos. All of this can be accessed from any of my Plex-enabled devices at anytime.

    Over the past year of using Plex, the one thing I didn’t have was a dedicated Plex server. I had run my Plex server on my main Windows 7 desktop, which I would turn off when I wasn’t using it – such as during the day when I was at work. When the desktop was running, it used over 100 watts of power, and even more if I was playing a game, so it wasn’t very economical to have it running all the time.

    Because of this, Plex wasn’t available all the time, and I had to go and turn on my desktop if I wanted to watch a movie, or someone else wanted to watch something through Plex.

    A few months ago I decided to look into using a dedicated machine as my Plex server. Over the past year of using Plex, I was also learning what was needed for a Plex server, and surprisingly, the requirements for a Plex server really isn’t much, especially compared to something like a gaming machine.

    What Is Needed For a Plex Server?

    Any machines I have built-in the past were always geared towards gaming. With gaming, you really can’t have too much of anything, and sometimes buying the latest and greatest provided better gaming experience – think graphics cards.

    With Plex, really the only thing that matters is the processor you install in the machine. If a device you connect to the Plex server can’t natively play a media file on the server, Plex will transcode (change) the file into a format the device can play. The transcoding process happens on the server by the server’s processor, and the largest CPU usage happens when transcoding high-definition movies.

    According to the Plex documentation that discusses CPU requirements, a processor PassMark of 2000 is recommended to transcode a single 1080p media file and 1500 for a 720p media file. You can lookup processor PassMark scores at Passmark. Just put the name of the processor in the search box, click search and select the benchmark link in the results, or just click the “Benchmark results” link at the top of the results to narrow down the results to benchmarks only. When viewing the benchmark results the number under “Average CPU Mark” is the PassMark score.

    Of course, if you can get Plex to direct play all your movies, then you can get by with a lower PassMark score, however, you will need to be sure that all your movies will direct play with all devices.

    Besides the processor, there really isn’t any major requirement for Plex. An internal graphics card, 4 GB RAM, any modern hard drive for the system will all work fine for a Plex server. Of course, if you plan on running more on the server besides just Plex, then you may have higher server requirements, but for someone like me, you won’t need anything over-powering.

    Keep in mind that many of the consumer-level NAS devices on the market do not have a processor powerful enough to transcode HD videos. Only the more expensive (think $1000+) NAS devices have the processors that are capable of transcoding HD videos.

    Plex supports many operating systems, so picking one that you are familiar with is the best option.

    My Plex Server Requirements

    With the above in mind, I decided to look at what I could build for my Plex server. The desktop (circa January 2010) running Plex at the time with the following specs:

    • Processor: i7 920 2.67GHz (PassMark: 4992)
    • RAM: 12GB
    • Hard drive: (2) 500GB Western Digital Blue (Raid 0)
    • Operating System: Windows 10 Pro (upgraded from Windows 7 Pro)
    • Graphics cards: (2) HD Radeon 5850 1GB (Crossfire)
    • Plex storage: Western Digital Duo 8TB

    For an almost 6-year-old machine, it ran Plex without any issues, but as I stated earlier, just consumes a lot of power. Also, the computer is rather load when it is running, so not only did I want a machine that used less power, but I also wanted a more quiet machine.

    Before I started to think about what I wanted for my Plex server I developed a list of requirements that I needed for the new server:

    • Needed to use less than 50 watts of power when idle, but the computer must stay on – not in sleep mode.
    • Quiet enough that it couldn’t be heard when standing in the same room.
    • The processor needed to have a PassMark of at least 6000 – enough to transcode 3 HD movies.
    • Include USB 3.0 ports because the media files were stored on the Western Digital Duo that is USB 3.0.

    A monitor, keyboard, and mouse are not required as I can share my existing desktop hardware. I will be creating a headless (no connected monitor) Plex server so a monitor, keyboard, and mouse will only be connected during the setup of the machine.

    Once I had my server requirements I had to decided how best to go about acquiring my new server.

    To Build or Buy?

    When building a server there were two options available to me – build a new machine or buy a pre-built one. Since I like to build and upgrade machines, I chose to go the former route first.

    I decided to try multiple server configurations at PCPartPicker to see what I could come up with in terms of parts for the new server.

    After trying out a few configurations I realized that most of the configurations would be about $700 CAD (Canadian), and I wasn’t looking at spending that much for a computer that would just stream media files to my devices. Fortunately, the requirements of my Plex server didn’t need high-end hardware, or did it need any hardware created in the last year or two, so I decided to go with my next choice – buying a machine. In my case, I decided to go for a used machine to save on cost as they are usually cheaper than newer machines.

    I searched eBay for systems that would meet the requirements I stated above. I found multiple systems that filled the requirements nicely so I began to watch the auctions to watch how the pricing of the machines changed.

    After a few weeks, I finally managed to win an auction for a Lenovo ThinkCentre system for $200, which I was quite happy about. The system has the following specs:

    After reinstalling Windows 10 Pro, the Plex Media Server application, moving over the Plex data, and reconnecting the external drives containing my media files, my new Plex server was up and running. Over the past month my Plex server has run 24 hours a day, 7 days a week, without any issues.

    Now that the server is up and running, I have managed to do much more with the server than simply run Plex.

  • 3 Simple Ways To Blast Past The Competition

    3 Simple Ways To Blast Past The Competition

    If you’re thinking of improving your business, it may be difficult to know where to start. Should you try the practical Management by Objective method invented by the legendary Peter Drucker? Should you hire a PMP course certified professional? Should you give the disciplined, data-driven strategies of Six Sigma a go? What about Agile Management? Should you give Agile Project Management with Scrum a chance?

    Many ingenious management models are available. They can make a huge difference to your bottom line. But it takes time and cost to get certified. They all need extensive study and practice to do well. It takes experts to teach them and disciplined application to get good at using them. Before you try any of them, why not get a jumpstart on your competition through technology? A quicker way to gain a competitive advantage is to upgrade your technology.

    Technology increases efficiency. Business growth depends on efficient processes that save time. When you save time, you can do more, and the more you do, the more you can earn.

    Your business will experience a quantum leap in efficiency if it just upgrades in three areas:

    1. Communication: Get a more efficient telephone system.
    2. Computer systems: Use computers designed for business.
    3. Software: Leverage the same software the big players in your industry use.

    Let’s look at each one more closely…

    1. Communication: Get a more efficient telephone system

    It’s hard to imagine improving on the high standard available for telephones. But improvement does not mean a faster, more reliable connection or a clearer line. You probably have these already. Instead, think about improving your infrastructure.

    One telephone system that has an excellent infrastructure is the PBX systems. If you don’t have it, you should get one. If you already have one, then you can upgrade it by moving it to the cloud. A hybrid infrastructure that puts a PBX system on the cloud will give you a competitive edge. You will have more than a feature-rich service. You will also have disaster recovery and location independence.

    2. Computer systems: Use computers designed for business

    Many small businesses buy the same computers used as home users. But specialized business PCs would serve their needs better than consumer PCs.

    There are 4 distinct advantages to using a business desktop for your team:

    1. They are sturdier, built to last longer.
    2. They are easier to service. It can cost you income, when your computer is down. If you can get it fixed fast you’ll save lost earning time.
    3. You’ll be able to get specialized technical support services. You’ll be able to immediately troubleshoot any hardware or software problems.
    4. You can get a service contract to get your technical support calls. Unlike regular consumers, you won’t wait on the line for hours. Instead, you’ll get your calls answered faster from a dedicated support team.

    But that’s not all, you will also be getting much more power.

    You’ll get dual-core processors like or Intel Core i3 or AMD A4. Consumer PCs usually just offer Pentium dual-core CPUs and Celeron. You’ll also get at least 4 gigabytes of RAM, but you can get 8GB or even 16GB. More memory lets you run multimedia processes fast. More memory also lets you open up more software at the same time.

    If you use graphics intensive software, you’ll appreciate all this extra memory. With this memory power your work won’t slow to a crawl.

    3. Software: Leverage the same software the big players in your industry use.

    How can I business get some of the best software at a price it can afford? It can get top-of-the-line software through Software as a Service (SaaS).

    The research group Gartner defines it “as software that is owned, delivered and managed remotely by one or more providers. The provider delivers software based on one set of common code and data definitions that is consumed in a one-to-many model by all contracted customers at anytime on a pay-for-use basis or as a subscription based on use metrics.”

    SaaS is a unique distribution model for software. A vendor makes software available to customers on the Internet. Since it’s cloud-based software you won’t have to install it. The traditional method, called software as a product, suffers by comparison. It requires you to buy software, install it on your servers or PCs and troubleshoot and update it. Besides the high upfront cost, you may need to hire IT people.

    Renting software through SaaS offers 6 unique business advantages:

    1. The vendor handles administration. For example, taking care of updates or patch management.
    2. There are no compatibility conflicts with other programs in your computer network.
    3. It levels the playing field. Your small company can now run software that only big companies could access.
    4. The software is available from any PC from any location. You can work on a project in the office, at home or while travelling.
    5. It is easy for teams to collaborate on a project.
    6. The software is available anywhere in the world with Internet access. Even outsourcers hired for a special project can use it.

    Start With A Solid Foundation

    If you want to upgrade your business, try these three upgrades first. They will give your business a solid technical foundation. You can then invest in advanced management techniques to further enhance your business.

  • Go Big: Larger Tablets for Bigger Jobs

    Go Big: Larger Tablets for Bigger Jobs

    Is it time to upgrade your tablet? If it’s more than a couple of years old, you probably should. You’ve missed out on a lot of advances in display definition, better processors, and higher RAM that could make your tablet experience a lot smoother and more productive.

    Tablets are also a lot lighter and thinner, with tons of apps and features and can even measure up to a laptop at 15.6 inches in display size. Bigger tablets can be better, and not much heavier than a smaller device, but still loads lighter than a laptop.

    Size Matters

    Working consistently on a small screen and mini keyboard can be annoying, so if you’re doing a lot more work with your tablet, it’s worth it to upgrade both in terms of display and functionality. Larger format screens start at 10 inches and can exceed the size of laptop displays.

    The most popular sizes are the newer and pricier 12 inch models or the more affordable 10 inch models like the Nook Galaxy Tab 4 by Samsung. Depending on what you use a tablet for – a multimedia device, gaming, graphic design, or as a laptop replacement – you’ll want to consider the specifications carefully.

    Very often a tablet that you think is a great deal may not have good resolution, or a more up-to-date processor, or enough RAM to do what you want it to do.

    Shop for Right, Not Cheap

    Tablets are a fast growing segment of the world market. As people need to bring the internet with them, and in a more easily usable form than a laptop, tablets users worldwide are estimated by eMarketer to pass the 1 billion mark this year.

    Tablets have a lot going for them, including portability, ease of use, and a variety of applications available via sources such as iTunes for iPads, Google Store for Android devices. Shopping for a cheap tablet risks getting locked into older versions of operating systems without as much functionality, or getting stuck with outdated hardware.

    If you want a useful tablet that you’ll still be using two years from now, getting a newer model is critical. Here’s a few of the things you’ll need to look for.

    • Operating System: Android has just released version 6 of its operating system called Marshmallow, and iOS for Apple devices is on version 9. Windows operating systems are also available, but you should look for them to be running at least Windows 8 and not Windows RT, which is becoming quickly obsolete. Windows RT does not support Microsoft legacy software, and apps are thin on the ground at the Windows Store. There are also some tablets coming to market with the Chrome OS from Google, with all the apps you can find for Android. At the moment, Statista notes that Android is the most popular OS across all devices, with 66 percent of the global market share.
    • CPU: The GHz doesn’t always tell you the whole story since the number of cores also factors in. You’ll find dual core, quad-core, octo-ore, and even multiple processors, depending on the model and manufacturer. In general, the higher the GHZ, the better. You’ll find Apple with their own proprietary chips, but some of the most popular processors are Intel Atoms and I-series, NVIDIA Tegra, Snapdragon, and Exynos.
    • RAM: You’ll find that tablets running Windows usually have the most RAM, generally because they are running the full Windows OS in either version 8 or 10. More lightweight OS tablets from Chrome, Android, and Apple have 2GB to 3GB. The more RAM you have and the better your processor, the more smoothly your tablet will run, with less hanging and crashing.
    • Display: Most tablets now offer way better than 1080P, with resolutions typically in the 2560×1600 range. Also check out the PPI (Pixels Per Inch) number.

    The adoption of tablets is one of the fastest growing demographics, with 45 percent of Americans owning and using a tablet as of the recent Pew Research survey. A tablet fills a lot of the niches once taken up by portable DVD players, full-sized laptops, MP3 players, and GPS devices. You may end up consolidating a lot of your extraneous devices into a tablet with additional peripherals such as a Bluetooth keyboard, stylus, speakers, and headset.

    With cloud-based applications, you will find that everything from gaming to homework is portable in a way that’s not possible with a laptop, and more usable than a smaller format tablet or smartphone. With Black Friday and Cyber Monday coming up, you should be able to get some great deals on newer models with just a point and click – or a swipe and tap.