Blog

  • Help! My Sidebar is Displayed Below My Content!

    Help! My Sidebar is Displayed Below My Content!

    Since I have been designing my own WordPress themes, I have learned a lot of create CSS-designed themes and how the various elements on a page interact with other elements. It has been frustrating at times to position elements in the correct locations, but it is because of this frustration that I have managed to learn how to create my themes.

    The one common problem that I had when I started designing my themes, and it seems it is a common problem to many people, is that of my sidebar dropping below my content when displaying my page. The cause of this problem is that the widths of my content and sidebar divisions were larger than the entire container they were rendered in. I thought I had the calculated the widths correctly, but what I thought was the width, wasn’t the true width of the elements. This post explains how you can easily debug such a problem.

    A Few Things To Help Follow Along

    I find that the best way to learn is to do things myself. I will be showing you some HTML/CSS code in this example, as well as using a Firefox extension. So you can also try things for yourself, you should use the following steps:

    1. If you don’t have it installed, install the Firefox Web browser, open Firefox and then install the Firebug extension.
    2. Download this example HTML file (in zip format), and then extract it to any directory on your local computer. Once downloaded, open the HTML file in a text editor, as well as opening the file in FireFox.

    Once you have done the above steps, you can now follow along in this post.

    The Width Example

    In the example HTML file that was provided above, you will notice that there are three elements defined in the file (shown between the <style> tags), container, content and sidebar. The container element is the main container and will contain both the content and sidebar elements. The content is displayed on the left, while the sidebar is displayed on the right. You should see this in your Web browser.

    You will also notice that each element has a defined width attribute. The container element has a width of 900 pixels, the content element is 600 pixels wide, and the sidebar element is 300 pixels wide. As it stands, you should be seeing the content element and the sidebar element side-by-side, because they have a combined width that is equal to the width of the container – 900 pixels.

    To show this fact in Firefox, use the following steps:

    1. Right-click the text in the content section and select “Inspect Element”. A new window on the bottom will open. Stretch the bottom window up if you don’t see much of it.
    2. On the left of the window is the HTML code, while on the right is the information about the selected element. On the right, click the “Layout” option. This will display a boxed representation of the selected element.

    The layout diagram for the three elements is shown (combined), in the image below.

    Example Elements Layout Diagram
    Example Elements Layout Diagram
    (Click to enlarge)

    By clicking on the container, content, and sidebar elements you can easily see the width of the elements in the Layout diagram. Let’s make some changes to the CSS to see the impact.

    When Width is Not What You Think

    The width defined in the CSS styles is not always what you think it is. The width that you define in the stylesheet is the width that will contain the contents of the element, but it isn’t the total width of the element.

    To prove this point, make the following change:

    [code language=”css”]
    #content
    {
    background-color:#ccc;
    float:left;
    padding:1px; /* Make this change */
    margin:0;
    width:600px;
    }
    [/code]

    Now refresh the file in the Firefox browser. What you will now notice is the content element is above the sidebar element.

    In the left Firebug window, click on the content element. The layout diagram in the Firebug window still shows the content element as having a width of 600 pixels. If the width didn’t change, how come the content and sidebar elements are no longer beside each other?

    The total width of the content element has changed with the addition of the padding. We have added 2 pixels of padding (1 pixel on the left and right) to the element, so the true width of the content element is now 602 pixels and not 600 pixels.

    You can now see the additional 1 pixel padding in the layout diagram of the Firebug window to the left and right side of the content element. The layout diagram that indicates the padding is shown below.
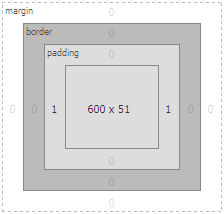
    Content Element With 1 Pixel Padding
    Content Element With 1 Pixel Padding
    (Click to enlarge)

    Adding the width of 300 pixels to the sidebar to the 602 pixels for the content gives a total width of 902 pixels, which is now wider than the container width of 900 pixels. Because of this, the sidebar element is “squeezed” out of alignment, and is now below the content.

    If you were to change the margin attribute of the content element to 1 pixel instead of the padding attribute, the result would be the same. The same result would also happen if you were to add a border to the left or right of the content element.

    Changing those same attributes (border, padding, or margin) of the sidebar element would have the same effect, as well.

    Therefore, the true width of an element is defined as:

    true width = [width] + [border (left and right)] + [padding (left and right)] + [margin (left and right)]

    By using the Layout option in the Firebug extension for various elements, you can easily see the values for the above calculation for any element. You simply add them up to get the total width of an element.

    The next example shows how we can determine the total width of an element when the three attributes are assigned. The CSS styling fo the content element is shown below.

    #content
    {
      border:1px solid #000;
      background-color:#ccc;
      float:left;
      padding:5px;
      margin:2px;
      width:600px;
    }

    Using the Firebug Layout window, we can now see that the total width of the content element is now 616 pixels. The diagram that shows the calculation is displayed below.
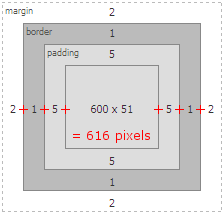
    Content Element With Total Width Calculation
    Content Element With Total Width Calculation
    (Click to enlarge)

    If you are having trouble with displaying various elements side-by-side on you Web pages, you should use the Firebug Firefox extension to verify that the total width of the elements can fit properly in the containing element. By using the Firebug extension, along with its layout feature, you can easily calculate the width of the various elements by simply clicking on them in the code.

  • An Introduction to Pico Projectors

    An Introduction to Pico Projectors

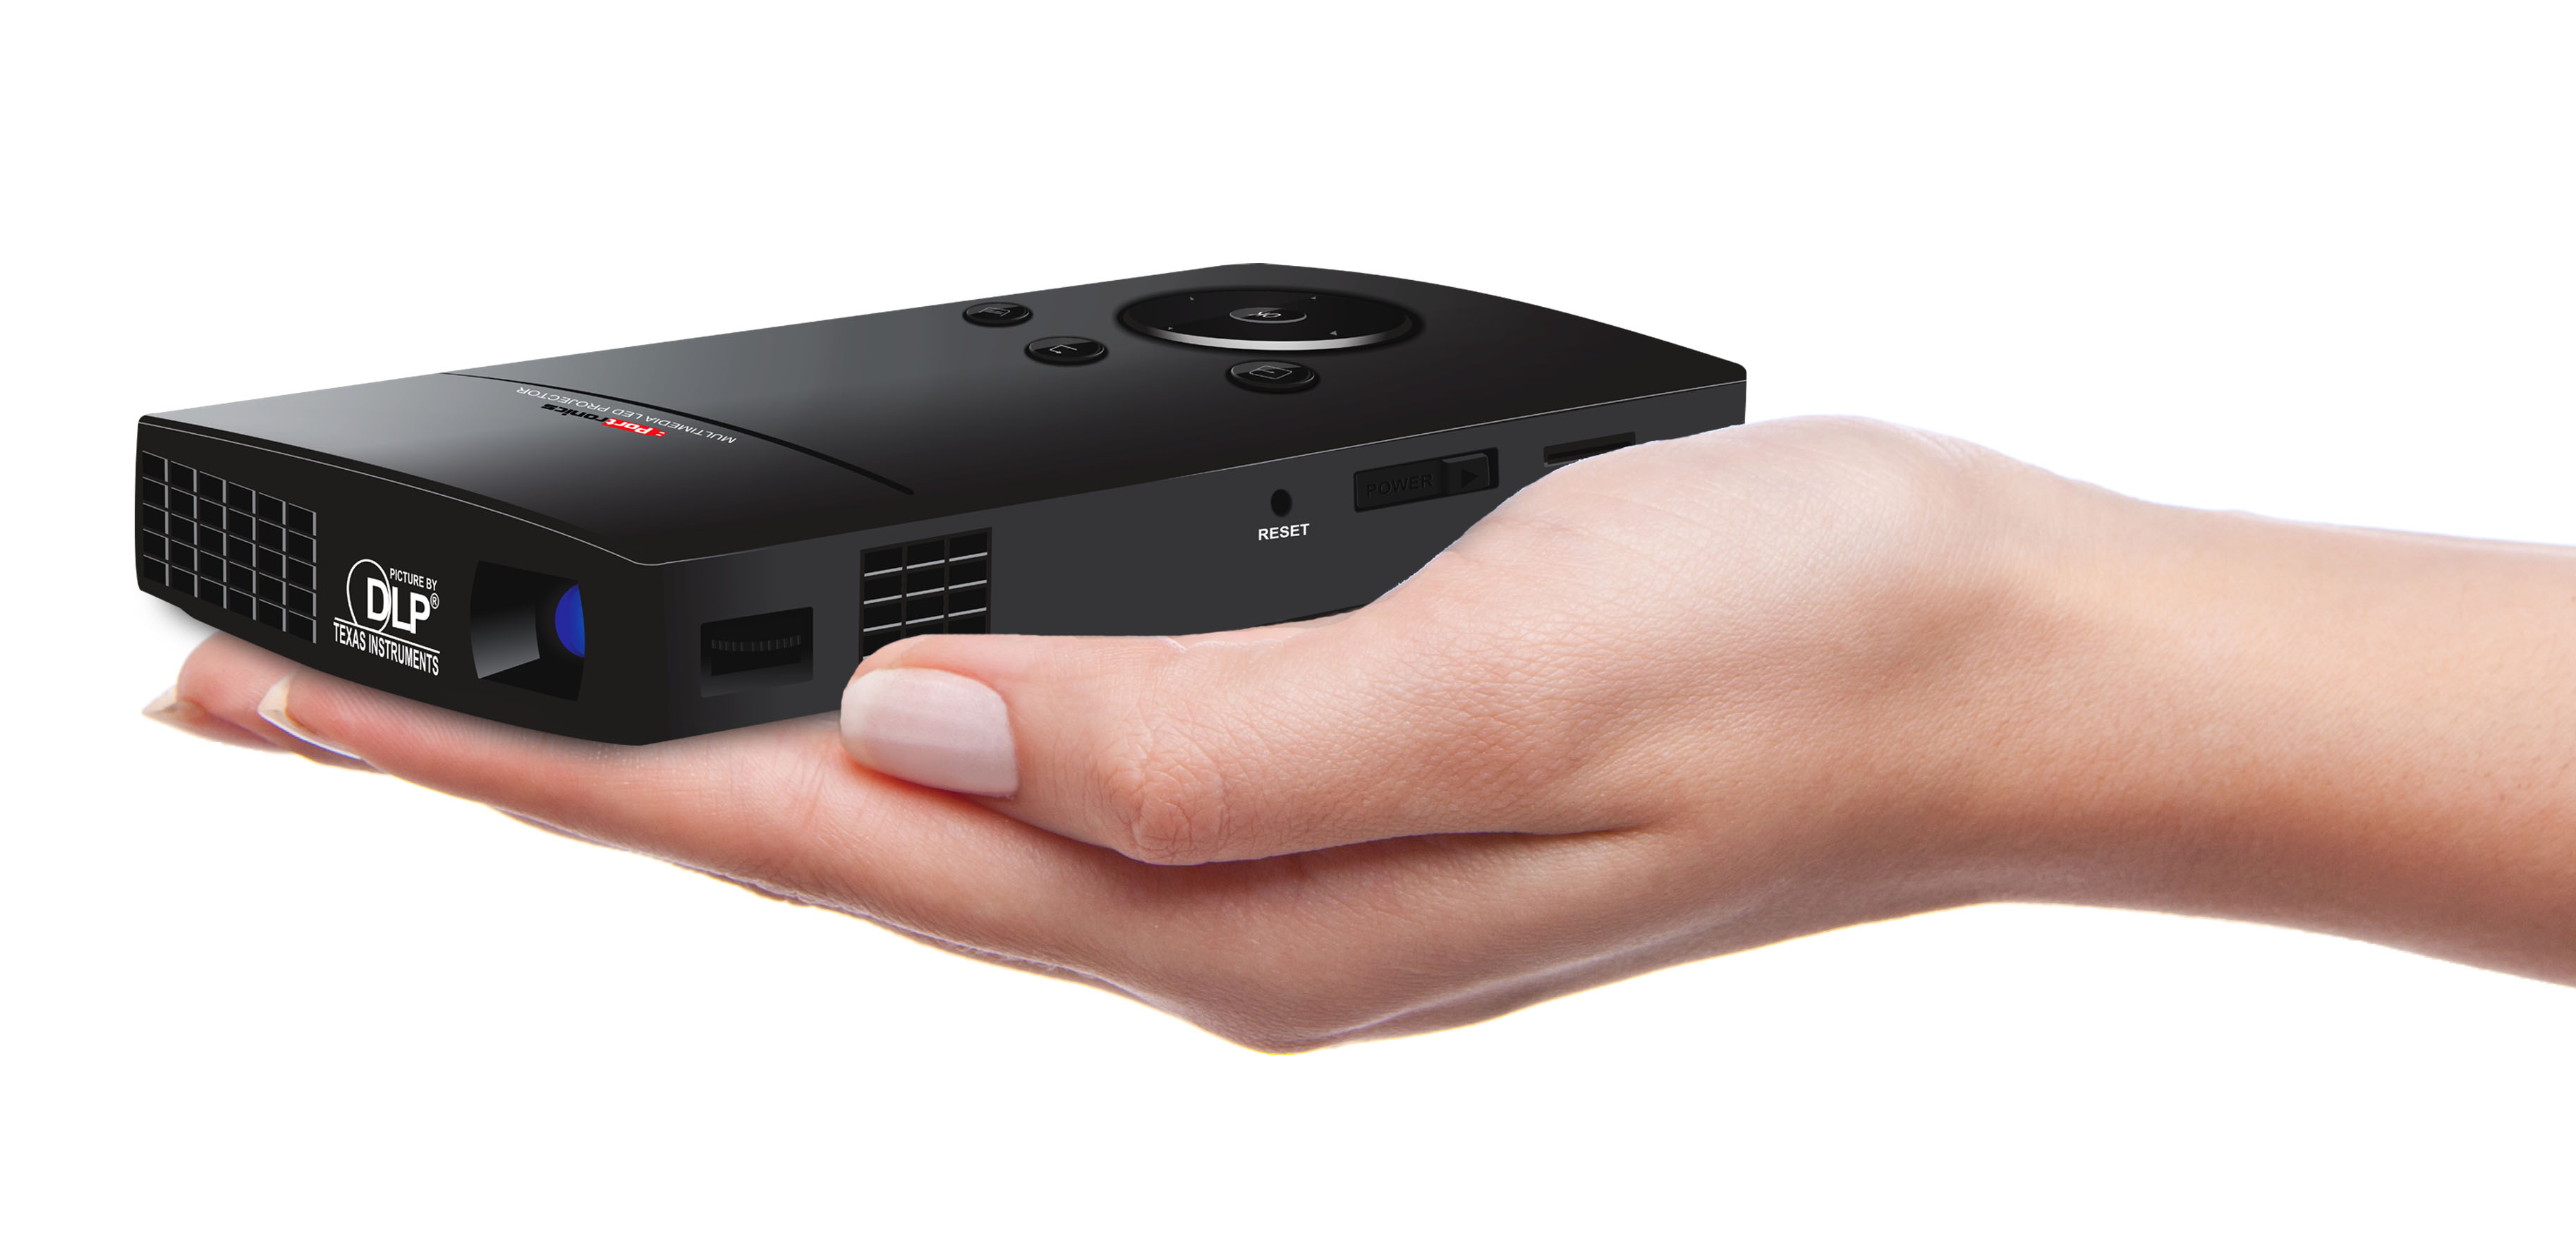
    Despite only being the size of a mobile phone Pico projectors are set to have a large impact on the mobile technology scene.

    Also known as mobile or pocket projectors, pico projectors offer a solution to the problem of having mobile technology such as mobile phones and digital cameras with excellent image capture and storage capabilities but limited display abilities.

    Pico projectors allow you to display large, high quality digital images from your phone or laptop while on the move with minimal set-up time or cabling involved.

    Pico projectors are ideal for a wide selection of applications including picture or video browsing and gaming as they allow greater levels of interactivity.

    They are however somewhat limited by the lower brightness when compared to small desktop data projectors.

    As a result they can only be used effectively in low light environments.

    Image sizes can be varied from as little as 13cm up to an impressive 3m (diagonal distance) from larger models.

    About Pico Projectors

    Pico projectors have evolved significantly since they first appeared on the audio visual market in 2006 with a selection of technologies available from a variety of manufacturers.

    Platforms of Pico Projects

    Currently the two most popular platforms in use are DLP and LCoS. Both use LEDs as the light source but whereas DLP uses mirrors to direct the light LCoS filters it via up to three LCD panels.

    DLP technology is in use with a number of the biggest projector manufacturers including Optoma, LG and Samsung and although DLP projectors generally demonstrate higher contrast, better efficiency and lower power consumption when compared to LCoS units, they do have slightly lower resolution due to the use of mirrors to direct the light.

    Other platforms such as laser-LCoS and laser-beam steering are also available which, as the name suggests, use lasers as the light source in place of LEDs.

    Laser Pico projectors display the benefits of always being in focus and are bright and efficient but they do suffer from something known as speckle effect which manifests on the image as a scattering of shiny metallic-like dots.

    Available Inputs to Pico Projectors

    As Pico projectors are designed to be used with a wide variety of data source devices such as mobile phones, laptops, DVD players and cameras they are available with a selection of input types.

    This can include more traditional connection types like VGA and RCA but certain units like WowWee’s Cinemin Swivel come complete with an adaptor to allow connection to the iPhone.

    Other units also allow connection via HDMI and also Wi-Fi.

    USB connection is also an option and has the benefit of providing both data and power supply.

    Due to the small size of Pico projectors their battery life is limited to around an hour of continuous use and as such the ability to provide power via a USB can be a useful feature, particularly if you always have a USB port handy.

    Overall Pico projectors may have some performance limitations due to their small size but this also proves to be their salvation.

    They allow you to release all those images and videos stored on your phone or digital camera and effectively display them to more than just yourself.

    Their low weight and small size allows them to be easily transported and their simple connectivity and operation means they can be rapidly employed with the minimum of set up time.

    With the number of available Pico projectors, there is one available to fit virtually any budget with entry level models such as the Aiptek 43002 available for around £70 and more advanced models such as the Optoma Pico PK301 coming in at around £300.

  • Differences Between LCD, Plasma and LED Televisions

    Differences Between LCD, Plasma and LED Televisions

    Many people still use cathode ray tube, or CRT, TVs. These boxy sets take up a lot of space, cannot be viewed clearly from all angles and don’t display high-definition picture. If you and your family watch a lot of TV or play video games at home, investing in a flat-screen television is a smart choice.

    Flat-screen TVs may look the same, but there are important differences in technology between different types of HDTVs. If you’re looking to buy a new television for your home or office, you might not be sure where to begin.

    HDTV technology has improved dramatically in the few years since it was first introduced, and the variety of choices offered to the consumer can be overwhelming. Any of these options can be an excellent choice, but one may be a better fit for your needs than the others. Here is a brief guide to choosing the best television for your home.

    (more…)

  • Is SEO Only for Large Businesses?

    Is SEO Only for Large Businesses?

    Large corporations spend massive amounts of money to get top search engine positioning. They are happy to spend sums that smaller competitors can only dream of.

    It’s easy to see why they would be willing to make such a financial commitment. Most of us, as Internet users, will feel reliant upon the search engines.

    (more…)

  • How to Implement an Email Marketing Campaign

    How to Implement an Email Marketing Campaign

    Email promoting is a relatively easy, inexpensive and productive method for modern businesses to stay in touch with their clients and also increase their particular incomes. For instance, a newsletter helps you communicate messages in your organization while at the same time demonstrating your own depth and experience, your greatest resource for your business. Distributing an email newsletter ensures that your company remains in the thoughts of your expanding network. In addition, good email newsletters are normally sent to friends of the receiver of the mail, thus expanding the network even further.

    (more…)

  • Enhance Your Interaction with a Touch Screen Laptop

    Enhance Your Interaction with a Touch Screen Laptop

    Touch screen technology isn’t new. You’ve likely been using it for years on your laptop or notebook in the form of a touch-sensitive pad, or mouse. Until recently it’s proven difficult to get usable, reliable, interactive capacity on laptop and notebook screens.
    (more…)

  • Facebook Viruses: Don’t be Fooled

    Facebook Viruses: Don’t be Fooled

    Facebook is the place to talk with friends, share photos and catch up with old acquaintances, but you shouldn’t have to deal with Facebook viruses. Unfortunately it’s also the place to get infected with computer malware. The most well-known recent infection was the Koobface worm, seen at first as a video offer.

    “Check out this Paris Hilton video!”

    “I caught you on a secret cam!”

    Click on the video attachment, and you get instructions to load a viewer for the video, usually Flash Player. If you agree to download the viewer, your computer gets infected with all sorts of nasty things.

    (more…)

  • Sleep Mode and Hibernate: What is the Difference?

    Sleep Mode and Hibernate: What is the Difference?

    If you have ever owned a laptop, netbook, or another device that runs on a battery, chances are you have put that device to “sleep” when you have disconnected it from a power source. Many times when we use the device after putting it to sleep, it starts really quickly.

    Operating systems support a sleep mode as well as another power down state called hibernate. Both modes are different in how they store data and the amount of power they use. Understanding the difference can help you determine which state you should leave your computer in once you are done using it.

    Sleep Mode

    For those that use a laptop, or similar device, on a regular basis, you are probably familiar with this mode – especially if you even talk about putting your laptop to “sleep.”

    When a computer enters this mode, the data remains in RAM (memory) so when the user uses the computer again, the computer instantly starts up from where they left off.

    In this state, the RAM in the computer still remains powered to retain the information that is stored in memory. This means, that while power is reduce, or cut off from the rest of the system, there is still power being used for the RAM.

    For laptop computers, the battery is still being drained to keep the RAM powered. The benefit is that the computer starts up really quickly since there is no need to reload the operating systems again along with any programs. The drawback is that if power is ever lost – the battery is drained – all work that wasn’t saved would be lost.

    To avoid losing any data, you can put your computer into a hibernate state.

    Hibernate

    While the sleep mode of a computer keeps data in memory, and also keeps the memory powered, the hibernate state moves the data from memory and stores it on the hard drive, and then powers down the computer. Once the computer is restarted, the data that was previously stored in memory is moved from the hard drive and back into memory.

    Since the local hard drive is not volatile, meaning it won’t lose the data when the power if turned off, this helps to prevent any loss of data. The one drawback is that a computer restart isn’t as fast as sleep mode because the data must be copied from the hard drive to memory before the user can use the computer. Hibernate is faster, however, than starting a computer from a cold boot (from a complete shutdown).

    Also, because the contents of memory must be copied to the hard drive, you must have enough space on the hard drive equivalent to the amount of memory. If you have 4 gigabytes of RAM installed, then you must have 4 gigabytes of hard drive space. Windows creates a hibernate file on the computer when the hibernate option is enabled.

    Hybrid Sleep

    The hybrid sleep mode is a mix between sleep mode and hibernate. The contents of memory stays in RAM, and is also transferred to the hard drive. The memory of the computer remains powered.

    When the computer is restarted, and no power was lost during sleep mode, the computer will start up instantly because of the data being stored in memory.

    If, however, power was lost while in sleep mode, the data that was once stored in memory (which is now lost because of the power outage), is retrieved from the hard drive, just as it does with hibernate.

    Naming Conventions

    Since computer began providing a means of entering a sleep mode, the actual name of the sleep mode has changed. Here is a list of what various operating systems have called sleep mode:

    Sleep Mode Name Operating System
    Suspend Windows 95
    Linux
    Stand By Windows 98 – Windows 2003
    Sleep Windows Vista – Windows 2008
    Mac OS 8 – OS X

    Regardless of the naming convention that is used, putting your computer into sleep mode, or in the hibernate state can be a good idea to conserve power and provide a quicker startup.