Knowing how to disable audio enhancements in Windows 10 can become useful if the audio enhancements cause a spike in CPU usage – usually audiodg.exe causing high CPU usage in Windows 10. There could be a variety of reasons why, such as incompatible drivers, corrupted files, or you just don’t want Windows to apply its own enhancements to the audio.
If you would like to disable the audio enhancements in Windows 10, you can use the following steps:
Disable Audio Enhancements in Windows 10
Disabling the audio enhancements in Windows 10 is very similar to Windows 7, so if you have done so in the past, then you should have no issue following these steps. If you haven’t you should still be able to easily follow the steps as it isn’t difficult to disable the audio enhancements.
Other related posts:
Fix: Audiodg.exe High CPU Usage
How to Disable Audio Enhancements in Windows 7
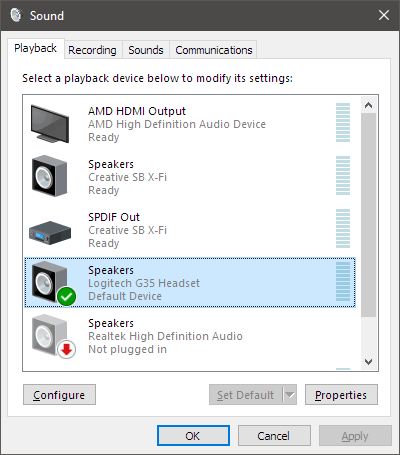
- Click the Windows 10 start button and then type Sound. Click the Sound option from the search results.
- In the Playback tab, right-click the audio device you would like to disable the audio enhancements for, and then select Properties.
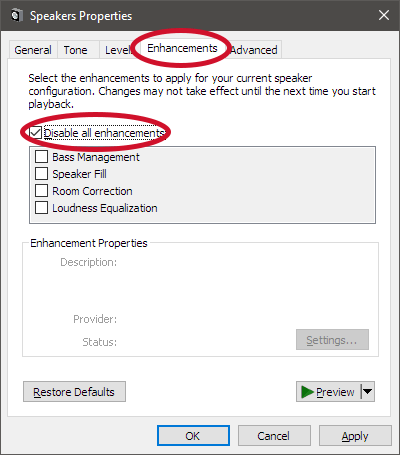
- Click on the Enhancements tab to display all the available audio enhancements
- Click the Disable all enhancements checkbox. The enhancements list should now become greyed out.
- Click the OK button to close the Properties window.
- You can use steps 2 – 5 for any other audio device you wish to disable audio enhancements for. When done, click the OK button to close the Sound window.


If audiodg.exe in Windows 10 causing issues with Windows audio enhancements, using the above steps should help alleviate the issue until a solution is found. You can also just leave the enhancements disabled and use the enhancements that come with your audio device instead.
