Tag: Plex

  • How I Stream HD Movies Without Using WiFi

    How I Stream HD Movies Without Using WiFi

    I have mentioned in previous posts that I have setup and configured a Plex media server in my home. This server allows me to stream my collection of movies, T.V. shows, photos and home videos to any electronic device that is connected to my home network.

    For mobile devices, I don’t stream the highest quality video file that I have saved on my Plex server. Instead Plex will stream a smaller copy of the video to the mobile devices. The copy is also HD (720p at most) with stereo sound. When viewed on a mobile device, the content looks great.

    The issue was streaming the best video quality to either of my two HDTVs. One HDTV is located on the same floor as my WiFi router and uses a Roku 3 to connect to the Plex server. The second HDTV is located two floors down in the basement, and is a Roku TV.

    I can stream HD content from the Plex server at the highest quality (1080p with surround sound) without any issues. Unfortunately, streaming the same content to the second HDTV in the basement was not doable because of the weak WiFi signal.

    Buffering Issue

    The issue

    My issue was determine how to stream HD movies without using WiFi, and without running Ethernet cables.

    Many people that stream HD content in their home may run Ethernet cabling between the rooms in their house. For me that isn’t a viable solution.

    All the rooms in my house are finished, including the basement, so running cabling through the walls is not an option. With the router and HDTV being at the opposite ends of the house, it is more difficult to run Ethernet cable between the devices.

    I needed another solution. Luckily, there was an alternative.

    Netgear Powerline 1200 and Extra Outlet (PLP1200-100PAS)

    The solution

    I have written about powerline technology in the past that allows me to transfer data over the existing powerlines that are in my home. This technology has been around for years, and the network speeds have been increasing over that time.

    Previously, I was using Actiontec PWR511K01 500 Mbps adapters, but one has failed after several years, so I stopped using them. They provided decent speeds and worked better than WiFi.

    In my case, I now live in a different house then when I first began using powerline adapters. The biggest issue that I saw in my house is that I have aluminium wiring on the main and second floor and copper wiring in the basement.

    I took a chance on using the powerline adapters to connect the HDTV in the basement to the router on the second floor. For high-quality HD content, I needed to buy faster adapters than what I previously used. This would ensure I had a fast connection to the HDTV from the router and provide better quality streaming.

    Gigabit powerline adapters and streaming 4K content

    I bought the Netgear Powerline 1200 and Extra Outlet (PLP1200-100PAS) adapters because of the gigabit ports. Realising that I wasn’t going to reach gigabit speeds with powerline adapters, I still figured they would be faster than WiFi.

    After plugging in the adapters, I was glad I bought the extra outlet ones because they are huge. The adapters block the second outlet in the wall, so the extra outlet comes in handy. After connecting one adapter to the router, and the second to the HDTV using Ethernet cables I tested out the connection.

    The adapters established a connection in seconds, even when one was connected to aluminium wiring and the second to copper.

    I tested out the connection by streaming HD movies from my Plex server to the HDTV in the basement. The content streams full quality from the Plex server, over the powerline adapters, to the HDTV without any stuttering.

    Next I wanted to run a more intensive test – streaming 4K content since the HDTV is a 4K television.

    Using both Netflix and YouTube, I streamed 4K content to the HDTV without any problems. After playing 4K content for several hours from Netflix, there wasn’t a single pause or stutter when streaming. I didn’t play the 4K YouTube video for as along, but there wasn’t a single stutter during playback.

    After the tests were successful, I bought a second set of the Netgear Powerline 1200 adapters. I connected the first HDTV to the router using the powerline one of these adapters. Now I can easily stream HD content to both HDTVs without any issues, even at the same time.

    As for the Actiontec adapter (one still works), I connected that to the VOIP phone modem. It connects to the Netgear powerline adapters without any issues, as well.

    The conclusion

    The powerline adapters allow me to stream HD movies without using WiFi. Even over different wiring, the adapters have worked flawlessly and have allowed me to stream 4K content without any stuttering or buffering.

  • How to Update Plex Automatically When Run as a Service

    How to Update Plex Automatically When Run as a Service

    On my Plex media server I run the Plex Media Server as a service, and the one issue that I had was not being able to update Plex from within the Web dashboard. The reason is that when running Plex Media Server as a service Plex is running as a service, any update through Plex can’t be done because the service needs to be stopped first before any updates can happen.

    For me, another issue was that the Plex Media Server runs under a standard user account on my Windows 10 machine, and a standard user account can’t perform any application installs, which leads to another reason for me to disable Plex auto updates.

    While I can’t have Plex auto update to the latest version, I have found another way of accomplishing the same goal. I created a small application called Plex Server Auto Updater that will perform the same update task when Plex is running as a service.

    What does the Plex Auto Updater do?

    The Plex Auto Updater makes it easy to update Plex when the Plex Media Server is running as a service. The updater will automatically perform the tasks that you would normally need to take when updating Plex.

    Note:

    Since the Plex Auto Updater needs to install the Plex update, the updater needs to be run under an administrator account. If you are logged in as a standard user, you simply need to right-click the Plex Auto Updater executable and select “Run as administrator” to allow the updater to perform the update.

    The following actions are performed when the updater is run:

    1. Stops the Plex service.
    2. Stops any Plex processes that may still be running.
    3. Installs the update.
    4. Deletes the run keys from the registry to prevent Plex from auto-starting outside of the service.
    5. Stops any Plex processes that may have started after the update.
    6. Restarts the Plex service.

    The updater will update Plex regardless of where Plex is installed, where the Plex local data directory is located, and which user account is running the service.

    Getting the Plex Auto Updater

    I created the Plex Auto Updater so that it is portable, which means it doesn’t need to be installed. It is a single executable that can be saved and run from any directory on your machine.

    To get the Plex Auto Updater and use it, follow these steps:

    1. Download the latest release of Plex Auto Updater.
    2. Extract the psupdate.exe file from the zip file. You can extract the executable file into any directory.
    3. Double-click the executable to perform an update. Later in this post I describe how you can run the updater so it updates Plex automatically.

    To have the Plex updater perform an update, there is one thing that will need to be done in Plex to ensure the updater can find the updates, which I discuss below.

    Configure Plex Media Server for Plex Auto Updater

    Configure Plex Media Server for Plex Auto Updater

    Before running the Plex Auto Updater, it is important to first have Plex automatically download the latest updates. The Plex Auto Updater will check these downloaded updates to determine if it should install a newer version.

    To enable Plex to download updates automatically, use the following steps:

    1. Log into the Plex server Web dashboard.
    2. Click the “Settings” option under “Manage” on the left.
    3. Click the “Server” option from the top menu if it isn’t already hightlighted.
    4. In the “General” section, check the “Automatically download updates” checkbox.
    5. Click the “Save Changes” button at the bottom.

    Once the above steps have been completed, and an update has been downloaded, the Plex Auto Updater can now perform the update.

    Of course, you can simply run the Auto Updater executable, but the point is to have it update automatically without any user intervention. This can be done by simply scheduling a task to run the executable at a specified time.

    Schedule the Plex Auto Updater

    Schedule the Plex Auto Updater

    Once Plex Media Server has been configured to download any updates, you can now schedule the Plex Auto Updater to automatically check the updates to see if one is available.

    To avoid updating the Plex Media Server when you are streaming media, you will want to schedule the updater at times when the media server won’t be streaming any media, such as early morning.

    To schedule the Plex Auto Updater, use the following steps:

    1. Click the Windows icon to bring up the Start Menu. Type “Task Scheduler”, and then select the “Task Scheduler” that shows up in the list.
    2. Click the “Action” menu and then select the “Create Basic Task” menu option.
    3. Enter a name for the task, and then click the “Next” button.
    4. Select a schedule for how often you wish the Plex Auto Updater to run, and then click the “Next” button.
    5. Enter the schedule information, and then click the “Next” button.
    6. Select “Start a program” for the action.
    7. Click the “Browse” button and then navigate to the location where you placed the psupdate.exe file. Click the “Open” button to select the file.
    8. In the “Add arguments” field, enter “-silent” (without the quotes). This will cause the updater to run without any user interface. Click the “Next” button to continue.
    9. Check the “Open the Properties dialog for this ask when I click Finish” checkbox, and then click the “Finish” button.
    10. When the Properties dialog is open, ensure the user that runs the task is an administrator. If not, click the “Change User…” button.
    11. Enter the administrator user’s name in the “Enter the object name to select” textbox. Click the “OK” button to continue.
    12. Select the “Run whether user is logged on or not” option. Click the “OK” button.
    13. Enter the administrator’s password and then click the “OK” button.

    When the above steps is completed, you should have a task scheduled to run the Plex Auto Updater at a specified schedule, and using the administrative user account.

  • This application solves the issue I had when running Plex as a service and not having the ability to update Plex automatically. With the portable application I created, I can now schedule Plex updates so that my Plex Media Server has the latest release.

    Download the latest Plex Server Auto Updater release.

  • How I do More with My Plex Media Server by Keeping it Simple

    How I do More with My Plex Media Server by Keeping it Simple

    When I was looking at setting up my Plex Media Server, the one thing that I really wanted to make sure was that I kept the entire setup simple. I wanted to set up and manage a server that could stream media files to my devices, and not much beyond that idea. This meant I didn’t need a high-end and powerful computer to accomplish the goal, but I did have to make sure the system could handle at least three media transcoding operations at a time.

    Once I had settled on the server, installed the operating system (Windows 10 Pro) the next thing I did was to decide how I wanted to set up my Plex media files. I also had some other services running on my desktop that I figured I could have my server manage, such as my regular data file management and backup. At this point I decided to look at how best to use the server to manage as much of my files as possible, while at the same time automating as many processes as possible.

    I began to think about some ideas.

    My Plex Media Server Ideas

    I was running the Plex media server from my main desktop for a year before investing in the dedicated server. All my Plex media files were stored on a Western Digital Duo 8TB external drives connected to my desktop through USB 3.0, which I wanted to keep as is.

    The Western Digital Duo external connection does contain to Western Digital Red drives, and one drive was a mirror of the other. For the mirroring, I wanted this to be more automatic, but without the use of RAID 1. On top of the automatic mirroring, I also wanted to see if I could also monitor the health of my Plex media drives so I can take action if one of the drives was having issues.

    Since my Plex usage wasn’t great, the amount of idle time on the server would be quite substantial. This go me thinking about also use the server to manage my data files, which were stored on a Western Digital My Book external hard drive, connected via USB 2.0 (my desktop only supports USB 2.0). I figured with the always on option of the server, and the USB 3.0 interface, I could move my data files external hard drive to the server as well.

    The added benefit of moving my data files external hard drive to the server is I could also monitor that drive as well to make sure that there are no issues with the drive. Between the data files external hard drive and the Plex media hard drives, the data files external hard drive is more important as it has files I can’t recreate, such as family photos and personal videos.

    To better protect my data files, I could add a second external hard drive, and mirror the current data files external to the new drive. I could also transfer my Backblaze account to the server from my desktop so my data files can always be backed up since the server is always on.

    I will continue to edit my photos on my desktop, but I will set up shares on the server that will allow me to map to the photos from the desktop for editing. This will also provide more protection for my data files from such threats as ransomware or other malware that can cause me to lose my database. I will talk more about how I handle this in another post.

    With all my ideas for my new server, it was time for me to put it into action.

    The Plex Media Server Setup

    To help understand what I would like with my Plex Media Server, here is a quick summary:

    • My Plex media files on my Western Digital Duo external drives to be mirrored automatically.
    • My personal data files on my Western Digital My Book external drive to be mirrored to a second external hard drive.
    • My personal data files to be automatically backed up to Backblaze.
    • All hard drives in my server to me monitored to make sure there are no issues.

    The good news is that all the above points can be managed with very little hardware, software, and with minimal setup. To accomplish my goal, I would need the following:

    Western Digital Duo 8TB
    This as an external enclosure that has two 4TB Western Digital Red drives. I bought this about a year ago to store my Plex media files, and I just needed to connect it to my server.
    Western Digital My Book 3TB
    I bought this drive when the 2TB Western Digital external drive that contain my data files showed signs of failing – bad sectors. That drive was over 5 years old, so it was time to replace the drive with a newer model.
    Western Digital My Book 3TB #2
    This external drive I had just bought a few days ago so I could create a mirror of the first 3TB external hard drive – the drive that has my data files.
    Stablebit DrivePool
    This is the software that is going to duplicate both my Plex media files and my data files to the correct drives automatically. Stablebit DrivePool easily combines the disk space from both external hard drives into a single drive.
    Stablebit Scanner
    Software that will easily allow me to monitor all my hard drives, and integrates effortlessly with DrivePool. Stablebit Scanner will also notify me, via email, if there are any issues with a hard drive.
    Backblaze
    My unlimited online cloud backup solution. This software runs as a service and will continuously monitor my data files for changes and then automatically upload the changes to the Backblaze cloud service.

    Before getting into the details of how it all will come together, let me show you how it will be setup with a diagram:
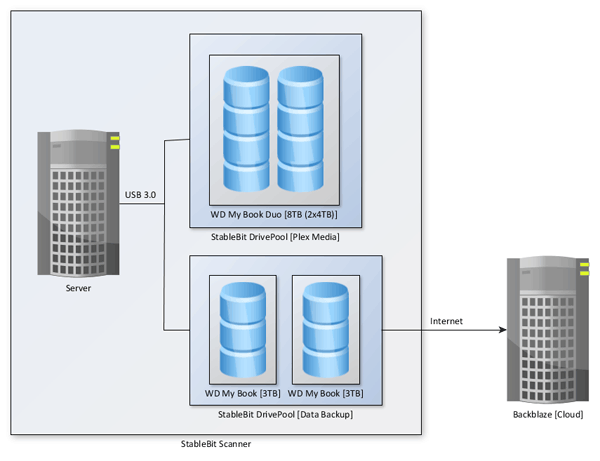
    My Backup and Plex Server

    The Plex Media Setup

    The main reason I setup the server was to host and stream my Plex media files, so I will start with the Plex media storage idea of the server. The diagram below shows what is involved with setting up my Plex media on my server.
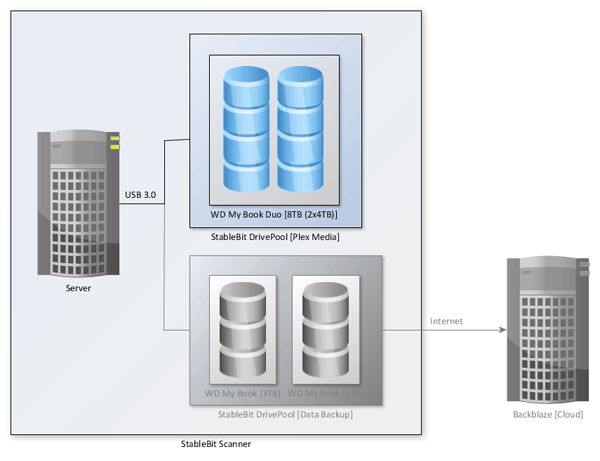
    My Server - Plex Media Storage

    All my Plex media files are stored on my Western Digital Duo external device. This device is considered a DAS (direct-attached storage), because it connects directly to my server through a USB 3.0 port instead of over the network. The device includes two Western Digital Red drives (4TB each), which I setup as JBOD (Just a Bunch of Disks). Setting up the drives in this way allows me to manage the storage setup of the disks using DrivePool

    I create a single drive pool for my Plex media files from within DrivePool and added both hard drives from the DAS to the pool. This produced a pool of 8TB in storage size. After the pool was created, I enabled duplication in DrivePool so that each file stored on one of the drives would be automatically copied to the other drive. This essentially halves the amount of storage space in the pool because each file is stored twice.

    If one of the two hard drives in my DAS was to fail, I wouldn’t lose all of my media since all files are duplicated on the other drive. It is, of course, possible for both drives to fail at the same time since they share the same DAS unit, and in such a situation I would rebuild my media libraries. I don’t consider my Blu-ray, DVD, and CD libraries to be critical enough to have a full backup solution as I do my personal data files.

    The Data Files Setup

    The most important data I have has always been stored on an external hard drive, but it was connected to my desktop . I would turn off the external hard drive when I didn’t need to get access to my data, but it would sometime annoy my wife because she couldn’t easily access digital photos. To make life easier for me, and her, I decided to connect the external hard drive that has my personal data files to the server so it can be accessed at any time.

    The diagram below shows how my data files are connected to the Plex server.
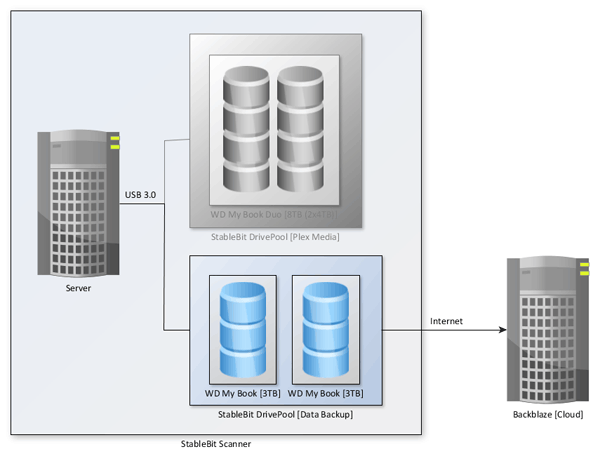
    My Server - Data Backup Storage

    After seeing how easy it was to set up and manage a drive pool for my Plex media files, I figured it would be a great option for my personal data files. I have always made multiple copies of those files, but having multiple local copies was something that I didn’t have. I purchased a second Western Digital external hard drive to contain the copies of my data files.

    My data files setup is very similar to my Plex media files, with the exception of using two external hard drives instead of a single DAS device. I create a second drive pool (the first being my Plex media), and then added the two external hard drives to the pool. Because the second external drive was new, and didn’t contain any of my data files, DrivePool took some time to copy over the files from the first drive onto the second drive after I setup file duplication.

    In addition to the two local copies, I also have an offsite, cloud copy of my files stored with Backblaze. I have had this setup on my desktop for many years, and I wanted to transfer it to my server so my data files can continue to be backed up online.

    I followed the instructions on the Backblaze website about moving my account information to the server, changed the drive in the software to point to the new DrivePool drive and then Backblaze went to work verifying that all files were backed up. After Backblaze quickly went through the list of files in the drive pool, it indicated that all files were backed up and everything was good again.

    The result of the above setup is that when I add or change a data file in the drive pool, the file will automatically be duplicated to the second hard drive by DrivePool and then automatically be backed up to the cloud by Backblaze. This means two copies of the file are automatically created without any work outside of adding or modifying the original file.

    Monitoring the Hard Drives

    The one aspect of managing my data that I had neglected in the past is to actively monitor the hard drives where my data was stored. When I setup my Plex Media server, I wanted to make sure that I also enabled monitoring so I can be more proactive of replacing hard drives that were about to fail. I was lucky with my previous external hard drive as it had just begun to fail and I was able to copy off all of my data. I didn’t want to take the chance again.

    For monitoring I installed another Stablebit application called Drive Scanner.

    Once I installed Drive Scanner on my server it immediately detected all the hard drives – both internal and external – that were connected to my server. The application began reading the S.M.A.R.T data for each drive and alerting me if there were any issues.

    Note:

    The S.M.A.R.T. data from my Western Digital external hard drives (not my Western Digital Duo) could not be read and reported by the Drive Scanner application. I had to change the partition of the external hard drives from MBR to GPT for Drive Scanner to read and report the S.M.A.R.T. data from the two external hard drives.

    The most common issue I have at the moment is the drive temperatures getting high because of all the copying, especially my data files drive when DrivePool was duplicating the data from one drive to another. When any issue happens, I receive an email from Drive Scanner that describes the issue.

    While duplicating files with DrivePool can cause the Drive Scanner to issue heat warnings, the best part of the two applications is that DrivePool will start to throttle the duplication process to help reduce the heat. The two applications work together to make sure that your drives are running without any issue. The integration between the applications is seamless and only requires both to be installed on the same system.

    In addition to the S.M.A.R.T. monitoring, Drive Scanner will also check the disks for any issues. The disk scan is set on a monthly schedule and you can see the results directly in Drive Scanner. If needed, I can also start the scan manually. If a drive once again reaches a heat warning, the scanning process will throttle in an attempt to reduce the heat. I usually only scan my drives overnight when there is very little IO on the drives.

    My Plex Media and Backup Server

    By utilizing my Western Digital Duo, two external hard drives, Stablebit DrivePool, Stablebit Drive Scanner, and Backblaze, I now have a server that can stream all my media to any device I own, as well as automatically duplicate my personal data files locally and offsite in the cloud.

    The best part is that this server is running headless (no monitor), and without any user logged in so even if Windows does reboot, such as after an update, I don’t have to remember to go and log in as everything will automatically run without any problems.

  • Creating My Plex Server

    Creating My Plex Server

    Just over a year ago I started out using Plex to manage my home media library. I had used a media player that had many of my ripped DVDs, and was connected to a T.V. for several years. The issue was I wanted something that would allow me to watch my movies, view my photos, and listen to my music from any of my devices that were connected to my local network. After a quick search, I discovered Plex.

    What is Plex and Why I Needed a Plex Server

    In a nutshell, Plex is a client-server-type architecture. You essentially install the Plex Media Server on a machine in your home, and the Plex apps on the devices you want to connect to the server and then you will be able to stream the media from the server to the device. Right now, my Plex clients are a desktop, two laptops, two iPhones, an iPad, an Android phone, and a Roku 3. My main method of accessing Plex is through the Roku 3 connected to my HDTV.

    On the Plex server I have ripped all my Blu-ray and some DVD discs, and installed iTunes to get access to my wife’s iTunes music, as well as linked to all my family photos and videos. All of this can be accessed from any of my Plex-enabled devices at anytime.

    Over the past year of using Plex, the one thing I didn’t have was a dedicated Plex server. I had run my Plex server on my main Windows 7 desktop, which I would turn off when I wasn’t using it – such as during the day when I was at work. When the desktop was running, it used over 100 watts of power, and even more if I was playing a game, so it wasn’t very economical to have it running all the time.

    Because of this, Plex wasn’t available all the time, and I had to go and turn on my desktop if I wanted to watch a movie, or someone else wanted to watch something through Plex.

    A few months ago I decided to look into using a dedicated machine as my Plex server. Over the past year of using Plex, I was also learning what was needed for a Plex server, and surprisingly, the requirements for a Plex server really isn’t much, especially compared to something like a gaming machine.

    What Is Needed For a Plex Server?

    Any machines I have built-in the past were always geared towards gaming. With gaming, you really can’t have too much of anything, and sometimes buying the latest and greatest provided better gaming experience – think graphics cards.

    With Plex, really the only thing that matters is the processor you install in the machine. If a device you connect to the Plex server can’t natively play a media file on the server, Plex will transcode (change) the file into a format the device can play. The transcoding process happens on the server by the server’s processor, and the largest CPU usage happens when transcoding high-definition movies.

    According to the Plex documentation that discusses CPU requirements, a processor PassMark of 2000 is recommended to transcode a single 1080p media file and 1500 for a 720p media file. You can lookup processor PassMark scores at Passmark. Just put the name of the processor in the search box, click search and select the benchmark link in the results, or just click the “Benchmark results” link at the top of the results to narrow down the results to benchmarks only. When viewing the benchmark results the number under “Average CPU Mark” is the PassMark score.

    Of course, if you can get Plex to direct play all your movies, then you can get by with a lower PassMark score, however, you will need to be sure that all your movies will direct play with all devices.

    Besides the processor, there really isn’t any major requirement for Plex. An internal graphics card, 4 GB RAM, any modern hard drive for the system will all work fine for a Plex server. Of course, if you plan on running more on the server besides just Plex, then you may have higher server requirements, but for someone like me, you won’t need anything over-powering.

    Keep in mind that many of the consumer-level NAS devices on the market do not have a processor powerful enough to transcode HD videos. Only the more expensive (think $1000+) NAS devices have the processors that are capable of transcoding HD videos.

    Plex supports many operating systems, so picking one that you are familiar with is the best option.

    My Plex Server Requirements

    With the above in mind, I decided to look at what I could build for my Plex server. The desktop (circa January 2010) running Plex at the time with the following specs:

    • Processor: i7 920 2.67GHz (PassMark: 4992)
    • RAM: 12GB
    • Hard drive: (2) 500GB Western Digital Blue (Raid 0)
    • Operating System: Windows 10 Pro (upgraded from Windows 7 Pro)
    • Graphics cards: (2) HD Radeon 5850 1GB (Crossfire)
    • Plex storage: Western Digital Duo 8TB

    For an almost 6-year-old machine, it ran Plex without any issues, but as I stated earlier, just consumes a lot of power. Also, the computer is rather load when it is running, so not only did I want a machine that used less power, but I also wanted a more quiet machine.

    Before I started to think about what I wanted for my Plex server I developed a list of requirements that I needed for the new server:

    • Needed to use less than 50 watts of power when idle, but the computer must stay on – not in sleep mode.
    • Quiet enough that it couldn’t be heard when standing in the same room.
    • The processor needed to have a PassMark of at least 6000 – enough to transcode 3 HD movies.
    • Include USB 3.0 ports because the media files were stored on the Western Digital Duo that is USB 3.0.

    A monitor, keyboard, and mouse are not required as I can share my existing desktop hardware. I will be creating a headless (no connected monitor) Plex server so a monitor, keyboard, and mouse will only be connected during the setup of the machine.

    Once I had my server requirements I had to decided how best to go about acquiring my new server.

    To Build or Buy?

    When building a server there were two options available to me – build a new machine or buy a pre-built one. Since I like to build and upgrade machines, I chose to go the former route first.

    I decided to try multiple server configurations at PCPartPicker to see what I could come up with in terms of parts for the new server.

    After trying out a few configurations I realized that most of the configurations would be about $700 CAD (Canadian), and I wasn’t looking at spending that much for a computer that would just stream media files to my devices. Fortunately, the requirements of my Plex server didn’t need high-end hardware, or did it need any hardware created in the last year or two, so I decided to go with my next choice – buying a machine. In my case, I decided to go for a used machine to save on cost as they are usually cheaper than newer machines.

    I searched eBay for systems that would meet the requirements I stated above. I found multiple systems that filled the requirements nicely so I began to watch the auctions to watch how the pricing of the machines changed.

    After a few weeks, I finally managed to win an auction for a Lenovo ThinkCentre system for $200, which I was quite happy about. The system has the following specs:

    After reinstalling Windows 10 Pro, the Plex Media Server application, moving over the Plex data, and reconnecting the external drives containing my media files, my new Plex server was up and running. Over the past month my Plex server has run 24 hours a day, 7 days a week, without any issues.

    Now that the server is up and running, I have managed to do much more with the server than simply run Plex.