The load time of a blog is a critical factor not only for retaining visitors, but also for performing well in search engines. There are many ways you can reduce the load time of a blog, and in this post I will look at an actual example of how I managed to reduce the load time of a blog by 90%!.
Before I go into the steps, I’ll provide a little background. I recently switched hosts, and while the new host is cheaper, I noticed a decrease in performance. On top of that, I am on the shared hosting plan, so I don’t have the performance luxury of a VPS.
Since I have chosen to have my blogs on a cheap plan, there aren’t as many options available to me as there are for the more expensive plans, such as memory caching and more dedicated hardware.
While there are limitations, there are also options that I can use to help with the load time of my blogs. The good news is that the options to increase the performance of my blogs don’t cost anything, and can actually be done in minutes, and not hours or days.
In the next several sections I will show you the performance of my blog before optimizing it, and then after it is optimized. There are a few things to note:
- The blog I am optimizing is a simple gaming blog called Skyrim Travels.
- It currently uses the free service from CloudFlare to help with content caching.
- The blog uses a child theme based on the Thematic theme.
- For WordPress caching, it uses the Hyper Cache plugin.
- All tests for load time will be performed using Pingdom Tools
With the above points in mind, let’s first take a look at the starting point for reducing the load time of the blog.

Reduce the load time of a blog – before
To begin, I head over to Pingdom Tools and analyzed the load time of my Skyrim Travels blog. You can use any online tools for measuring your blog, but I find Pingdom Tools to be easy to use and easy to understand.
After running the test I got the below result.
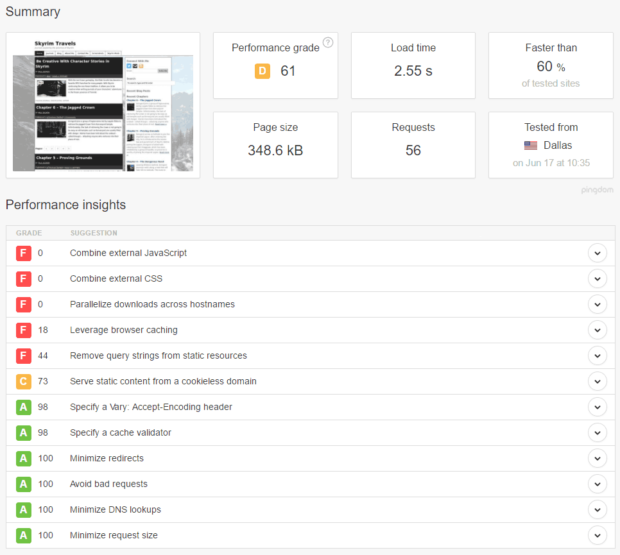
The load time of the blog was at 2.55 seconds, which wasn’t too bad, but it still was higher than I would have liked it to be. Actually, I was surprised and thought it would be higher.
The performance grade indicated 61 out of 100, which I don’t like. You can see some of the issues in the lower part of the image, with the colour red meaning something could be improved. There were several issues with the performance, and the good news was that many of the issues in red could be fixed easily and with minimal effort on my part.
The one thing I do want you to be aware of when performing tests on your blog is the number of requests that are made to display a page of your blog. The more requests a visitor needs to make, the longer it will take to display the content. Try to reduce the number of requests needed for your blog as much as possible. In the case of my blog, I could reduce the number of requests automatically as I fixed the issues.
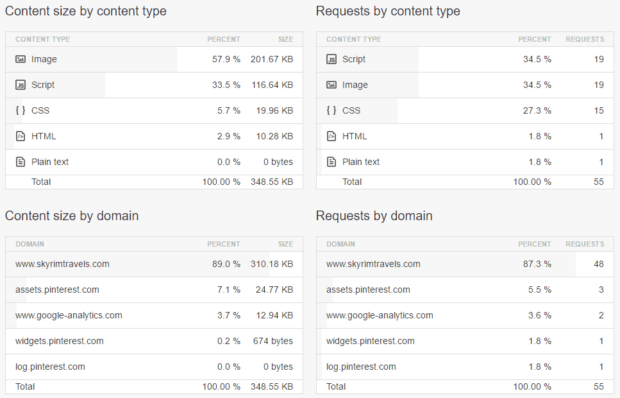
Speaking of requests, the image above helped show me the content for the various requests that are made to my blog. The two tables on the right showed the content type of each request and the domains receiving the requests. From the table I could see that 19 requests were made for scripts and another 19 were made for images. The Skyrim Travels blog does have a lot of images to display, so I won’t worry about those requests, but I could do something about the number of script requests.
Apparently a lot of CSS files (15 requests), are also downloaded from the blog by a visitor. I should be able to also reduce this number, as well.
On the left side we can see the content size by both type and domain. While I won’t worry too much about the size, I should be able to reduce the number slightly. The largest size for content are the images, which I should be able to compress further, but at this time, I do have other options. The scripts and CSS files I should reduce slightly as I perform the optimizations.
Reducing the load time
Now that I know some of the issues that I needed to fix, let’s look at each issue and the solution that I implemented to fix the issue.
Note:
When I did the optimizations for my blog I disabled the Hyper Cache plugin as well as set CloudFlare to Development Mode. This allowed me to see the effects of the changes I was making to my blog. When All optimizations were done, I re-enabled the Hyper Cache plugin and turned off Development Mode in CloudFlare.
Combine external JavaScript and CSS
For my WordPress blog, fixing this issue was fairly easy as it just required me to install and configure one plugin – Better WordPress Minify. I have used other minify plugins in the past, but I find this one has worked the best for me.
I simply downloaded and installed the plugin and BWP Minify appeared on the left from my WordPress dashboard. From there I clicked the BWP Minify option to view the General Options page.
Since I wanted to minify both the JavaScript and CSS files I clicked the Manage enqueued Files tab at the top. When the page to manage the files was first displayed I was shown the following message:
No enqueued files detected.

Please try visiting a few pages on your site and then refresh this page.

You should clear this list once in a while to get rid of files that are no longer being used as this is not done automatically.
I then visited my blog – it doesn’t get much traffic so it would take a while for the enqueued files to populate the lists. Once I viewed a few pages, the two lists were automatically populated.
I accepted the defaults, and clicked the Save Changes button at the bottom. Once the changes were saved, I opened the blog to ensure it was still displaying correctly. Minifying resources such as JavaScript or CSS can affect the look at feel of your blog so it is always best to view multiple pages on your blog, and to try out various aspects, such as commenting, to ensure everything is still working.
Note:
Since I disabled both my caching plugin and CloudFlare, I could see the effect of minifying my JavaScript and CSS files immediately. Had I kept either enabled, then I would have seen the cached version, and not the results of the minified files. Ensure that you disable any caching before viewing your blog after minifying the files.
Once I confirmed my blog was still displaying correctly, I looked at resolving the next issue.
Leverage browser caching
Resolving this item involved editing the .htaccess file on my server. All root folders for your WordPress blogs should have a .htaccess file created. All I needed to do in this case was open the file in a text editor and add the following lines:
ExpiresActive on
# ExpiresByType overrides the ExpiresDefault...
# cache expiration time of 2 days|A172800.
ExpiresDefault A172800
ExpiresByType image/jpg A4838400
ExpiresByType image/jpeg A4838400
ExpiresByType image/gif A4838400
ExpiresByType image/png A4838400
ExpiresByType image/bmp A4838400
ExpiresByType image/x-icon A4838400
ExpiresByType image/svg+xml A4838400
ExpiresByType text/javascript A4838400
ExpiresByType text/x-javascript A4838400
ExpiresByType text/css A4838400
ExpiresByType text/html A4838400
ExpiresByType application/x-font-ttf A4838400
ExpiresByType application/x-font-woff A4838400
ExpiresByType font/opentype A4838400
ExpiresByType application/x-shockwave-flash A4838400
ExpiresByType application/x-javascript A4838400
ExpiresByType application/javascript A4838400
ExpiresByType video/mp4 A4838400
ExpiresByType video/ogg A4838400
ExpiresByType video/webm A4838400


Header append Cache-Control "public"


Header append Cache-Control "proxy-revalidate"


Header set Cache-Control "private, no-cache, no-store, proxy-revalidate, no-transform"
Header set Pragma "no-cache"
The above lines set the cache expiration time as well as the cache control settings. I won’t go into detail about what all the lines do, as they are well documented online. For your blog, you may want to adjust the times and cache settings as you may wish to use different values.
That was all that was needed to enable caching for the files. The next step was to remove the query strings from files to properly enable the caching.
Remove query strings from static resources
This is the last issue that I had to fix. By default, WordPress tends to add the WordPress version to the static resources by appending “?ver=” to each of the files. This has a negative affect on caching, and also one way for miscreants to determine which version of WordPress you are running, and then take advantage of any vulnerabilities in that version of WordPress.
You don’t need to have the version number appended to any of the static resources, so it is best if you just remove it.
Removing the version query string was really easy; I just had to add the following function to my functions.php file in my theme:
Once the function was added to my theme, I reloaded my blog and viewed the source. All static resources no longer had the version query string appended to the end.
One additional change in CloudFlare
I had corrected the issues that were reported by Pingdom Tools, but there was one additional change that I needed to make on CloudFlare to ensure that my blog not only loaded as fast as possible, but also allowed me, once I re-enabled CloudFlare, to preview any new posts without having caching issues.
Since my blog was already in CloudFlare, I didn’t have to go through the setup. So I logged into CloudFlare and selected my blog and then clicked Page Rules at the top. By default, CloudFlare allows me to add three page rules with the free CloudFlare account.
The three page rules that I added were as follows (you will obviously change the URL to match your blog):
- URL: *skyrimtravels.com/wp-admin*
- Disable Security
- Cache Level: Bypass
- Disable Performance
- URL: *skyrimtravels.com/*preview=true*
- Cache Level: Bypass
- Disable Performance
- URL: *skyrimtravels.com/*
- Browser Cache TTL: 30 minutes
- Always On: On
- Cache Level: Cache Everything
- Edge Cache TTL: a month
What the above three rules do is disable any caching when I access the WordPress dashboard (anything in wp-admin), or preview a post (preview=true in the URL). Everything else, like viewing my blog, I use the cache settings outlined in the rule. The cache settings will cause everything to be cached on the CloudFlare servers for one month. Anything that doesn’t have a browser expiry cache, will default to 30 minutes.
So after the browser cache expires in 30 minutes, and a new request is made for the same resource, the resource will be returned by the CloudFlare server instead of blog’s web server. The reason is because there are many CloudFlare servers around the world so regardless of where the visitor is located, it will be faster to download the files for my blog from a closer CloudFlare server than from my host’s server.
To avoid any issues with accessing the login page since it would use the third rule, I also installed the Rename wp-login.php so I could rename it to something like https://skyrimtravels.com/wp-admin-mylogin. It doesn’t matter what you name it as long as it begins with wp-admin so it would use the first rule, and not the third one.
Once all the above changes were made, I returned to Pingdom Tools to rerun the tests.
Reduce the load time of a blog – after
After making the changes I outlined above to my blog I was interested to see what improvements would result from the changes. Needless to say that I was surprised with how much of an improvement was seen once I ran the tests. One thing I should not, however, is that because I had to prime both the WordPress and CloudFlare caches, I had to run the test twice to see the improvements.
The image below shows the results of the test after the changes to the blog.
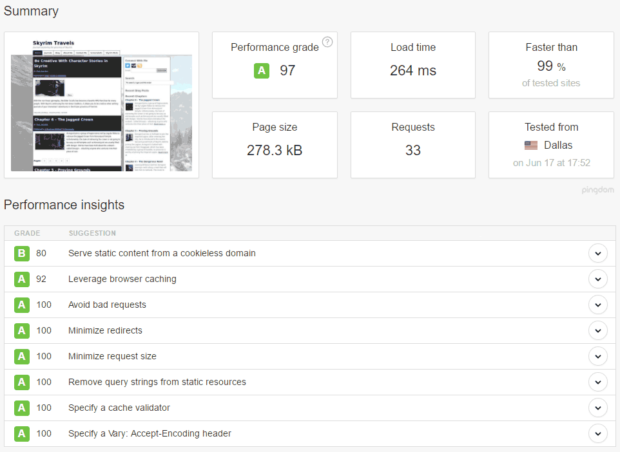
The most notable improvement is in the response time, which is about 90% lower than the initial tests I ran. I ran the test multiple times and all tests reported around the same response time.
The second improvement is in the number of requests – decreased from 56 to 33 (41% decrease). This is a result of minifying both the JavaScript and CSS files into one or two files. The results of the minify also impacted the size of the files being download, which you can see in the page size. The initial test showed a page size of 348.6 KB, while the latest test shows a size of 278.3 KB, which is a 20% reduction in size.
The combination of reduced requests and page size have a drastic effect on the response time of the blog, as it would on any site.
Let’s have a look at the content that is being downloaded from the blog.
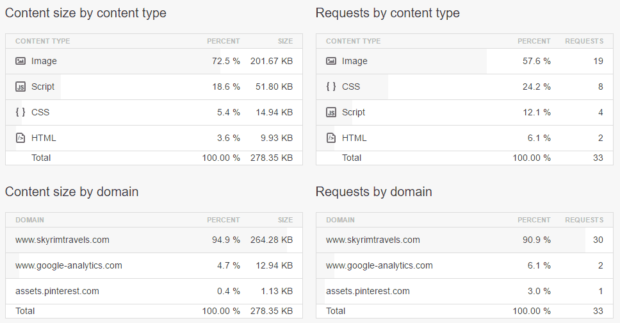
The content information is largely affected by the minifying process for both the JavaScript and CSS files. When the two file types are minified, both the number of files that need to be requested, and the file sizes are reduced. The file size is reduced because the spaces, carriage returns, and comments are removed from the files.
As you can see above, the number of JavaScript and CSS files has been reduced. Both used to be two of the three most requested file types on the blog, with combined requests of 34. Now, after minifying the files, the total requests is 22 – a 65% reduction.
The largest reduction is with the JavaScript files. The initial test had 19 files being downloaded, and the now the requests number 4 (79% reduction). While not have as much of a reduction, the number of CSS files decreased from 15 to 8, which is still a nice 47% decrease in the number of files being downloaded.
As for the file sizes, that has also decrease, as well. The total size of the JavaScript files decreased from 116.64 KB to 51.8 KB, which results in a decrease of 56%. The CSS files didn’t have the same amount in decrease, but it was still a nice change – from 19.96 KB to 14.94 KB (25% reduction).
As I mentioned above, the decrease in both the JavaScript and CSS files are a result of minifying both file types.
With just a few changes made to my blog I have managed to significantly improve the response time for the visitors. There are many ways to optimize a WordPress blog, such as reducing the number of plugins, choosing themes that don’t load a lot of resources, but the changes I applied here can work for any blog, and Website.
