I recently had an issue with my wife’s laptop. It was running out of disk space. I tried to clean up as much as I could, but after viewing where most of disk space went, I realized it was a losing battle. The problem was I like to take a lot of digital photos, and then upload them on the laptop so my wife could enjoy them. Unfortunately, a 120 GB hard drive just doesn’t have the disk space when it comes to digital photos.
The solution was to upgrade to a much larger hard drive. When I upgrade a hard drive I usually start over with a freshly formatted drive. This time, however, I wanted to just move everything over to the new hard drive and install it without having to reinstall everything. After a few hours, the new hard drive was installed and all applications still worked without any problems. Read on to find out how I did it.
Hardware and Software
Before upgrading your laptop’s hard drive, there are a few things you will need. Let’s look at what will be needed before to upgrade the hard drive.
1. A New Hard Drive

Before replacing a hard drive it is important to figure out the type of hard drive connection. There are currently two standards: SATA and IDE (PATA). SATA is the newest standard and all computers sold today would probably be SATA. The IDE standard is older, and if your computer is more than two years old, it may have this standard.
The SATA connections are much smaller than the IDE interface. If you are unsure of which one your laptop has, do a search online, and you’ll probably find that information. It is usually common information that is supplied with your laptop specifications.
Note:
Laptop hard drives are 2.5″ in size, so ensure the hard drive you purchase is 2.5″. Desktop computers use 3.5″ hard drives.
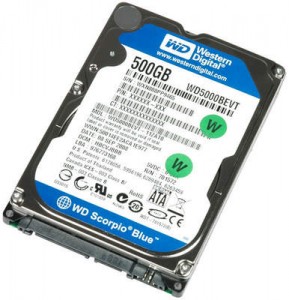
Once you know your hard drive interface, you can now look for a hard drive that includes that interface. The hard drive in my laptop was SATA so I purchased the Western Digital Scorpio Blue 500 GB hard drive, which has 4x the disk space of the current hard drive. I went to Newegg (US Site | Canada Site) to purchase the hard drive since they also offer free shipping, and the hard drive arrived within three days.
2. Hard Drive Enclosure

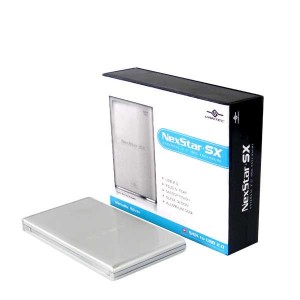
A second piece of hardware you would need is a hard drive enclosure. This is a small case that you insert the hard drive into so it can act as an external hard drive. I recommend you buy an enclosure since you will need to connect the new hard drive to your laptop along with the old hard drive. Once your new hard drive replaces the old one in the laptop, you can then install the old hard drive in the enclosure and have an external hard drive for data backups.
I purchased the VANTEC NST-285S2-SL Aluminum Alloy 2.5″ Silver USB 2.0 enclosure. Keep in mind that there are different enclosures for IDE and SATA interfaces, so make sure you buy the enclosure that matches your hard drive’s interface.
3. Cloning Software
Cloning software allows you to make an exact copy of one hard drive and save it to another. If the clone was successful, your laptop shouldn’t know the difference and everything should start up with little issue.
For this I didn’t want to purchase software that I won’t use very much. I am not too familiar with cloning software, but I did find out about Acronis True Image Home. There is 15 day free trial that allows you to clone your hard drive. I downloaded and installed that tool.
For help, you should also download the Acronis True Image Home manual, and print Chapter 13.
Once the hardware has been purchased and the software downloaded and installed, we are ready to upgrade the hard drive.
Upgrading the Hard Drive
This was the first time I had upgraded a laptop hard drive through cloning. The more data you have to clone, the longer it will take. For the 120 GB hard drive, it took about 2-3 hours. The steps below provide an overview of how I upgraded the hard drive.
- I installed the new hard drive (500 GB) into the enclosure. I connected the enclosure using the USB cable to the laptop and made sure that Windows was able to see it. Since it wasn’t formatted, it didn’t create a drive letter for it, so I had to use the Disk Management tool to ensure there was a second hard drive listed.
- Next, I ran the Acronis True Image Home tool. The cloning tool is listed under the Tools option at the top of the application. If you downloaded the manual, see above, then read Chapter 13 to learn how to use the cloning tool. For me, I selected manual partitioning since I wanted to control the size of my partitions. By default, Acronis True Image Home sizes them proportionally to the original hard drive, but if you don’t mind how the new partitions are sized, keep the defaults.
- Once the cloning tools gathered the necessary information, it asked to restart. Once I restarted, the tool went to work cloning the hard drive. As I mentioned earlier, this part took about 2-3 hours, and is dependent on the amount of data it needs to clone. If you have a large amount of data, it can take some time.
- Once the cloning tool finished, I turned off the computer. I then took the old hard drive out of the laptop.
- Next I removed the newly cloned hard drive from the enclosure and installed it in the laptop.
- I turned on the laptop and waited for it to load. Windows loaded without any problems, and I logged in and tried several applications, and also connected to the Internet. Nothing had broken as all applications loaded without issue and all data was intact.
- Seeing that the new hard drive was working properly, I installed the old hard drive in the enclosure. I waited about a week before formatting the old hard drive in case there were problems.
I now have a laptop with a 500 GB hard drive installed and another 120 GB external hard drive that I can use for backups. It has been almost two weeks since the hard drive was installed, and I haven’t run into a problem.
In case you are wondering, the laptop was a Dell Inspiron 6400 with Windows Vista installed.