As with all wireless routers sold, the D-Link DIR-615 Revision E isn’t sold in a secured fashion. The security of the wireless router is the responsibility of the owner.
While securing a wireless router may seem like a daunting task, most home wireless routers require the same settings to be changed to secure the router and wireless network.
What needs to be changed for the D-Link DIR-615 wireless router are broken down into three sections, that will hopefully help to understand what is being changed on the router.
To secure the D-Link DIR-615 wireless router, use the following steps:
Note:
Before securing your router ensure that you are connected to the router using a network cable, and not connected using wireless. Also, when accessing the administrator dashboard, it is best to try using Internet Explorer. Many router dashboards tend to work best with this Web browser.
1. Changing Administrator Credentials
The first thing you should do when securing your wireless router is to always change the admin password. Passwords will have a well-publicized default password for the admin account on your router, so changing it will make it difficult for unauthorized individuals to gain access to your router.
Changing the admin password will only affect logging into the dashboard of your router – where the router settings are located. This won’t secure your wireless network, which is outlined in the next section.
To change the admin password on the DIR-615 version E3, use the following steps:
- Open your Web browser and navigate to http://192.168.0.1. The login page will be displayed on the screen.
- Select “Admin” from the “User Name” dropdown list.
- Keep the “Password” field blank.
- Click the “Login” button.
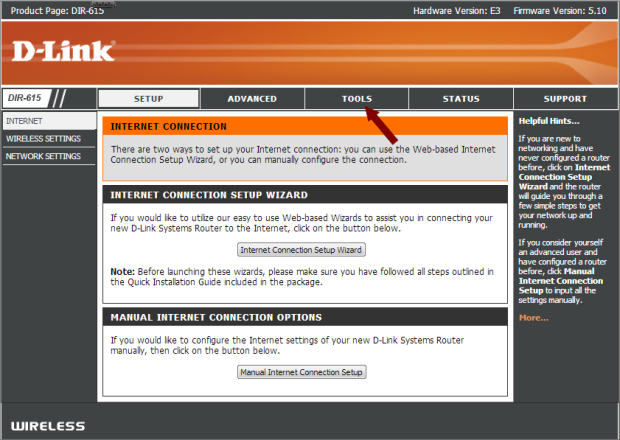
- From the top menu, click the “Tools” option.
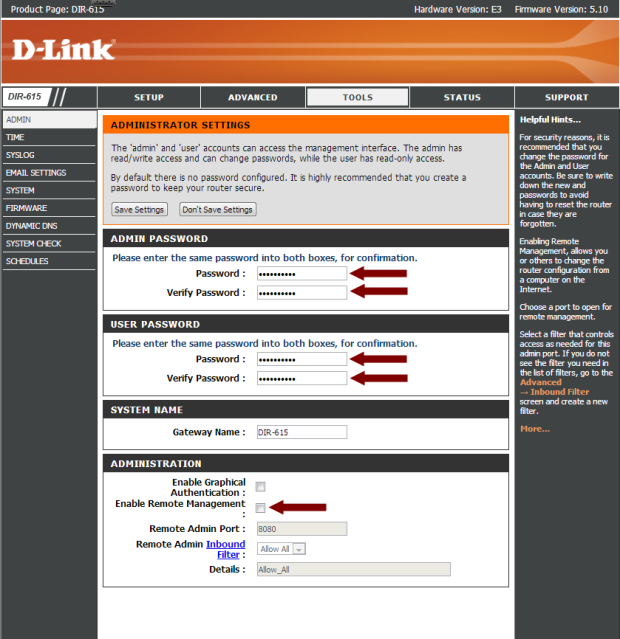
- Under the “Admin Password” section, enter a new password for the administrator. Ensure the password is long and complex to make it secure.
- Under the “User Password” section, enter a new password, but make it different than the admin password.
- In the “Administration” section, use the following options:
- Enable Remote Management: Unchecked.
- Click the “Save Settings” button at the top of the page to save the passwords.
- Wait for the settings to save, and then log in with the new admin password.
2. Securing the Wireless Network
After changing the admin password to your wireless router, you can now go ahead and secure the wireless network. By securing the wireless network, this will prevent unauthorized users from connecting to your network.
To secure your wireless network, use the following steps:
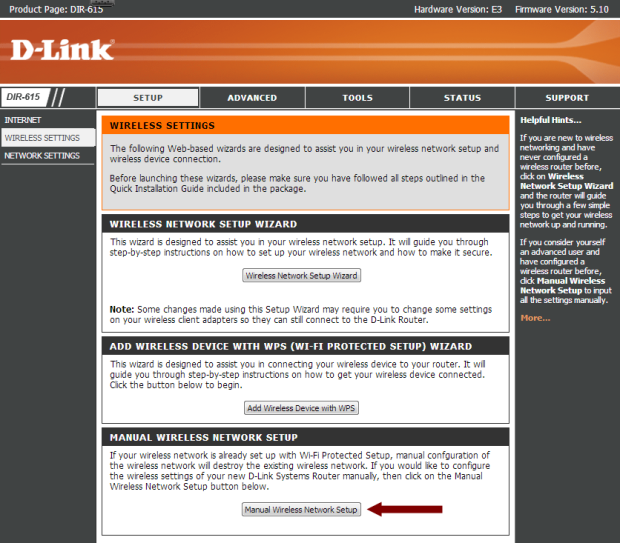
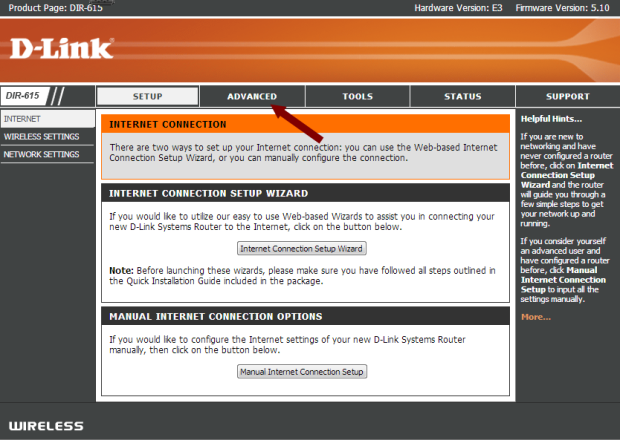
- Log in to the router with the “Admin” user if you have not already done so. Once the “Setup” page is displayed, click the “Manual Internet Connection Setup” button.
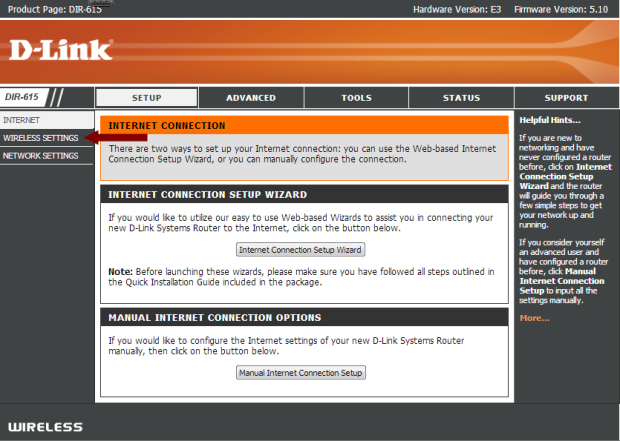
- From the left menu, click the “Wireless Settings” option.
- Next, click the “Manual Wireless Network Setup” button near the bottom of the page.
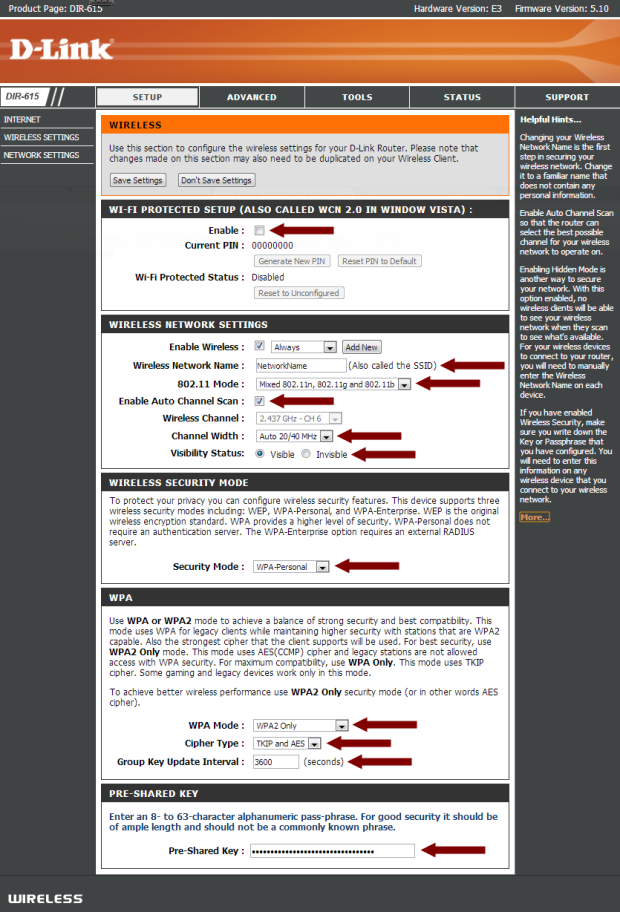
- In the “Wi-FI Protected Setup” section use the following options:
- Enable: Uncheck
- In the “Wireless Network Settings”, use the following options:
- Enable Wireless: Checked
- Wireless Network Name: Enter a name for your wireless network
- 802.11 Mode: Mixed 802.11n, 802.11g and 802.11b
- Enable Auto Channel Scan: Checked
- Channel Width: Auto 20/40 MHz
- Visibility Status: Visible
Note:
There is always some debate about hiding – not broadcasting – your SSID. The truth is not broadcasting the SSID does nothing to secure your network. Hackers can see both visible and hidden SSIDs with the tools/applications they use. While the average user may not use such tools, they won’t be able to gain access to your wireless network if you have it secured with WPA/WPA2 and a good passphrase.
- In the “Wireless Security Mode” section, use the following options:
- Security Mode: WPA-Personal
- In the “WAP” section, use the following options:
- WPA Mode: WPA2 Only (If you have issues connecting with this option, then try “Auto (WPA or WPA2)” instead.)
- Cipher Type: TKIP or AES
- Group Key Update Interval: 3600
- In the “Pre-Shared Key” section, use the following options:
- Pre-Shared Key: Create a long and complex key that will be used to gain access to your wireless network. This is the main security for your wireless network, so the longer the better.
- Click the “Save Settings” button at the top of the page.
At this time your wireless network is now secured. To connect a wireless device to your network, you wll need to selected the SSID from the list of wireless networks, and then enter the pre-shared key you created.
3. Additional Security Settings
There are a few additional security settings that you can do to provide even more security.
- Log into your wireless router using the “Admin” user and password.
- From the top menu, click the “Advanced” option.
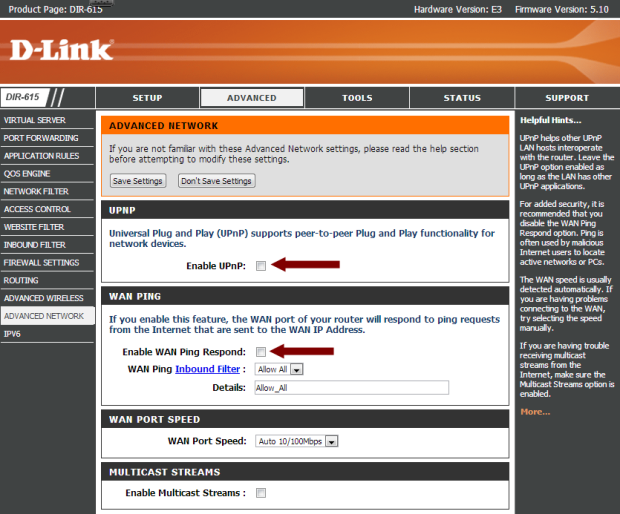
- From the left menu, click the “Advanced Network” option.
- In the “UPNP” section, use the following options:
- Enable UPNP: Unchecked
- In the “WAN Ping” section, use the following options:
- Enable WAN Ping Respond: Unchecked
- From the top menu, click the “Setup” option.
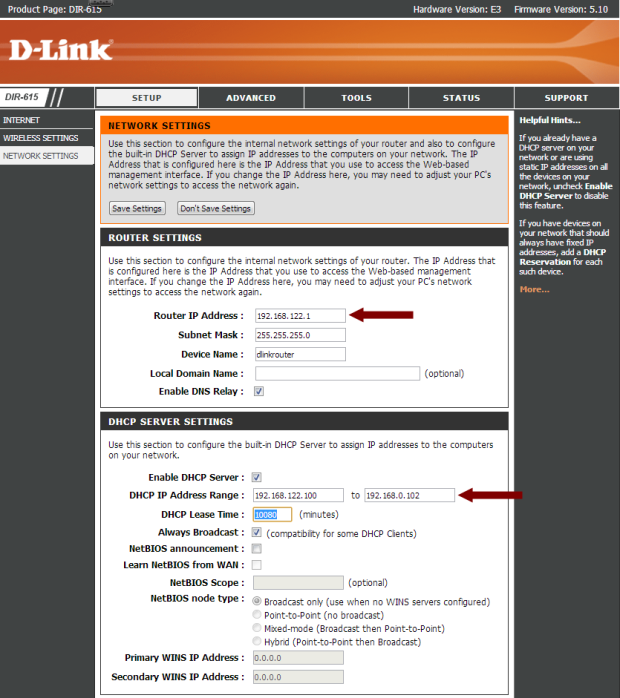
- From the left menu, click the “Network Setings” option.
- In the “Router Settings” section use the following options:
- Router IP Address: Change to something like 192.168.22.1
- In the “DHCP Server Settings”, use the following options:
- DHCP IP Address Range: Set the range to the number of devices you will connect to your network. For example, if you changed your rotuer IP address to 192.168.22.1, and you have 3 devices, then set the range 192.168.22.100 to 192.168.22.102
Note:
The following settings are optional, and unless you are comfortable with changing IP addresses, I suggest you leave them as the default and skip the next two sections.
At this point your D-Link DIR-615 is about as secure are you can get it. You can feel comfortable that only authorized users will be able to log into your wireless network.
