Blogger was created to provide an easy way for anyone to create a blog within a matter of minutes. You don’t need to know HTML or CSS to write and publish posts on a Blogger blog, since the user inteface, and templates, do it all for you. While you can edit the code, if you wish, for most people it is easier to simply add gadgets and move them around.
With this ease of use comes some restrictions, such as not being able to create pages that execute code. I have managed to provide alternatives to getting around several restrictions, and today I will discuss another alternative – displaying a blog list as a static page. Doing something such as this was asked a little while ago in my comments, and while I provided a quick reply, I decided to provide a more thorough solution.
A Blog List Post

As with many Blogger solutions I have created, this one involves using a blog post to display a blog list gadget. While you can’t add a gadget to a blog post, you can make it look like you did with some creative editing.
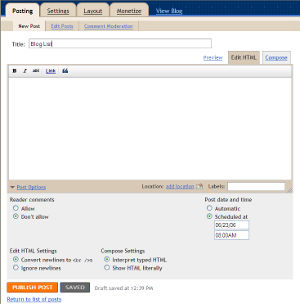
- Log into your Blogger account and create a new post.
- If you have already created static pages in the past, then do the same for this post. If you haven’t created static pages, then follow the instructions to create a static page in Blogger.
- Enter a title for the page, but don’t enter any content for the page. The content will come from a blog list gadget, which you will see later.
- Click the “Post Options” link at the bottom to display additional options.
- Under “Reader comments”, select “Don’t allow”. The reason we don’t want comments is because they will disrupt the layout of our blog list page.
- Click the “Publish Post” button at the bottom to save the post.
- View you new blog list post, and copy the URL from the address bar. We will need this URL later, so keep it handy.
- Next, click the “Layout” tab at the top of the page.
- Click an “Add a Gadget” link in the page element layout and then scroll down the list and click the plus sign next to “Blog List”.
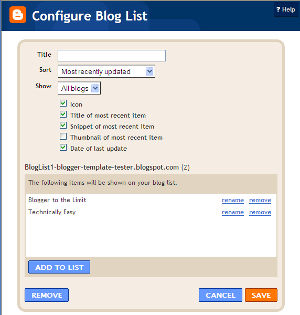
- Clear the “title” option so there is no text in the edit box.
- Edit the remaining options to your preference as everything else won’t effect how to display the blog list.
- Once you have changed the options, and added blogs to the list, click the “Save” button to add the blog list to your layout.
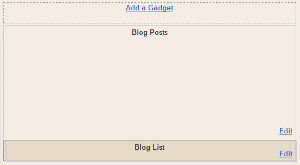
- Back at your blog’s page element layout, drag the “Blog List” gadget so it appears directly below the “Blog Posts” gadget. Since your blog list post contains no text, just a title, the blog list will be displayed directly under your post title.
- Click the “Save” button to save your current layout.
- Now we will need to edit some code. Click the “Edit HTML” option at the top of the page.
- Check the “Expand Widget Templates” checkbox to view all the HTML code for your template.
- Search for “bloglist” until you find a line similar to:
<b:widget id='BlogList1' locked='false' title='' type='BlogList'/>
- Below the line shown above, you will find an includable line. Right after that line we need to include the following:
<b:if cond='data:blog.url == "[URL of your blog list post]"'>
so it looks like:
<b:includable id='main'>
<b:if cond='data:blog.url == "[URL of your blog list post]"'> - Now we need to close the if statement, so scroll down, until you find:
</b:widget>
- Directly above that line is the end of the includable tag, which you should preceed with the closing if tag, like so:
</b:if>
</b:includable> - When the changes have been made, click the “Save Template” button to save your template. If all goes well, when you view your blog list post, you should see a static page that displays only the post title with the blog list gadget.

(Click to enlarge.)

(Click to enlarge.)

(Click to enlarge.)
For an example of what a blog list page looks like, please check out the blog list static post on Blogger to the Limit.
The above steps provides a compromise to those that want to display a static blog list page on a Blogger blog. The steps simply create a blank post that will only contain a title. Since there is no content, the blog list gadget will displayed flush up against the post title, which is what we want.
Next we change the blog list gadget code to only display the contents of that gadget when the URL is the same as the blog list post URL. This prevents the blog list from displaying on any other page or post on the blog.
One final note, the reason we disable comments on the blog list post is because the comment box is part of the blog posts gadget. This means that if it wasn’t disabled, the page would display the title, followed by the comment box, and then the blog list. This, obviously, won’t look good so we disable the comments.
